This is a tutorial to get you started on creating C and C++ programs in Eclipse.
Programming in C/C++ in Eclipse requires the CDT (C/C++ Development Tooling) plug-in and a C/C++ compiler.
Note that this guide describes a Windows version of a C/C++ compiler. If you are using a Mac or Linux, you will require a different compiler set up. The Eclipse instructions remain mostly the same.
There are a number of different compilers available to you, depending on your computer's operating system and requirements. For Windows, there is:
- Cygwin is
a large collection of GNU and Open Source tools which provide functionality similar to a Linux distribution on Windows.
All of these are versions of the GNU Compiler Collection (gcc). Whether using Windows, Mac, or Linux, so long as the compiler is gcc compatible, you should have no problem writing and executing programs for this course. Eclipse, of course, runs on Windows, Macs, and Linux.
Linux installations normally come with gcc installed. For Windows we recommend the installation of some version of Cygwin.
NOTE: the compiler collection installation folder must
not have spaces in its name. For Windows, Cygwin recommends installing
it in C:\cygwin64. After installation the C:\cygwin64\bin
must be added to the system path. See the installation instructions at:
How
to Install and Configure Cygwin in Windows Environment.
NOTE: the Cygwin installation process on Windows can take a long time!
(If you experiment with other installations, please let us know how things turn out.)
The university computers have Cygwin installed.
The Eclipse CDT plug-in allows you to create and execute C and C++ programs in Eclipse in ways similar to how the PyDev and Java plug-ins work. The CDT plug-in is installed in the Physics & Computer Science labs as well as the WLU public computer labs. You may install it on your own computers as well. CDT works with Cygwin gcc and a wide range of other C/C++ compilers.
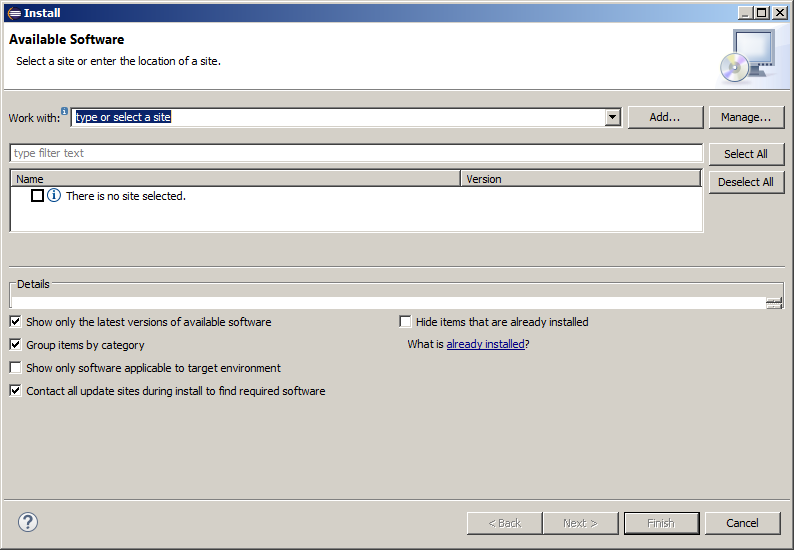
The simplest way to install CDT is through the software repository install process. From the Eclipse menu, choose Help / Install New Software…, which brings up the Install dialog box:
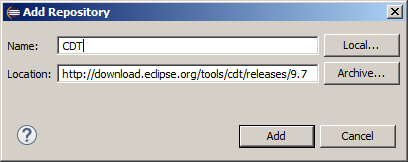
The software repository as of this writing is https://download.eclipse.org/tools/cdt/releases/latest.
Press to bring up the Add
Repository dialog box to add this URL to your list of available
Eclipse software sources:
Pressing OK connects you to the software repository, and
lists the CDT packages available:
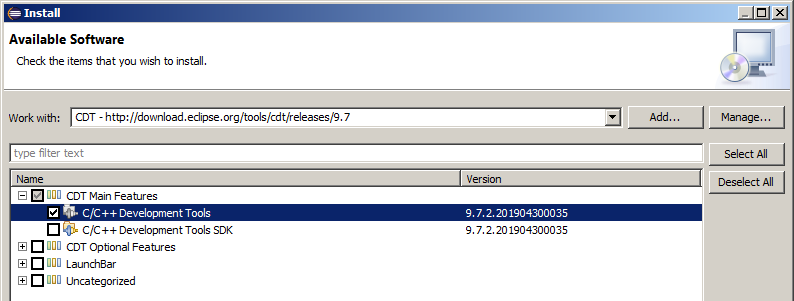
For now you need only select the C/C++ Development Tools.
There are a number of optional features that you may find useful later
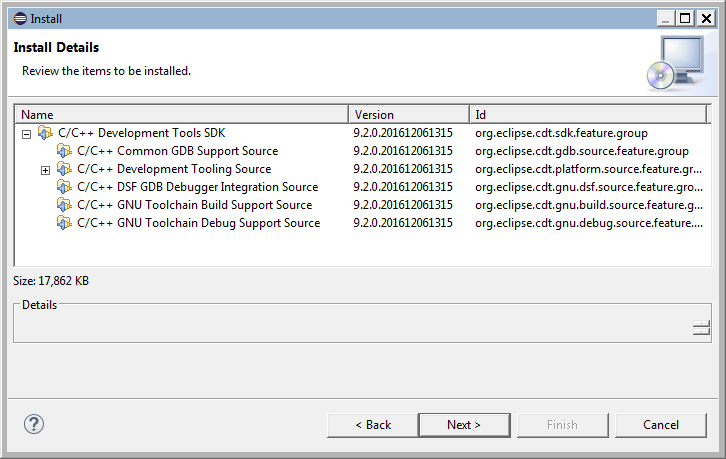
on - install them in the same way you install the main features. Press to review the
installation details:
Press and accept the license:
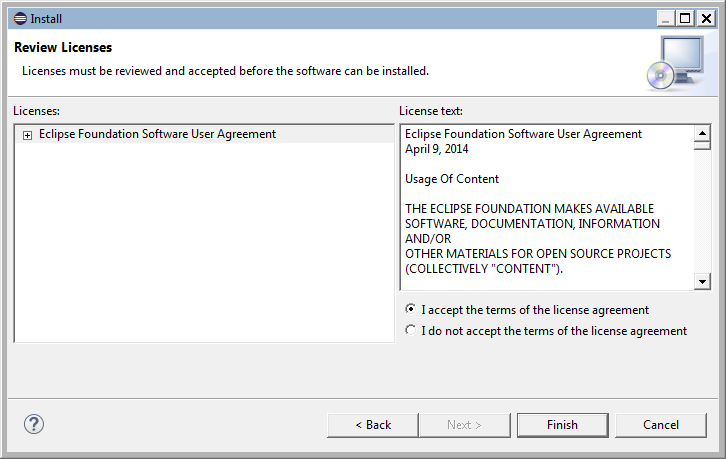
Press to complete the installation. Restart Eclipse if necessary.
Whether using Cygwin or another gcc compiler, you can verify that CDT recognizes it. From the Eclipse menu choose Window / Preferences (on the Mac choose Eclipse / Preferences), and select C/C++ / New C/C++ Project Wizard:
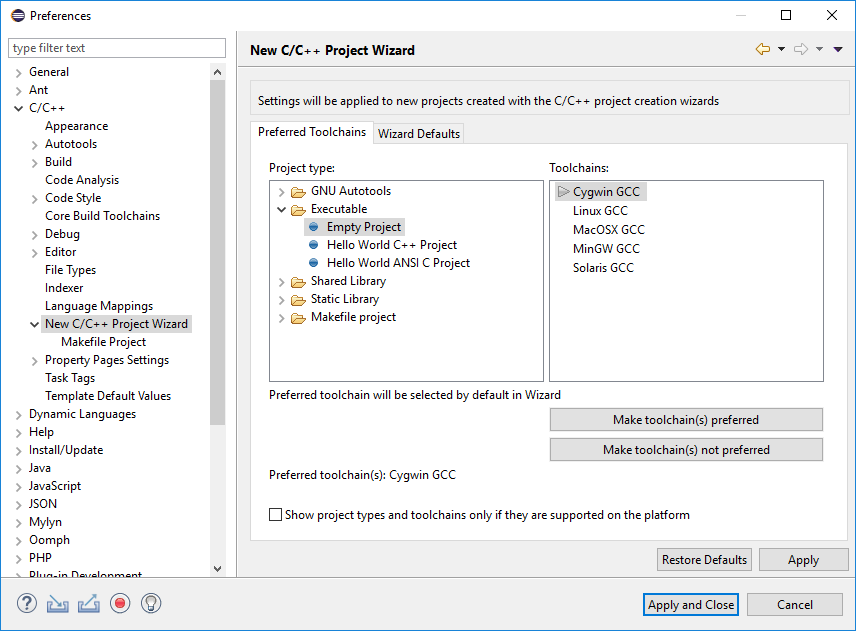
This dialog box lists all the compiler toolchains that CDT recognizes, and you can limit the list to only the ones available on your computer. Highlight the toolchain(s) you prefer to use, and press .
There are number of other formatting and editing options available. We require your C code to be nicely formatted. From C/C++ / Editor / Save Actions select the options as shown:
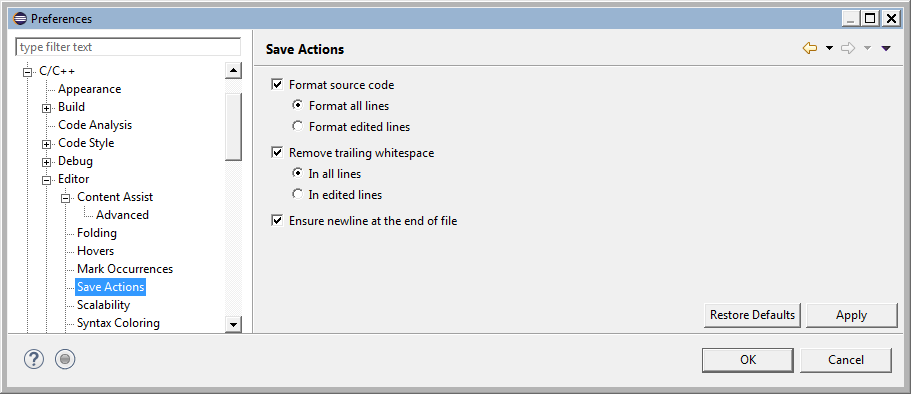
Press to complete the CDT customization.
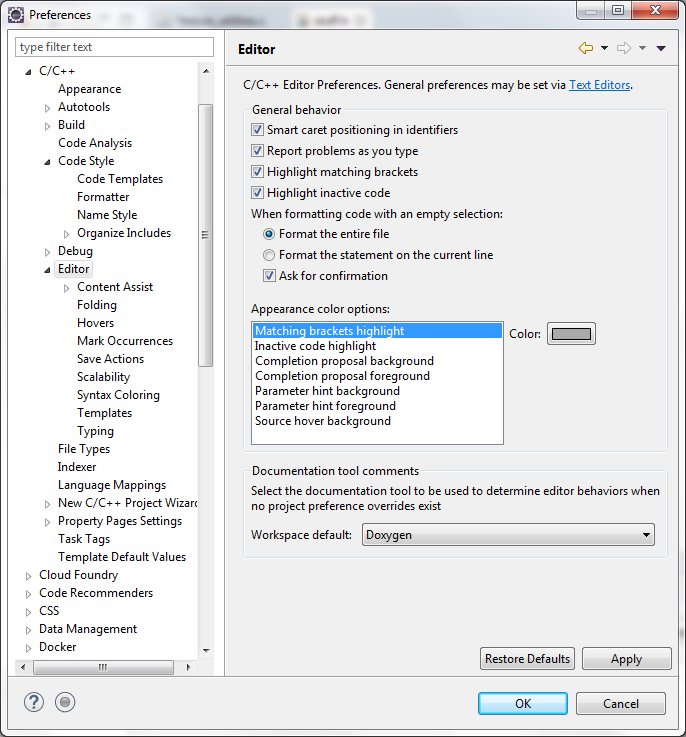
CDT can help you add rich documentation to functions and code. From C/C++
/ Editor / Documentation Tool Comments set the Workspace
default to Doxygen:
We also require you to set up default comments for your files. From C/C++ / Code Style / Code Templates / Comments / File:
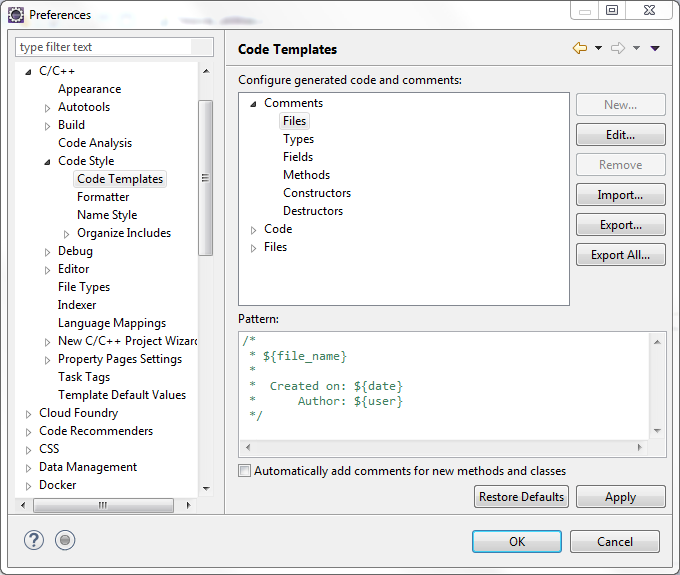
Choose to open the Edit Template dialog:
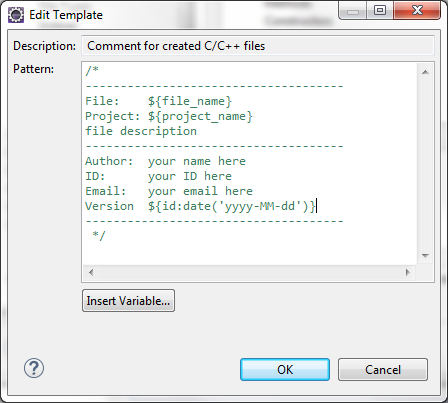
and copy and paste the following text (replacing the appropriate values) to the template:
/**
 * -------------------------------------
 * @file  ${file_name}
 * file description
 * -------------------------------------
 * @author your name, your id, your email
 *
 * @version ${id:date('yyyy-MM-dd')}
 *
 * -------------------------------------
 */
Press to save the changes.
These comments will be added to the top of every source code and header file you create in CDT.
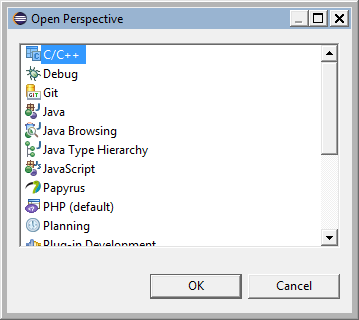
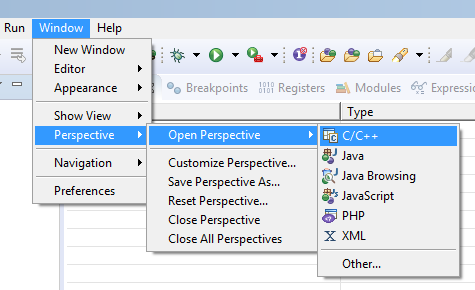
Different plug-ins provide different looks, or 'perspectives' to Eclipse, and it is best for working with CDT if Eclipse is running in the C/C++ perspective. From the main menu, choose Window / Perspective / Open Perspective / Other and click on the C/C++ perspective:
Right-click in the Project Explorer and choose New / Project. (If the menu shows a C project as an option, you may skip the following dialog box.) From this dialog choose a C project:
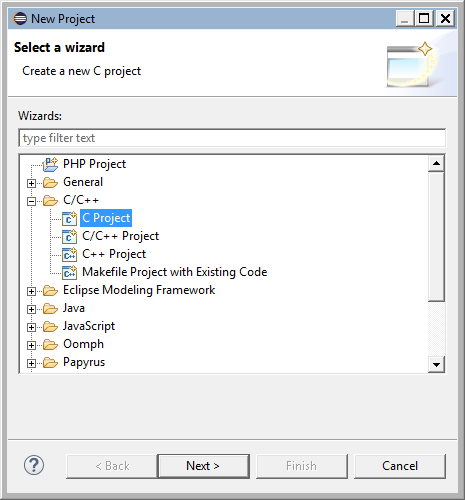
This brings up the Templates for New C/C++ Project dialog box. Select the C Managed Build template:

This brings up the C Project dialog box. Give the project a name and choose Hello World ANSI C Project. (Note that the toolchain should already be selected.):
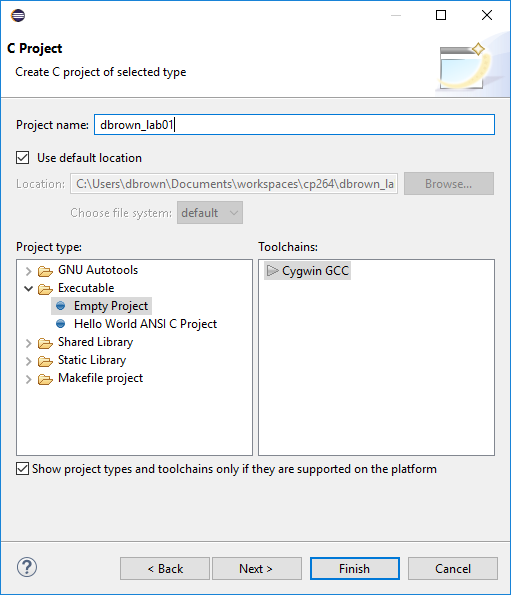
The Hello World ANSI C Project provides the code to create a simple "Hello World" program. This gives you immediately working code that you change to whatever actual code you wish. Press to complete the project set-up.
This creates a project entry in the Eclipse Project Explorer pane and opens the "Hello World" C source code file:
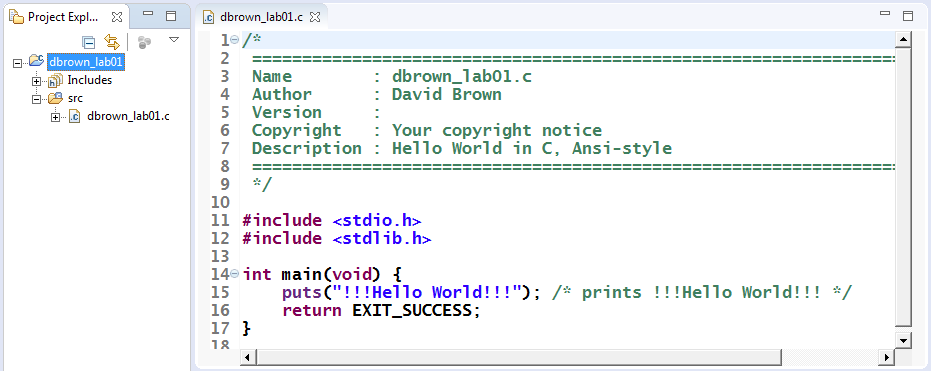
From here you may enter your C code, add files and folders, format your code, etc.
Add new header and source code files to a project by right-clicking on the src folder and choosing the appropriate type from the pop-up menu:
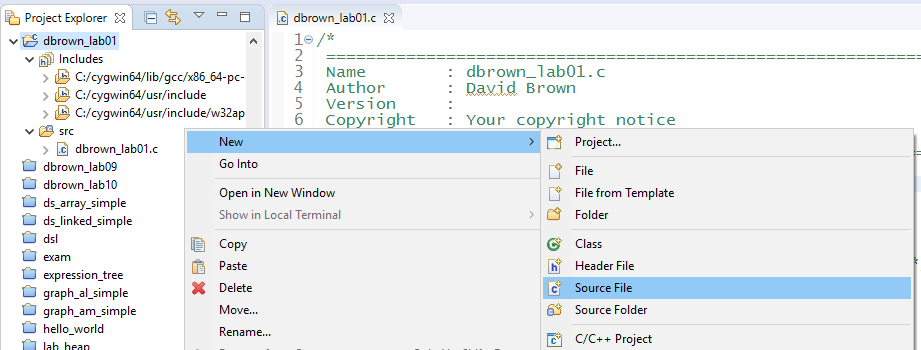
If you don't see the type of item you want to add, choose Other… and select what you need from the complete list of available items.
By default, a project looks in the project folder and the Cygwin include
folder for these files. Library header files are included by using the <…>
syntax; header files that you write in your src folder are
included by using the "…" syntax. Thus:
#include <stdio.h>
includes the stdio library header in your program, while:
#include "lab01.h"
includes the lab01.h header file from the project src
folder in your program.
Compile and link (build) the project by choosing Project / Build All from the Eclipse main menu. The console show the result:
22:52:26 **** Incremental Build of configuration Debug for project dbrown_lab01 ****
Info: Internal Builder is used for build
gcc -O0 -g3 -Wall -c -fmessage-length=0 -o "src\\dbrown_lab01.o" "..\\src\\dbrown_lab01.c"
gcc -o dbrown_lab01.exe "src\\dbrown_lab01.o"

22:52:26 Build Finished (took 374ms)
Eclipse/CDT takes care of adding appropriate libraries, etc. to the gcc compiler and linker calls.
Should project source code have errors, they are displayed in the Editor window, listed in both the Console and Problems tabs if you attempt to compile the code. For example, leaving the semi-colon off the print statement in the Hello World program not only displays warnings and errors in the editor and the Problems tab:
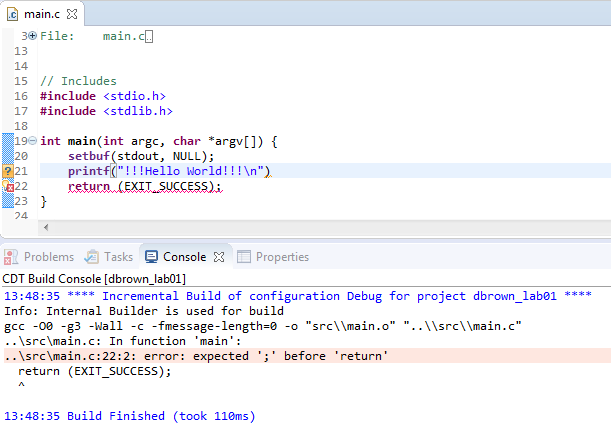
Attempting to compile this code displays the following errors in the Console tab:
23:02:36 **** Rebuild of configuration Debug for project dbrown_lab01 ****
Info: Internal Builder is used for build
gcc -O0 -g3 -Wall -c -fmessage-length=0 -o "src\\dbrown_lab01.o" "..\\src\\dbrown_lab01.c"
..\src\dbrown_lab01.c: In function 'main':
..\src\dbrown_lab01.c:17:2: error: expected ';' before 'return'
  return EXIT_SUCCESS;
  ^
..\src\dbrown_lab01.c:18:1: warning: control reaches end of non-void function [-Wreturn-type]
 }
 ^

23:02:36 Build Finished (took 156ms)
Errors and warnings often persist until the code is rebuilt. To guarantee that there are no lingering problems from previous builds, choose Project / Clean… from the Eclipse main menu. This clears out all errors and warnings and deletes any previously compiled object files. You must rebuild the code after a clean.
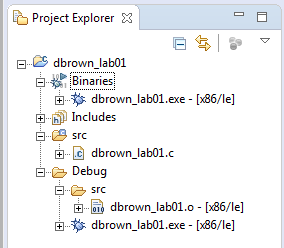
After a successful build, Eclipse creates object files (*.o)
and an executable file (*.exe) in the Debug folder
of the project. The executable file is also listed under Binaries,
although there is no actual Binaries folder created on disk.
The project contents may look like this:
Right click on the source code, project name, or the project binary in the Project Explorer and choose Run As / Local C/C++ Application to execute your program.The working cube executable produces the following output:
!!!Hello World!!!
in the Console tab.
A graphics program opens a new window in Eclipse.
The following code may not behave quite the way you want in C:
#include <stdio.h>
#include <stdlib.h>

int main(int argc, char *argv[]) {
    int number = 0;
    printf("Enter a number: ");
    scanf("%d", &number);
    printf("The number you entered is %d\n", number);
    return 0;
}
The program execution under Windows and Eclipse ends up as:
7
Enter a number: The number you entered is 7
which is not quite what we had in mind. This is due to a buffering
problem: In C, output is buffered, simply meaning that output is held
back from the console until specific events happen, such as printing an
end of line (\n). However, even adding the end of line as:
    …
    printf("Enter a number: \n");
    …
does not correct the problem in this case.
The simple fix is to turn off output buffering entirely:
#include <stdio.h>
#include <stdlib.h>

int main(int argc, char *argv[]) {
    setbuf(stdout, NULL); // turns standard output buffering off
    int number = 0;
    printf("Enter a number: ");
    scanf("%d", &number);
    printf("The number you entered is %d\n", number);
    return (0);
}
Note that output buffering must be turned off at the beginning of the program before any output has taken place.
Note that on some compilers the buffering is turned off by default. Even
if this is the case with your compiler, put the setbuf line
in anyways, as your code must be compatible with our compiler for
marking purposes.
This approach produces the desired output:
Enter a number: 7
The number you entered is 7
By default, C executables that are run from Eclipse do so without any
command line parameters. To add parameters to the execution, from the
Eclipse main menu choose Run / Run Configurations.
This brings up the Run Configurations dialog box:
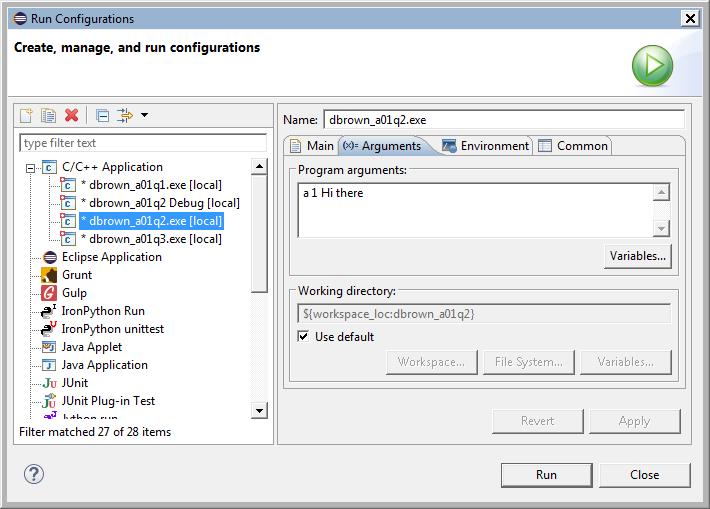
The left side of the dialog box lists the types of programs your copy of
Eclipse supports. Clicking on the cross to the left of C/C++ Application
lists all the C programs currently compiled and ready to run. Click on
the executable you wish to run. After selecting your executable, the
right side of the dialog box lists the options you may apply to the
executable. Click on the (x)= Arguments tab. You may
now enter your execution parameters into the Program
arguments: box. Click on
to execute your program with the command line arguments. The program
runs in the Eclipse console as usual.
If the Run Configuration dialog box lists no configurations, simply right-click on the C/C++ Application option and click on New. You may then select both the project and the executable you wish to run by pressing the appropriate in the Main tab. Note that the project must be compiled and an executable file exist before this works.
You may remove old run configurations by right-clicking on them and choosing Delete.
The CDT debugger allows you to walk through your program's source code line-by-line, and view the contents of it variables as the code is executing. Your code must be compiled and linked without errors in order for the debugger to work.
To start the debugger, right-clock on the project's executable file in the Project Explorer and choose Debug As. (You may click on the file in either the Binaries or the Debug folder - they refer to the same file):
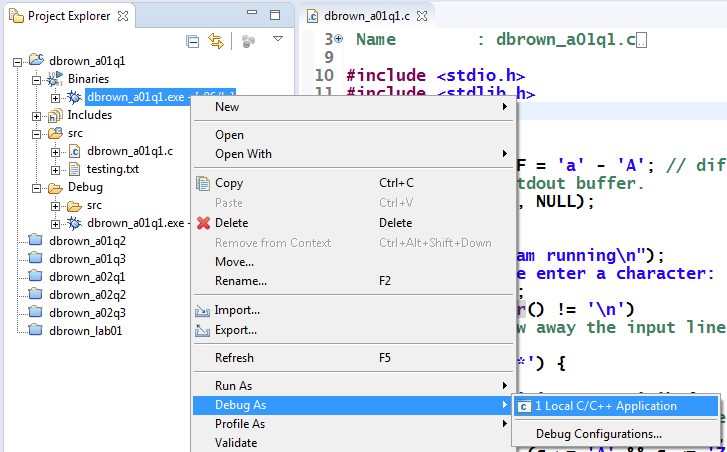
(The first time you do this a dialog box will pop up, asking if you wish to switch to the Debug perspective, and if you wish to do so every time you debug. Say yes to both.)
Choose Local C/C++ Application if your program does not
require command-line parameters, and Debug
Configurations… if it does. (See the previous section on Command
Line Parameters if necessary.)
You may now walk through your code line-by-line, or by setting breakpoints and executing multiple lines. At each step you can see the current values of your variables in the Variables tab, and your program output as usual in the standard Console pane. The Editor pane shows you what line in your program is currently being executed. (Be aware that the Editor pane will allow you to edit your code, but be aware that none of your source code changes will execute until you have left the debugger and re-compiled your program.) Eclipse will now look something like this:
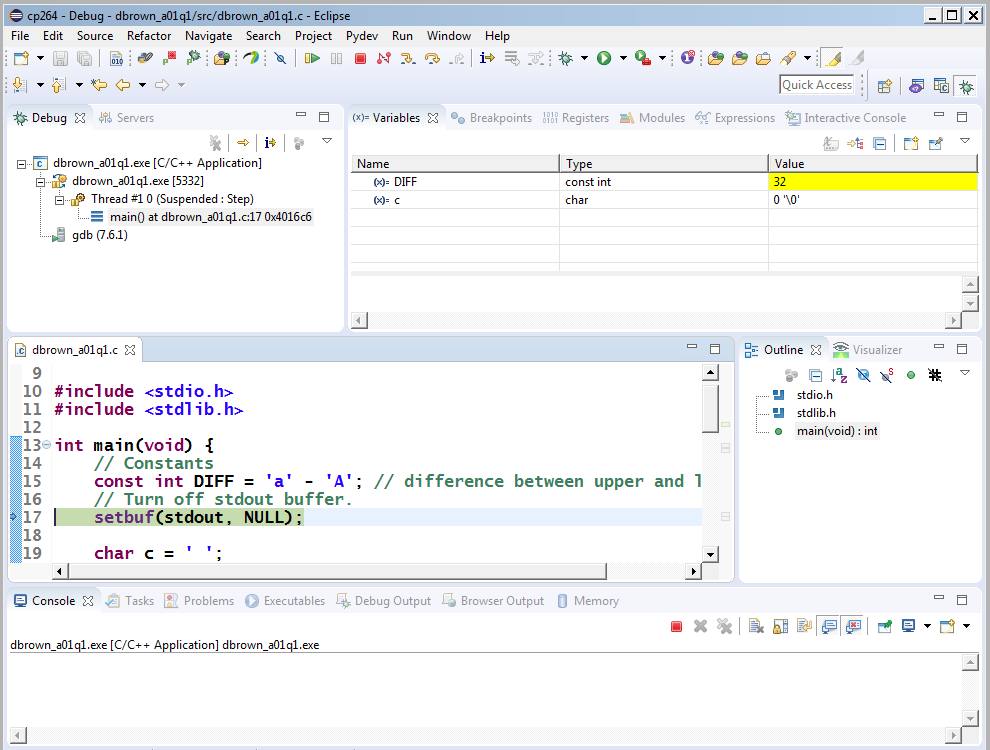
In this example, the line setting the integer constant DIFF
has already been executed, and its name, type, and value (32) appears in
the Variables tab. The line calling the setbuf
function is highlighted, indicating it will be executed next.
Code can be executed a number of different ways. The Run menu and the menu bar provide the following options:
-
Resume (
(F8) runs the program to the end, to a breakpoint, or until input is required. -
Step-Into (
(F5) executes the entire program line-by-line. -
Step-Over (
(F6) allows you to skip the contents of function calls. The functions are still executed, but their code is not traced line-by-line. -
Step-Return (
(F7) appears only when a function is being executed. Pressing this completes the execution of the function and returns immediately to the calling code. -
Terminate (
(Ctrl-F2) stops the debugging process.
Breakpoints are simply points in a program where you can pause its execution, allowing you to examine the current state of the running program. Breakpoints are executable lines in the source code where you choose to have the program execution stop until you allow it to continue executing. Breakpoints are extremely helpful in tracing a program's execution and finding errors in that execution.
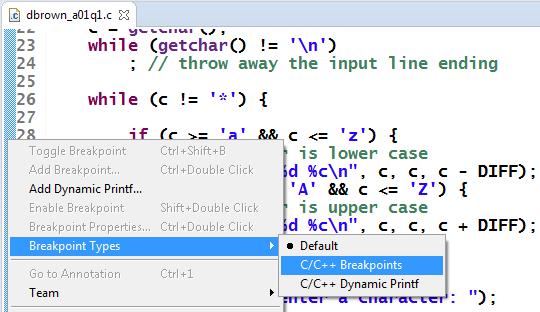
Breakpoints are set in the program source code. To set a breakpoint on a given line of source code, move to that line and right-click on the blue bar at the far left of the editor pane. If the right-click context menu has the option greyed-out, you must set the breakpoint type. (You should only have to do this once per debug session.) From the context menu choose Breakpoint Types / C/C++ Breakpoints:
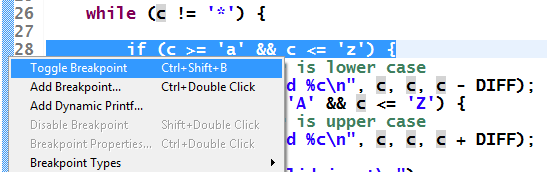
Now that the breakpoint types are set, right-click on the blue bar again and choose Toggle Breakpoint:
This puts a small breakpoint mark into the blue bar to the left of the source code statement that now has a breakpoint:

Now when you use Resume to execute the program, execution
pauses at every breakpoint set. Thus setting a breakpoint inside a loop
allows you to examine the state of a variable as it changes with every
step of the loop execution.
When finished debugging, terminate the debugger and return to the normal C view from the menu Window / Perspective / Open Perspective / C/C++:
It is very helpful to have your code nicely formatted at all times. C does not require its code to follow any particular formatting rules, but you can set Eclipse up to format your code automatically.
Eclipse provides a set of different possible formats - we suggest you use the K&R formatting. From the main menu choose Window / Preferences and go to C/C++ / Code Style / Formatter:
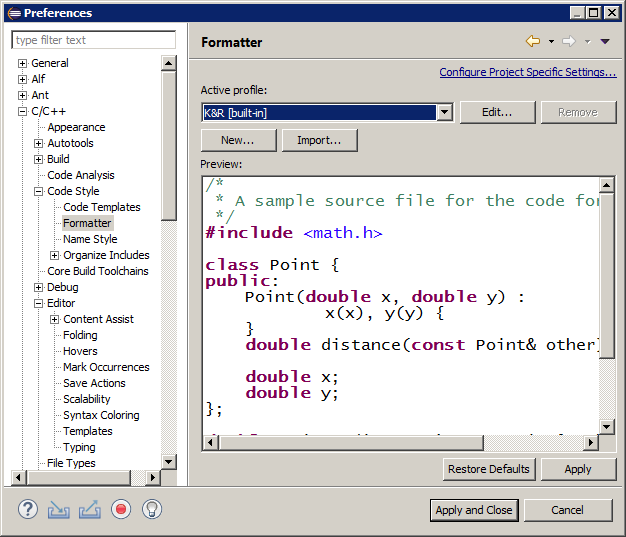
and select the K&R [built-in] Active Profile.
You can format your code any time from the editor by choosing Source / Format from the main menu.
A better approach is to instruct Eclipse to format your source code file every time it is saved. To set this up, choose Window / Preferences from the main menu, and go to C/C++ / Editor / Save Actions:
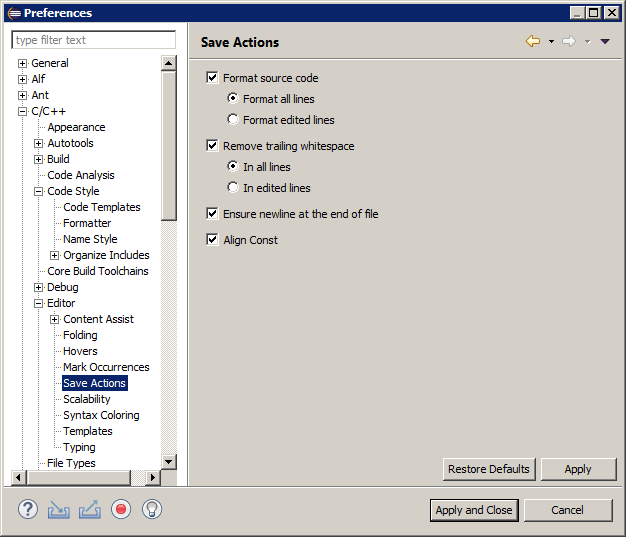
Check all of the checkboxes. Now, whenever you save your C code, it will automatically be formatted.
CDT can help you add rich documentation to functions and code. From C/C++
/ Editor / Documentation Tool Comments set the Workspace
default to Doxygen.
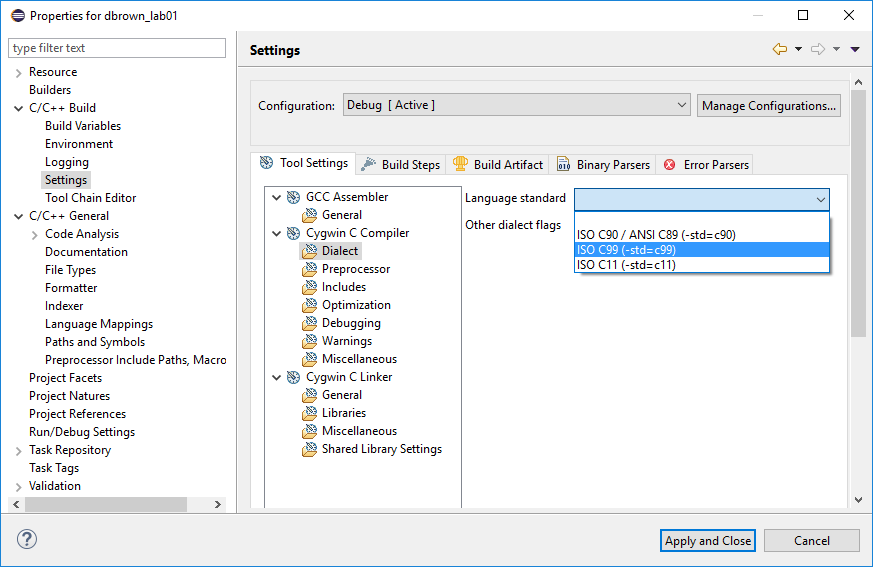
Setting the Dialect
C comes in a number of dialects, the details of which usually don't matter for us. Upon occasion you may need to use a particular dialect to meet some requirement. To set the dialect for a particular project, right-click on the project name and choose Properties / C/C++ Build / Settings / Dialect and choose the required dialect from the language standard drop-down box:
The Eclipse home page: http://www.eclipse.org/
The Eclipse CDT plug-in: http://www.eclipse.org/cdt/
The Cygwin home page: https://www.cygwin.com/