Writing to a Worksheet
Examples:
' Get user input and write it to a couple of worksheets
Dim strUserName As String

strUserName = InputBox("What is your username?")

' Write it to the active worksheet
Activesheet.Range("A1").Value = strUserName
' also works
Range("A1").Value = strUserName

' Specify a worksheet with the name Results
Worksheets("Results").Range("A1").Value = strUserName

' Textbook uses Code Names for worksheets like this
wksResults.Range("A1").Value = strUserName
Getting Data from a Worksheet
Examples:
' Get the value from A1 and store it in a variable
Dim strColour As String
strColour = Range("A1").Value
' Get a value from a different worksheet
strColour = Worksheets("Colour Names").Range("A1").Value

' Also works if the worksheet has the code name wksColourNames
strColour = wksColourNames.Range("A1").Value

' Can also use Object variables for the Range along with the Worksheet code name
Dim rngStartCell As Range
Set rngStartCell = wksColourNames.Range("A1")

strColour = wksColourNames.rngStartCell.Value
Select an Entire Range of Unknown Size
Imagine a spreadsheet with the following data:
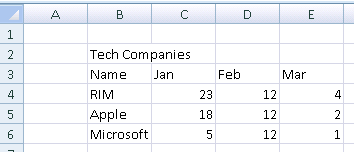
To select the data in the table you can use the Offset command so you can define the range, but specify only the data if you need to.
Example:
' Uses "first cell, last cell" notation
Range("B3", "E6").Interior.Color = vbYellow

MsgBox "See? The cells are yellow.", , "Just a pause"

'Basic Usage 'Colors the range no matter what size
Range("B4", Range("B4").End(xlDown).End(xlToRight)).Interior.Color = vbGreen
See the code and more examples in EndAndOffset.xlsm. If you have trouble downloading the file, look at the code here and copy/paste it into your own workbook. Use the data in the image above if you want to make it interesting.
You can also examine the file Ranges.xlsm.
The subroutine Range6() demonstrates how to select a range of cells whose size you don't know. It also shows how to determine its size. See the textbook for an explanation.
Removing "Dancing Ants"
After you copy a range of cells, the marquee selection indicator (or dancing ants) remains around the selection. When working on the spreadsheet, press the Esc key to remove them. In VBA code use the line:
Application.CutCopyMode = False
That is what would be recorded if you were recording a macro of copying cells and pasting them, then pressing the Esc key.
Writing Equations into a Worksheet
Sometimes you want to write an equation into a range of cells instead of just the answer. If you wanted to write the answer you could use the WorksheetFunction method described in the previous lab. However, if you want to place the actual equation into the spreadsheet (so the answer updates if the data changes in the worksheet) use this method:
Range("A8").Formula = "=sum(A1:A8)"
Notice that the syntax is different than how you would write it in VBA code because it has to be written the way a user would type it into a spreadsheet cell.
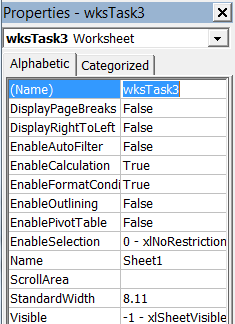
Set the Code Name of a Worksheet
A worksheet has both a name and a code name. The name of a worksheet appears on the tab of the worksheet inside the workbook. The code name is only visible in the VBE and users normally never see it without going into the VBE. Using worksheet code names can simplify your code. Set the code name for a worksheet using the Project Explorer inside the VBE:
Name a Range of Cells
In the following example, a number of cells are given Names using VBA code. If you are designing a worksheet as part of the application, range names can be created right from the beginning. However, creating range names using code can make your code simpler even if you choose to delete them after your program is done with them.
This example also includes how to declare a range object as a variable and use it in your code.
Sub SimpleExample()
    ' Name a range of cells
    Dim rngTitle as Range
    Range("A1").Name = "Title"
    Range("Title").Value = "Heart Rate App"

    ' Example of using the range object variable
    Set rngTitle = Range("Title")
    rngTitle.Font.Bold = True
End Sub
Practice
You can practice some of the techniques in this lab by completing the samples below if you wish.
-
Create a subroutine that asks for 2 Integers using an inputbox and adds them together. Your program should display the results in a message box and write the result onto cell A1 of a worksheet.
Tip: The result from an input box is a String, so remember to convert the strings to an Integer using CInt(). Otherwise "1" + "1" = "11".
-
The file Formatting3.xls contains code that is very difficult to read. Besides that, it contains an error. Reformat it with indenting, white space, and comments, and fix the error so that it runs correctly. Save the file as a macro-enabled workbook. The program contains one error. If you get blue shading in
$B$5:$B$8instead of$B$3:$B$6then your correction is simply in the wrong spot. Your final results should look like this: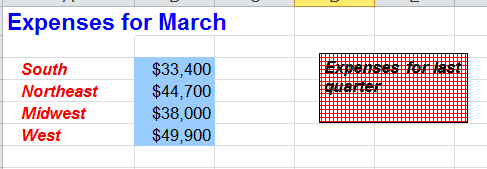
Instructions
All tasks are to be completed on your own.
-
Save the spreadsheet file as a Macro Enabled Workbook (
.xlsm) file before you write more code. Name your spreadsheet with your network login followed by_l03.xlsm. For example, if your network login wasbarn4520, then your lab file should be namedbarn4520_l03.xlsm. Save often. -
Show the Developer Tab in Excel. In Excel 2010, click File / Options Customize Ribbon and check the option for Developer Tab.
-
Put all code into a Module. Use a different Module for each task and name them appropriately as Task1 or Task2 etc.
-
Copy and paste this header into your code modules and fill it out:
Option Explicit

' ==== CP212 Windows Application Programming ===============+
' Name: Your Name
' Student ID:
' Date:
' Program title:
' Description:
'===========================================================+
-
Make sure you test your tasks before submitting your lab to the Dropbox.
-
When finished upload your file to the Lab 3 Dropbox in MyLearingSpace. Saving the file to the Dropbox is simply a safety measure in the event there are problems with your grade later in the course.
Tasks
Download the file Exam_Scores.xlsx and complete
the following tasks. Start by opening the file and saving it as a Macro
Enabled Workbook (file extension .xlsm). Name this
spreadsheet with your network login followed by _l03.xlsm.
For example, if your network login was barn4520, then the
file should be named barn4520_l03.xlsm. Remember to save
your work frequently in case there are problems.
Make sure you place a button on the worksheet to run every subroutine of the required tasks.
Put all items below in a subroutine. Write the code, don't record a macro.
-
Use VBA to name the following ranges with the specified name: cell A1 as Title, Boldface the font of the label in the Title cell, and change its font size to 16. Merge cell range A1:E1 and center the text.
-
Use VBA to name the following ranges with the specified name: the headings in row 3 as Headings,the students sequence in column A as Students.
-
Sort Exam 3 column in ascending form, then name the cells D3:D18 as column 3, and do the following on the fonts of this range: bold, italic, size 12, and green color .
-
Sort Exam 1 column in descending form, then name the cells B3:B18 as column 1, and do the following on the fonts of this range: bold, italic, size 12, and red color.
-
Write a new subroutine to clear all the changes done on the original Data worksheet. Place a button in the worksheet to run this subroutine.
Your work may look like:
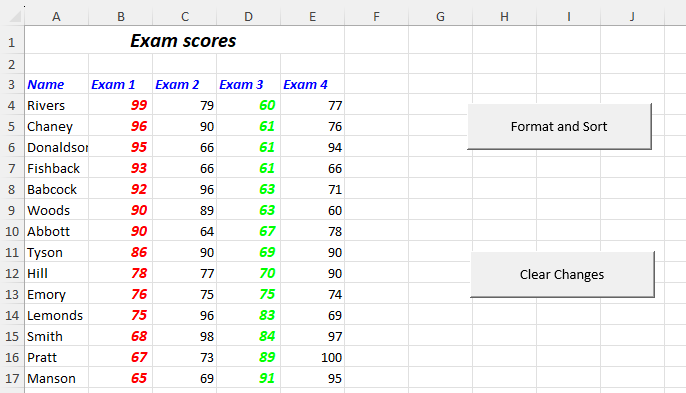
You have to use Button(s) on worksheet(s) to run the task(s) in this lab and all next labs. Marks will be deducted if you do not use buttons.
Links
Programming Checklist
The following is a list of things you should have in all of your programs. Your IAs check for these things when working with you in the lab and they should be included in all of your assignments.
- Does your program contain comments?
- Is your name, student ID, and current date included in a comment at the top of the code window or inside your main subroutine?
- Do you enforce variable declaration using
Option Explicitat the top of every code window? - Do your variables have meaningful names related to the problem?
- Is your username included in the name of the file?
- Did you submit your file to the right place in MyLearningSpace? All assignments and tasks must be uploaded to the proper dropbox.