This lab introduces the mechanics and practices of the CP216 labs. We assume that you have a basic grounding in using email and a web browser and handling a pc. If you need extra help for anything related to a lab, please talk to the Lab Instructor.
Administration
This lab completes the administrative tasks you started in the first week of classes. In order to work effectively in this course, you must have the following:
- a WLU Network login
- a WLU email address
- access to the CP216 web site
The Resources page contains links to and information about the software and language used in lab.
The Lab Instructor will briefly review these necessities.
The CPUlator Computer System Simulator
The main tool that we use in this course is the CPUlator Computer System Simulator. The Lab Instructor will discuss:
- the purpose of the software
- documentation and help
- a sample ARM assembly language program
- executing the simulator (running your program)
- loading and executing the program
- understanding and using the graphical user interface, including registers, memory, and output
- the coding standards you are to use for this course
The CPUlator Computer System Simulator simulates a number of different computers in a range of assembly languages. We are interested in using ARM7 on the DE1-SoC computer, which provides a set of simulated hardware, such as LEDs and seven segment displays to 'talk' to. From the main CPUlator screen, choose Architecture: ARMv7 and System: ARMv7 DE1-Soc:
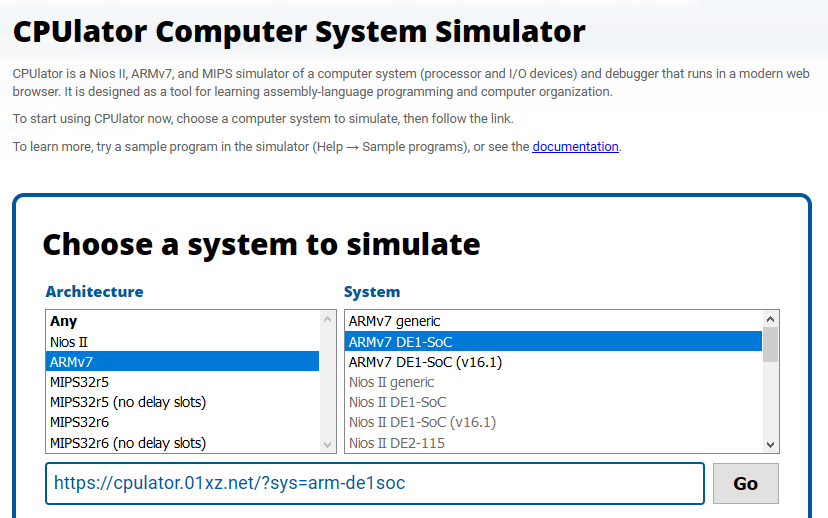
You may also go directly to this version: https://cpulator.01xz.net/?sys=arm-de1soc.
The CPUlator Computer System Simulator has an editor, and you can load files from your pc into the editor, but the program's File / Save option saves the editor contents to your download folder under an arbitrary name. (For security reasons the browser cannot save a file back to the one you loaded into the editor.) You can also copy/paste the contents of the editor into a local editor and save your code that way.
Copy the following code into the editor:
/*
-------------------------------------------------------
l01.s
Assign to and add contents of registers.
-------------------------------------------------------
Author:  David Brown
ID:      123456789
Email:   dbrown@wlu.ca
Date:    2023-07-13
-------------------------------------------------------
*/
.org    0x1000  // Start at memory location 1000
.text           // Code section
.global _start
_start:

mov r0, 9       // Store decimal 9 in register r0
mov r1, 0xE     // Store hex E (decimal 14) in register r1
add r2, r1, r0  // Add the contents of r0 and r1 and put result in r2

// End program
_stop:
b   _stop

.end
Full program at: intro.s
Press . The result of the compilation appears in the Messages box at the bottom of the screen. The result of attempting to compile this code should look something like:
Compiling...
Assemble: arm-altera-eabi-as -mfloat-abi=soft -march=armv7-a -mcpu=cortex-a9 -mfpu=neon-fp16 --gdwarf2 -o work/asmOXq9Xd.s.o work/asmOXq9Xd.s
work/asmOXq9Xd.s: Assembler messages:
work/asmOXq9Xd.s:15: Error: immediate expression requires a # prefix -- `mov r0,9'
work/asmOXq9Xd.s:16: Error: immediate expression requires a # prefix -- `mov r1,0xE'
Compile failed.
The simulator flags errors immediately, although it may not flag all
errors at once. This program is missing a # character in
front of the decimal value 9 (# indicates that the value is
an immediate, or raw, value), and the hex value 0xE, and
clearly flags the errors with the lines:
work/asmOXq9Xd.s:15: Error: immediate expression requires a # prefix -- `mov r0,9'
work/asmOXq9Xd.s:16: Error: immediate expression requires a # prefix -- `mov r1,0xE'
Fix the error in the code by adding a # character in front
of the 9 and the 0xE, and press to
recompile the source code. The Messages box now displays:
Compiling...
Code and data loaded from ELF executable into memory. Total size is 4112 bytes.
Assemble: arm-altera-eabi-as -mfloat-abi=soft -march=armv7-a -mcpu=cortex-a9 -mfpu=neon-fp16 --gdwarf2 -o work/asmkTsxTg.s.o work/asmkTsxTg.s
Link: arm-altera-eabi-ld  --script build_arm.ld -e _start -u _start -o work/asmkTsxTg.s.elf work/asmkTsxTg.s.o
Compile succeeded.
You may clear the Messages box at any time by pressing .
A successful compilation opens the Disassembly tab in place of the Editor tab. This shows your original code along with a compiled version of your code (which may not match your original code), the addresses in memory used by your code, and the opcode, or hexadecimal version of your code. You may also select the Memory tab to display the contents of memory
The Registers box shows the current contents of the computer's registers (to be discussed later), and the Settings box allows you to change how the contents of the registers and memory are displayed, from hexadecimal to signed decimal, for example.
Click on the Memory tab. Note how the contents of memory
address 0x1000 match the memory contents listed in the Disassembly
tab. (The aaaaaaaa values are the simulator's way of
displaying 'unknown' or 'uninitialized' memory address contents.) You
may go to any location in memory by typing a hexadecimal address in the
Go to address, label, or register: box.
Switch back to the Disassembly tab and run the program by pressing .
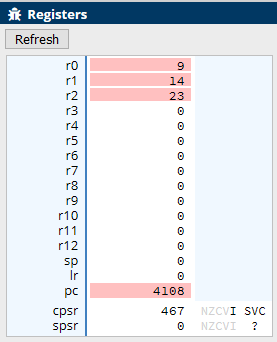
The light-yellow line in the code now highlights the termination line of the code, and the Registers box highlights the values of the changed registers. Use the Settings box to change the registers display between hexadecimal and decimal:
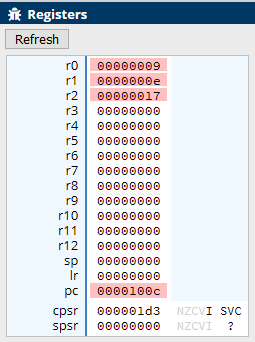
The Program Counter (pc) register stores the address of the
next instruction to be executed. At the end of this program it stores
the value 0x100c (hex) as the execution of the program ends
at this address. The Memory tab is unchanged as the program
makes no changes to memory.
Restart the program by pressing . Update the contents of
registers r0, r1, and r2 by
clicking on them and entering 0. Open the Disassembly tab and
step through the program one line at a time by pressing .
The code is now executed one line at time, the line being highlighted
before it is executed, and the register values being updated
individually as they are changed. This is extraordinarily useful for
debugging purposes - we will go through further debugging techniques in
future labs.
Programming in the ARM Assembly Language
The sample program was written in the ARM assembly language. It is a low-level language that allows you direct access to a microprocessor's components, such as registers and memory. The sample program uses a number of different directives and instructions.
Directives
A compiler directive sets compiler options, defines constants, or organizes memory.
The general syntax for most ARM directives is:
.directive {label}{value}
(Elements in {} are optional.)
- .directive
- The directive name - all directives start with a period.
- label
- an optional label for a line
- value
- a constant value as a string, decimal number, hex number, or binary number
The directives used in our sample program appear in all our programs. They are:
-
.org -
Format:
.org memory_addresstells the compiler where in memory to place the program. For various reasons we don't normally want to start at memory location 0.
-
.text - identifies the code section of the program.
-
.global -
Format:
.global labelidentifies globally visible labels.
-
.end - identifies the end of the source code and data.
Instructions
The general syntax for most ARM instructions is:
{label} operation{condition code}{flags} Rd, Operand1{, Operand2}
(Elements in {} are optional.)
- label
- an optional label for a line
- operation
-
the three letter operation instruction (ex:
mov,add) - condition code
- an optional condition code (to be discussed later)
- flag
- an optional flag (to be discussed later)
-
Rd - The destination register
-
Operand1 - A source register or other value
-
Operand2 - A second source register or other value
The instructions used in our sample program are:
-
mov(Move) -
Puts a value into a register.
The instruction:
mov r0, #9puts the (immediate) decimal value 9 into register
r0.The instruction:
mov r1, r0Copies the value in register
r0into registerr1. -
add(Add) -
adds two values and places the results into a register.
The instruction:
add r2, r1, r0adds the contents of
r0andr1and puts the result in registerr2.The instruction:
add r3, r1, #7adds the contents of
r1and the decimal value 7 and puts the result in registerr3. -
B(Branch) -
Branches execution to a memory location.
The instruction:
_stop:
b _stop
terminates a program by branching to its own location.
Program Documentation
Add the following to the top of all your programs, and replace the 'your' parts with your information.
/*
-------------------------------------------------------
file name
description
-------------------------------------------------------
Author:  your name
ID:      your WLU ID
Email:   your email
Date:    yyyy-mm-dd
-------------------------------------------------------
*/
In the following tasks, don't forget to press after any code changes you make, then or to execute the program.
Put your written answers to these tasks into the file answers.txt and
submit it as part of your zip file.
Copy the contents of intro.s
to the CPUlator and work with its code for the following tasks:
-
In the intro program, replace the value
0xE(hex) with14(decimal), and execute the program again. Does the behaviour of the program change in any way?
-
In the intro program, add a new line that uses the
movinstruction to put the value 8 into registerr3. Attempt to add the value of registerr3to the value in registerr3and put the result into registerr3with a singleaddinstruction. Is it legal to do this?(This is roughly the equivalent of executing
a = a + a.)
-
In the intro program, add a new line that attempts to add the immediate values 4 and 5 to the register
r4using theaddinstruction. Is it legal to do this? Replace the middle operand with a register. Does it work now?
Save your resulting program with the File / Save menu. This
saves your program to your Download folder as untitled.s.
Copy this to a more useful location and rename it as l01_t03.s.
Zip this file with your answers file into a file named login_l01.zip,
where login is your Laurier login. Upload this zip file to the
Lab 1 dropbox in MyLearningSpace.