by: David Brown
This is a tutorial to get you started on creating C and C++ programs in Eclipse.
Programming in C/C++ in Eclipse requires the CDT (C/C++ Development Tooling) plug-in and a C/C++ compiler. If you are working only in the Department's computer labs you may skip the installation instructions and go directly to the Defining a C/C++ Project section.
Note that this guide describes a Windows version of a C/C++ compiler. If you are using a Mac or Linux, you will require a very different compiler set up. The Eclipse instructions will be mostly the same.
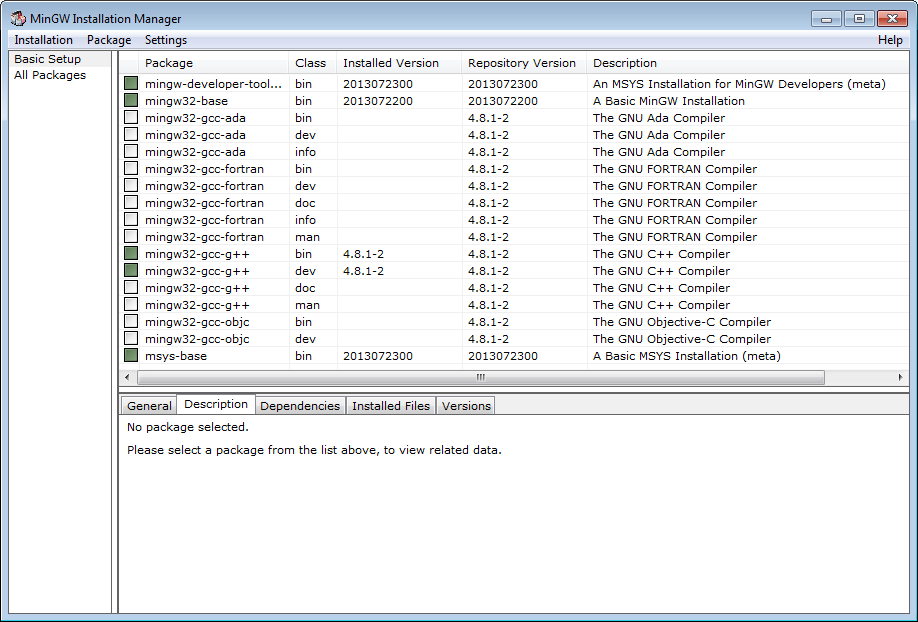
Get the MinGW installer (mingw-get-setup.exe) from the
Download section of the MinGW website, http://www.mingw.org. By default, MinGW is
installed to C:\MinGW - this should be fine. Mark the
packages:
You may also find the doc (documentation) and man (man page) options for these tools useful.
After selecting the packages, choose Installation / Apply Changes from the main menu. This starts the download process. Because of the large number of files to download, this is a slow process and may take 20 minutes or more.
After installation, add the C:\MinGW\bin and
C:\MinGW\msys\1.0\bin paths to the Windows PATH
system environment variable.
MinGW compatible libraries (such as freeglut) can be typically be set up in three different ways:
include, lib, etc.) as appropriateCheck with your instructor as to how to approach this.
We assume that you have already set up Eclipse. The examples in this guide, and the installation in our labs (as of this writing), is Kepler (version 4.3). If you need a primer, please see Installing Eclipse guide, particularly the part about installing plug-ins. You must be connected to the internet in order to do an install of a plug-in from a repository.
The CDT plug-in is available as part of the Kepler package. From the Eclipse menu, choose Help / Install New Software…, which brings up the Install dialog box:
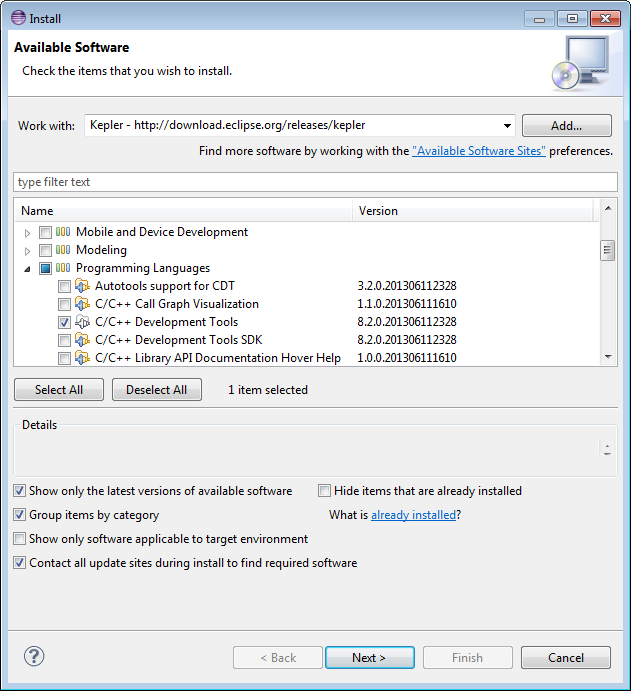
Open the Work with: list to see the available plug-in repositories. If you do not see the Kepler repository, add it by pressing the Add button, and enter the plug-in information into the Add Repository dialog box:
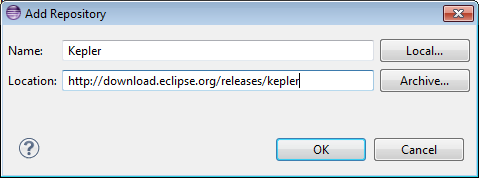
Repository name: Kepler
Repository URL:
http://download.eclipse.org/releases/kepler
After connecting to the Kepler repository the Install dialog box presents a list of the plug-ins available in the Kepler repository. Open the Programming Languages section and choose the C/C++ Development Tools. Press Next, and answer the rest of the dialogs appropriately until the installation finishes.
If MinGW/MYS has been properly set up on your PC, then there are no further installation steps to follow. CDT will recognize your compiler toolchain.
The following examples show how to create a new C++ project. Creating a new C project is very similar.
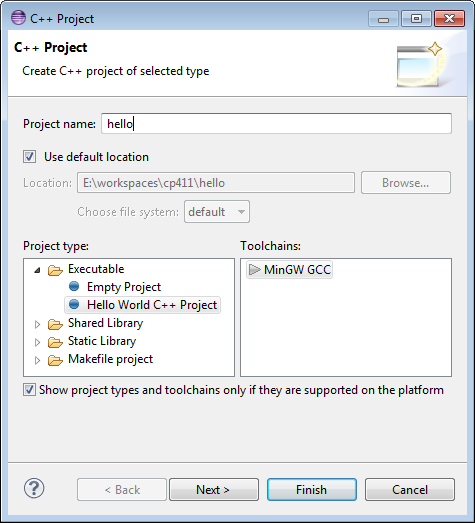
Start Eclipse and choose a new C++ project:
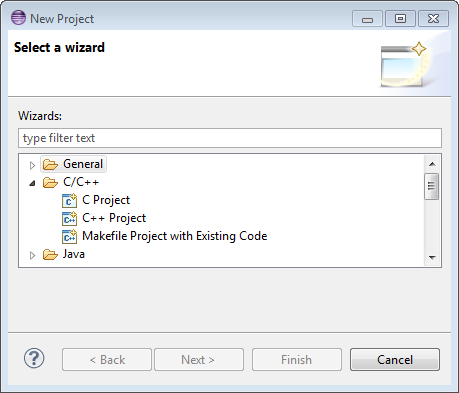
In this example we name our project "hello" and choose Hello World C++ Project as the project type using the MinGW CC toolchain. You will probably usually choose the Empty Project, but the Hello World C++ Project provides the code to create a simple "Hello World" program. If you have difficulties setting up an empty project, start with the "Hello World" project instead.
This creates a project entry in the Eclipse Project Explorer pane and opens the hello.cpp file.
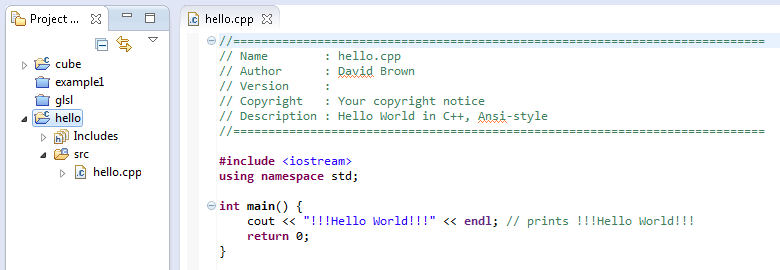
From here you may enter your C++ code, add files and folders, format your code, etc. The full capabilities of the CDT plug-in are extensive, but beyond the scope of this tutorial, so feel free to explore.
Although this document emphasizes using openGL libraries, the steps shown here are appropriate for any C/C++ libraries you wish to import into your programs.
The libraries required for an OpenGL project vary depending on the type of program to be run, but typically such a project requires the opengl32, glu, and glut libraries. These libraries must be explicitly added to the project. Adding libraries to a project is generally a two step process: tell the project where the header files it is to include are; and what and where the libraries it is to link with are. Where these header and library files actually exist on your computer determines just how they are to be included in a project.
The C project cube requires OpenGL, glu, and glut libraries. The default install of MinGW include OpenGL and glu, but not a glut library. The glut library chosen, freeglut, is added to the MinGW installation as a free-standing folder:
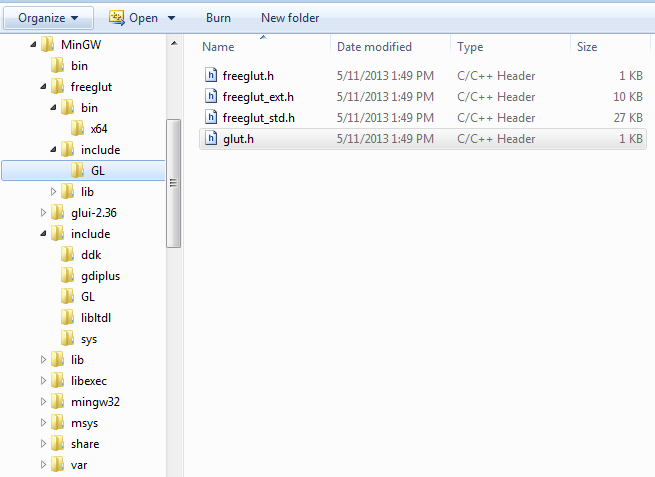
This organization is completely arbitrary. The contents of the
freeglut folder could have been distributed amongst the MinGW
folders, e.g. the contents of MinGW\freeglut\include\GL placed
in MinGW\include\GL. This would save having to tell the Eclipse
project where to find these include files. Wherever these files are stored,
however, the basic concept is the same.
cube.c contains the include directives:
#include <windows.h>
#include <GL/glut.h>
By default, the project looks in the project folder and the MinGW
include folder for these files. If the file being included is
not in these folders, you need to tell it where else to look. In the case of
this example, the MinGW\include folder contains a the
windows.h file, but the MinGW\include\GL folder
does not contain the glut.h file. That file is actually
contained in the MinGW\freeglut\include\GL folder. (Note that
header files and libraries do not have to be put into the MinGW
folder, they can be put anywhere on the file system. Such files can also be
put into the current Eclipse workspace, allowing them to be shared by all
projects within the workspace. It is, however, often useful to group such
libraries together in a common place.)
To tell the project where to look for include files, right click on the project name and choose Properties from the pop-up menu. This brings up the Properties for … dialog box. From the box choose C/C++ Build Settings to get to the Settings section of the dialog box, and in the list of GCC C Compiler options choose Includes. Here you have the option of including individual header files or define an include path that potentially contains many files. The dialog areas for both contain icons for adding, deleting, or editing files or paths, or changing the processing order of the files or paths already given.
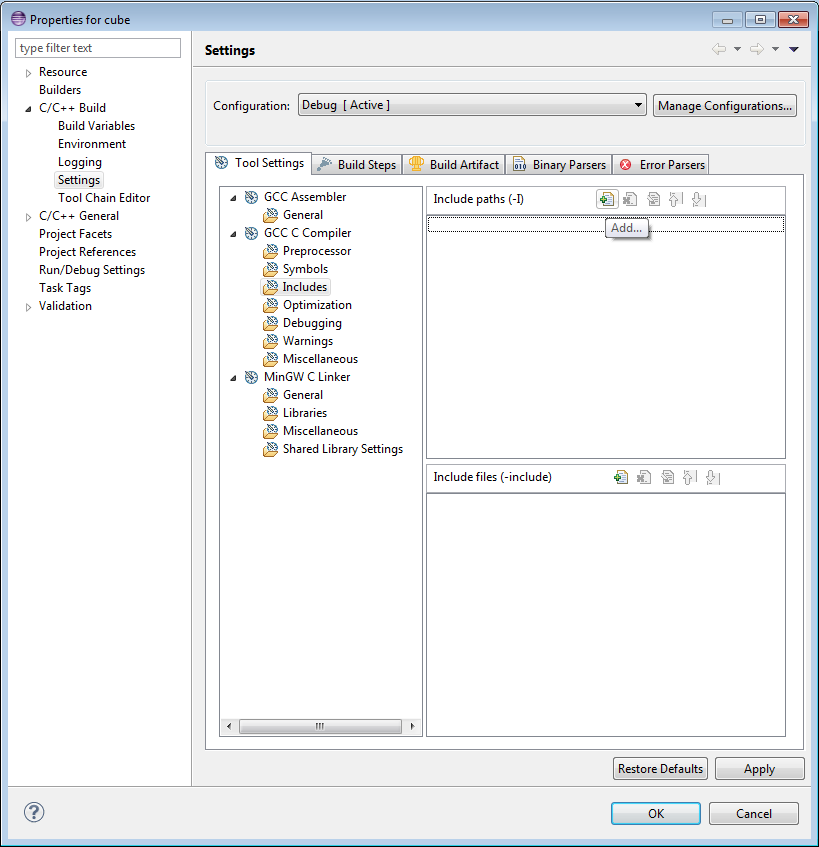
Note that the list of options for a C++ program differs from that for a C program, but the basic idea is the same.
To add the include path, click on the Add icon, and provide the path to the appropriate header files. You may browse to this location, and note that you can browse within the Eclipse workspace or within the file system.
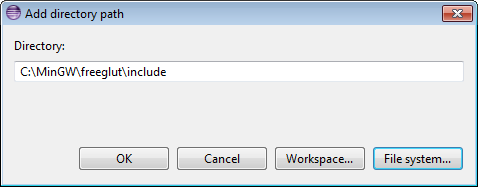
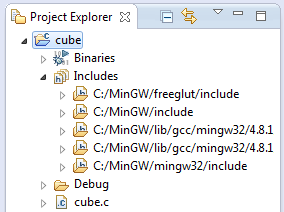
The path chosen now appears in the list of include paths within the Settings section, but also appears in the list of include paths within the Package Explorer:
Adding a library to a project may require both a library name and a
library path. As noted earlier, the cube project requires
opengl32, glu, and freeglut libraries. The first
two libraries are provided with MinGW and are stored in the
MinGW\lib folder as the libopengl32 and
libglu32.a files respectively. The library names used by the
compiler are opengl32 and glu32. The
32 is appended because these are 32 bit libraries. (How do you
know what the library names should be? Check the appropriate documentation
that comes with the libraries.)
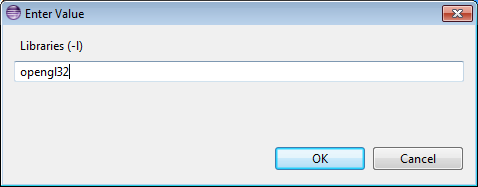
From the Libraries (-l) section of the dialog box, click on the Add icon and enter the library name to add it to the list of required libraries:
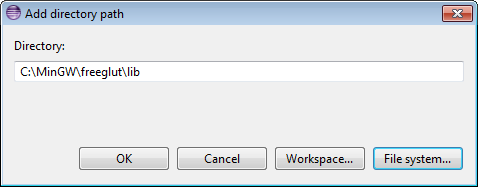
The freeglut library name is added in the same way the others
are, but the actual library file is stored in
MinGW\freeglut\lib. In order to find this library file, this
path must be added to the project library path.
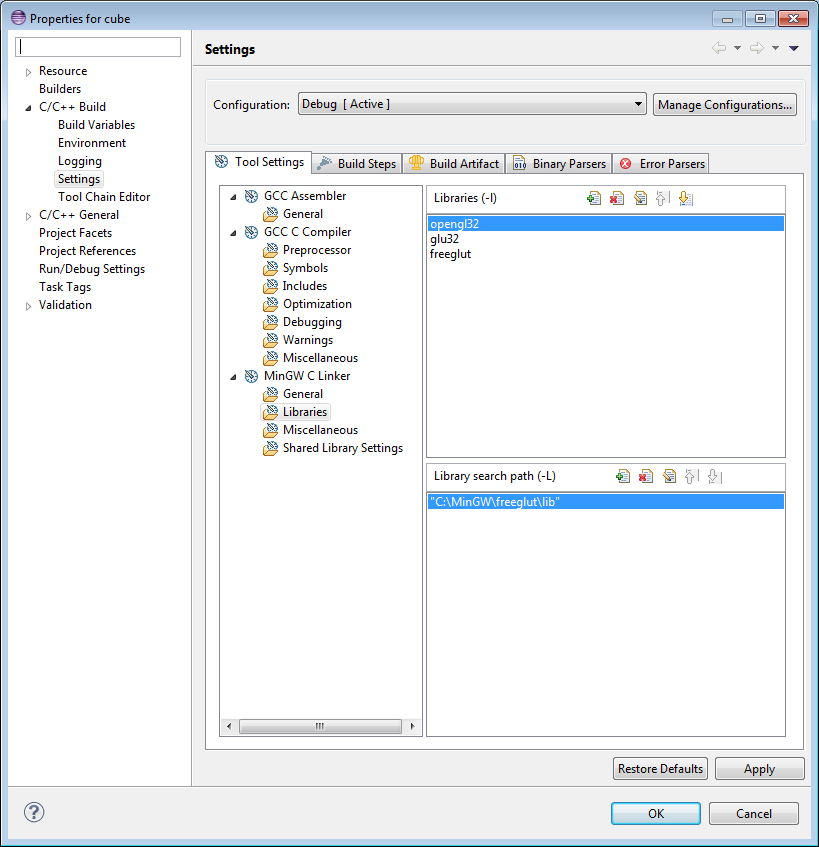
In the list of MinGW C Linker options choose Libraries. From the Libraries search path (-L) section of the dialog box, click on the Add icon and browse to the library file(s) folder to add that folder to the library file search path:
After adding all three libraries, you should see:
Compile and link (build) the project by choosing Project / Build from the Eclipse main menu. The console show the result:
21:29:33 **** Rebuild of configuration Debug for project cube ****
Info: Internal Builder is used for build
gcc "-IC:\\MinGW\\freeglut\\include" -O0 -g3 -Wall -c -fmessage-length=0 -o cube.o "..\\cube.c"
gcc "-LC:\\MinGW\\freeglut\\lib" -o cube.exe cube.o -lopengl32 -lglu32 -lfreeglut

21:29:35 Build Finished (took 1s.226ms)
Note that the added search paths and libraries are listed in the gcc compiler calls.
Should the project have errors, check the include and library paths. The error messages often make it clear in which library the problem resides. It may be necessary to change the order that the libraries appear in the library list. A library's position within the library list can be changed with the Move Up and Move Down icons in the Libraries options.
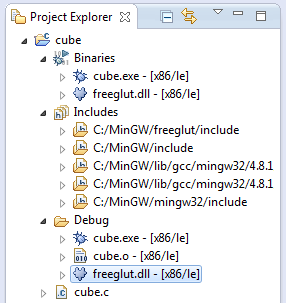
After a successful build process, Eclipse creates object files
(*.o) and an executable file (*.exe) in the
Debug folder of the project. The executable file is also listed
under Binaries, although there is no actual Binaries
folder.
In the cube example, Eclipse creates cube.o and cube.exe in the Debug folder.
Most Windows executables require DLLs (Dynamic-Link Libraries) to execute.
These libraries contain code common to many Windows executables. Some
particular libraries require a DLL that is not part of the default Windows
system. The freeglut package comes with a freeglut.dll
file (stored in freeglut\bin) that is required to run any
program written with the standard freeglut library. This file must
be placed either in a system path (such as C:\Windows\system),
or in the same folder as the project executable file. The advantage of
placing it in the system path is that any program may now use it, but if you
do not have access to the system path, then placing it in the Debug
folder works just fine. (The DLL file is also listed under
Binaries.)
The library documentation may be necessary to tell you when a DLL is required. (Note that freeglut in particular also allows compiling against a static library, which removes the need for the DLL, but that is beyond the scope of this tutorial.)
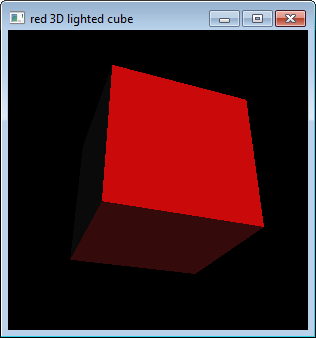
Right click on the project name and choose Run As / Local C/C++ Application to run a project executable. The working cube executable produces the following output:
The Eclipse home page: http://www.eclipse.org/
The Eclipse CDT plug-in: http://www.eclipse.org/cdt/
The MinGW home page: http://mingw.org/
freeglut binaries: http://www.transmissionzero.co.uk/software/freeglut-devel/
(Download the appropriate library, usually the freeglut 3.0.0 MinGW Package)
Here is the full source code for cube.c. Try it yourself. (Thanks to Mark J. Kilgard for the use of his code.)
Problems? Contact David Brown at dbrown@wlu.ca.