Objectives
- Set up the Java platform development environment.
- Warm up with development tools with Ant, Maven and Eclipse.
- Warm up Java with JUnit, Log4J, and documentation.
- Prepare lab report and submission.
Preparations
- It is recommended to use work directory
C:/enterprise/workspace/lab0for program projects and submission files of lab0, andC:/enterprise/workspace/lab0/imagesdirectory to store images of lab0. We will use these directories in the following task specifications. - Download readme.txt and lab0_report.md (right click the hypertext > Save link as) and save them to folder
C:/enterprise/workspace/lab0. - Both files are required in the assignment submission. You can open and edit these two files using a simple text editor, e.g., Nodepad++.
- Take a screen shot of the final output of each graded task, which will be used in the lab report.
- Check sample of lab0 submission package for an example of lab0 submission package.
Course software and directory
We will describe the lab tasks based on 64 bit Windows 10 OS. However, lab tasks can also be done on Linux or Mac OS. If you decide to use Linux or Mac OS, you need to make it work by yourself, and demonstrate it accordingly in the report.
Some programs uses user directories and do not like space and underscore in user name. If the user name of your account has space or underscore, you’d better create a new user account (make sure no space and underscore in user name), and do all the course work under the new account.
Java JRE, SDK, Software Tools
In this task, we will install and configure the common software systems that will be used in course work of labs, assignments and project.
Utility software
Creating EC directory system
We create and use a root directory named enterprise for all course work and EC software systemms. For convenience, we put the root directory under the C directory.
- Create a directory named
enterpriseunder the C directory. Create the user environment variableENTERPRISEwith valueC:\enterprise. - Create subdirectory
workspaceandtmpunder theenterprisedirectory. - Under the workspace directory, create subdirecties: lab0, lab1, …, lab5, a1, …, a5, project.
Download, install, configuration Utility programs
Minimally, we need the following utility software for the course work. You can install them if they are not on your machine yet.
- 7zip, a compression program to zip and unzip package files. We will use 7zip to zip, unzip, and inspect all types of packages. The 7zip installer can be downloaded from the 7zip site. Do the default installation. It is installed in
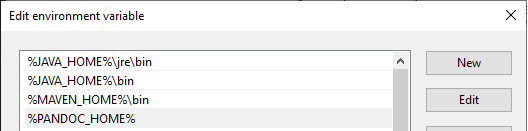
C:\Program Files\7-Zipdirectory. AddC:\Program Files\7-Zipto user’s environment Path variable, so that we can call7zto zip and unzip by command line operations.
- Notepad++, a simple text editor with more features than Notepad. It can be downloaded from the Notepad++ site. By default, it is installed in
C:\Program Files\Notepad++directory. AddC:\Program Files\Notepad++to user’s environment Path variable, so that you can issue and startnotepad++from command line console. You can install xml tool plugin for the convenient of editing xml documents. - Pandoc, a document conversion program. We will use Pandoc to convert lab and assignment reports from Markdown format to HTML format.
- Download and save pandoc-2.2.3.2.zip to
C:/enterprisedirectory (right clicking the hypertext > Save link as, choose the folder to save). Extract it toC:/enterprisedirectory (right click the zip file (> Show more options, if Windows 11 used) > 7-Zip > Extract Here). To simplify the description, we refer to these steps as “Download, save and extract”. - Add
C:/enterprise/pandoc-2.2.3.2to user’s environment Path variable.
- Git, an open source distributed version control system. We put some of our lab projects in private repositories on GitHub. You can download and install Git from git for Windows.
Testing the installation.
Open a command console (shortly cmd console), type and run commands:where 7z.exe where notepad++.exe where pandoc.exe where git
The console output should show the paths of the executable programs. Take screen shot of the above command console output (Shift + Windows key + S, select the area, start Paint program, and paste to Paint, save image as pandoc.png file in folder C:/enterprise/workspace/lab0/images). The screen shot image will be used in lab report. Add 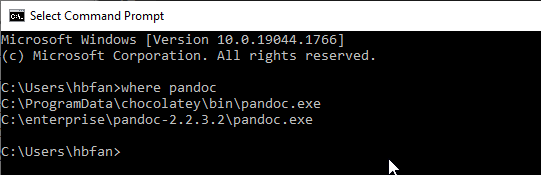{width=90%} to the a0_report.md in section T1.1 Utility Software. This is to verify that you have done this task properly. We will do the same for other tasks.
Download warm up projects
Download ec-lab0.zip and save it the lab0 folder C:/enterprise/workspace/lab0. Extract it by right clicking the file > 7-Zip > Extract Here. Then the lab0 folder contains sub-folders ec-file-io, ec-junit-log, ec-junit-log-ant, ec-junit-log-mvn, etc. These folders contain the warm up Java projects we will try out next.
git clone https://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@github.com/hfan-edu/ec-lab0.git
This will create a local repository under lab0/ec-lab0, containing the warm up projects.
Notice
- The string
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is the Private Access Token for the private repo on GitHub. - If you use GitHub to manage the projects of this course, please put them in private repositories to avoid disclosing the course work.
Java JRE and JDK
We will use the JDK 1.8 for all our Java projects. JDK 11 should also work for most lab tasks except a few tasks in lab5, so we stay with JDK 1.8 for consistence.
- Download JDK1.8.191 by clicking the hypertext, and save it to
C:\enterprisedirectory, and extract there. Then you have the Java JDK installed inC:\enterprise\jdk1.8.0_191directory.
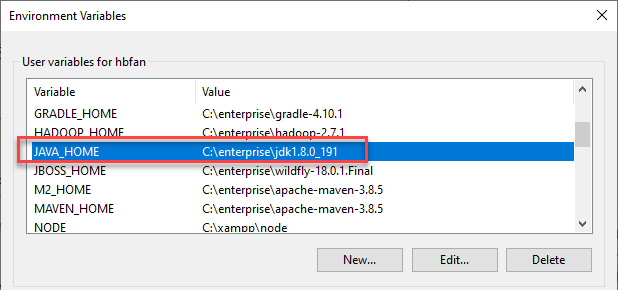
- Create a user environment variable named
JAVA_HOMEwith valueC:\enterprise\jdk1.8.0_191or%ENTERPRISE%\jdk1.8.0_191, andJRE_HOMEwith valueC:\enterprise\jdk1.8.0_191\jre. Then add%JRE_HOME%\binand%JAVA_HOME%\binto user’s Path variable.
- Open a new cmd console, check Java JRE version by the following command.
java -version
The output should be like the following.
java version "1.8.0_191"
Java(TM) SE Runtime Environment (build 1.8.0_191-b12)
Java HotSpot(TM) 64-Bit Server VM (build 25.191-b12, mixed mode)
The following command returns the path of the jre program java.exe.
where java.exe
The following commands return the information and path of the Java compiler javac.exe program.
javac -version
where javac
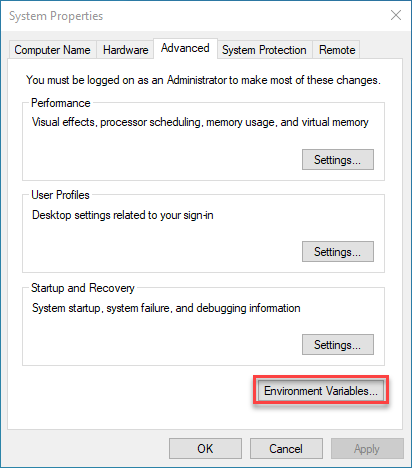
If the above commands do not return proper information of your Java installation, you need to check the user’s and system’s environment Path variables, remove other Java paths if there are. Make sure you click OK to save the settings, and open a new cmd console to test the changes.
Apache ANT and Maven
Apache ANT
Apache Ant is a basic software tool for automating Java software build processes. It works like the UNIX make build tool, but for building Java projects.
- You can download apache-ant-1.10.1 and unzip it to the
C:\enterprisedirectory. You can also download it from Ant's official site. - Add user environment variable
ANT_HOMEpointing to the Ant home directory, likeC:\enterprise\apache-ant-1.10.1, and%ANT_HOME%\binto the Path environment variable. - Open and a command console, input following command.
ant -versionThe output is like the following if Apatche Ant is installed and configured properly.
Apache Ant(TM) version 1.10.1 compiled on February 2 2017
Apache Maven
Apache Maven (Maven in short) is a widely used open source build tool for Java projects. It has the major features for resovling dependency and for developing and deplolying EC projects. We will use Maven for our course work projects.
- Download, save and extract maven-3.8.5 to
C:/enterprisedirectory. - Add user environment variable
MAVEN_HOMEandM2_HOMEboth pointing to Maven’s home directory, likeC:\enterprise\apache-maven-3.8.5and add%MAVEN_HOME%\binto the Path variable. You may wonder why we need define bothMAVEN_HOMEandM2_HOMEin environmental variables. Well, some applications useMAVEN_HOME, some others useM2_HOME. For example, Eclipse's Maven plug-in needsM2_HOMEto access Maven programs. - Open a cmd console, type the following command.
mvn -version
The output looks like the following if Maven is properly installed and configured.
Apache Maven 3.8.5 (3599d3414f046de2324203b78ddcf9b5e4388aa0)
Maven home: C:\enterprise\apache-maven-3.8.5
Java version: 1.8.0_191, vendor: Oracle Corporation, runtime: C:\enterprise\jdk1.8.0_191\jre
Default locale: en_CA, platform encoding: Cp1252
OS name: "windows 10", version: "10.0", arch: "amd64", family: "windows"
Take a screen shot to show that you installed Maven properly.
By default Maven set C:/users/your_username/.m2/repository as local repository directory. Check C:\enterprise\apache-maven-3.8.5\conf\settings.xml for localRepository.
Eclipse JEE
We will use the Eclipse-JEE (2020-03) (Eclipse Java Enterprise Edition) as the default project development IDE in this course. Eclipse-JEE comes with many plug-ins for enterprise application development.
Note that Eclipse JEE is well establised IDE for Java EE project. However, since we will use Maven as the default build tool for our project, you can use any IDE or editor to write and code, and command line to test and build code. If you choose use other IDE, such VS Code, you can just say and demonstrate with your IDE.
Installing Eclipse JEE
- Download, save and extract Eclipse-JEE (2020-03) to
C:/enterprisedirectory, then you have theeclipse.exein theC:/enterprise/eclipsedirectory. You can also download it from Eclipse download site. Note that Version 2020-03 is the last release with default Java 1.8. Later version of Eclipse-JEE uses Java 11 as default, if you use the later version, you need to set java version to 1.8 in the eclipse.ini
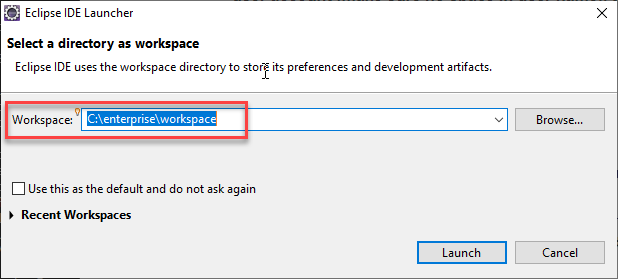
- Start Eclipse by clicking the
C:/enterprise/eclipse/eclipse.exe. Set Eclipse workspace at start by typingC:/enterprise/workspace. We will use this workspace for our course work projects.
Testing Eclipse with Java Project
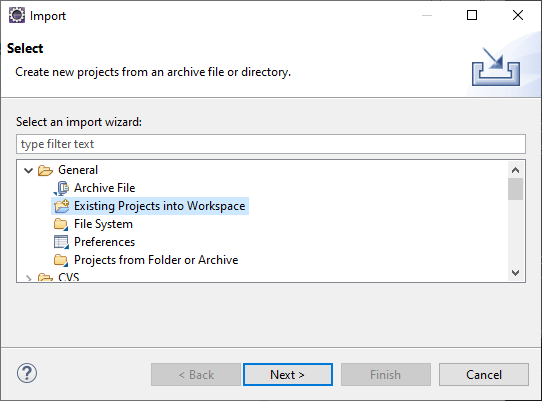
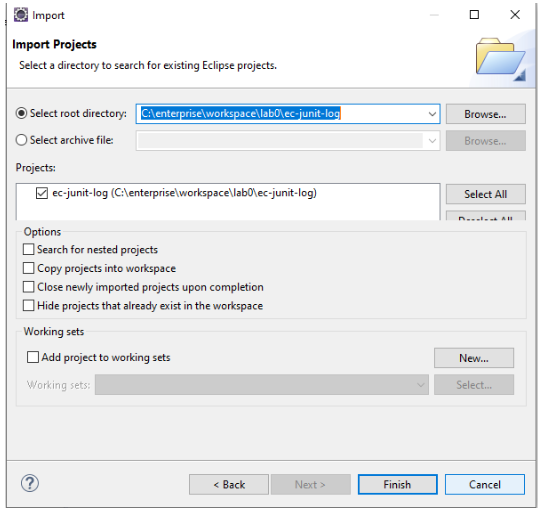
- Import ec-junit-log to Eclipse as existing general project.
Eclipse: Click File > Import > General, Existing Projects into Workspace, Next > Browse, Select root directory, browse to the ec-junit-log folder > Finish.
- Click to open the README.md file in ec-junit-log. Follow the instructions in README.md to explore the project.Figure 7 shows the project in Eclipse after importing.
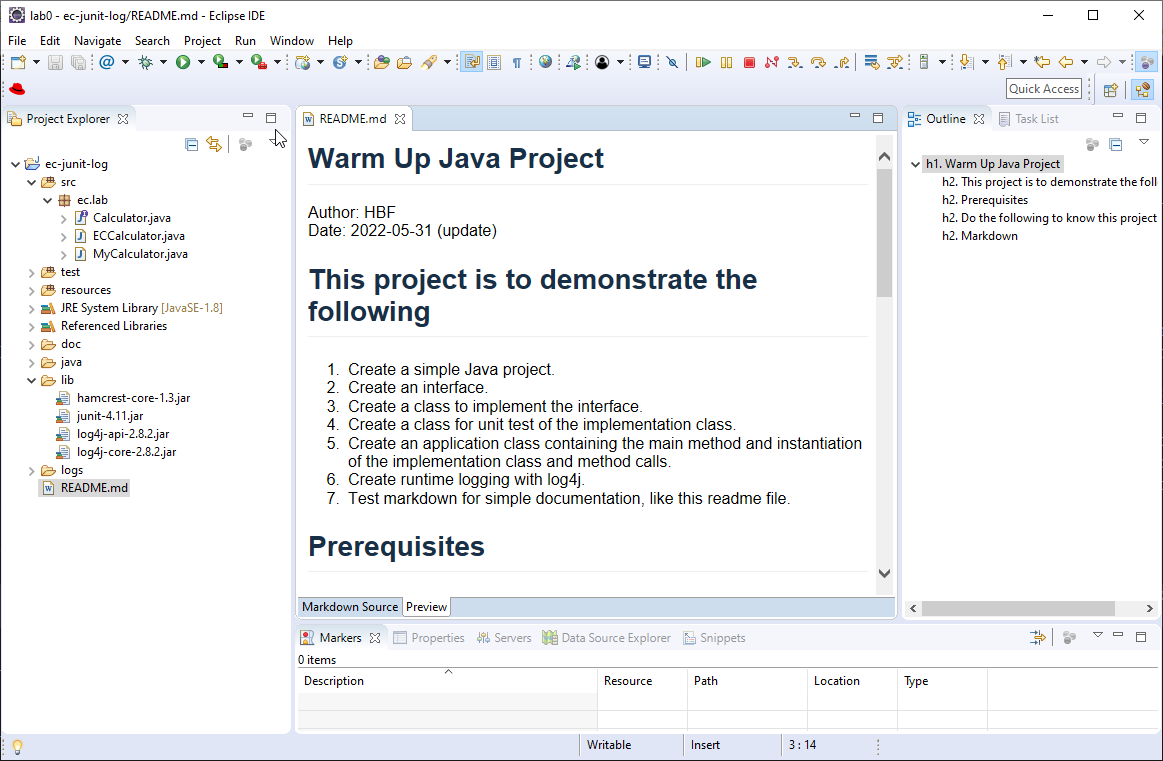
Note that this project is to warm up with Java interface and implementation, JUnit test, running Java application, exporting and executing runnable jar package. It also warms up for logging, and writing README.md document in markdown.
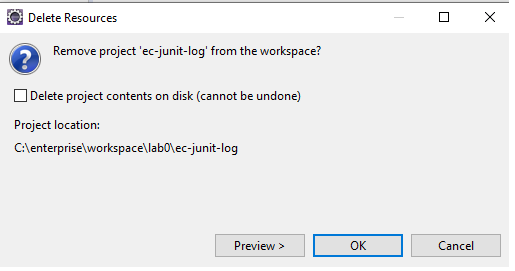
- Delete ec-junit-log from Eclipse: File > Delete. Do not check “Delete project content on disk”, otherwise it will delete the project directory
ec-junit-log.
Testing Eclipse with Java Ant Project
- Import ec-junit-log-ant to Eclipse as general existing project. This is an Ant project. Follow the instructions in README.md to explore the project.
- Delete ec-junit-log-ant from Eclipse.
Warm up Maven projects
This task is to warm up with the Maven built tool. We will mostly use Maven to build our Java based enterprise computing projects.
A Maven project is defined by the so-called Project Object Model (POM) file. It is an XML file containing information about the project and configuration details used by Maven to build the project. Using Maven commands, we can compile, test, and build Java package.
ec-junit-log-mvn
ec-junit-log-mvn project is a Maven version of the previous ec-junit-log project.
- Open and read pom.xml to see the XML elements it contains. Particularly, it uses
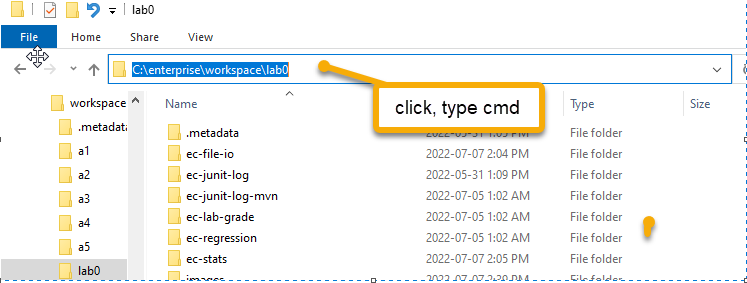
<maven-assembly-plugin>to build the final executable jar (or fat jar) that contains all dependencies. - Open a cmd console, change directory (cd) to the
ec-junit-log-mvndirectory. This can be down simply through file explore by clicking and typingcmdin the path region.
Use Windows command tree /F to see the directory structure of the project.
C:\enterprise\workspace\lab0\ec-junit-log-mvn>tree /F
Folder PATH listing for volume Windows
Volume serial number is 62F7-4D99
C:.
│   pom.xml
│   README.md
│
└───src
    ├───main
    │   ├───java
    │   │   └───ec
    │   │       └───lab
    │   │           │   Calculator.java
    │   │           │   ECCalculator.java
    │   │           │   MyCalculator.java
    │   │           │
    │   │           └───log4j2
    │   │                   Log4j2Example0.java
    │   │                   Log4j2Example1.java
    │   │                   Log4j2Example2.java
    │   │                   Log4j2Example3.java
    │   │
    │   └───resources
    │           configuration.xml
    │           log4j2.xml
    │
    └───test
        ├───java
        │   └───ec
        │       └───lab
        │               CalTest.java
        │
        └───resources
This is a typical directory structure of Maven projects. Java programs are organized in packages. In this project, the ec subdirectory under src/main/java directory is the specific source code packaging structure of this project. Maven uses <sourceDirectory>src/main/java</sourceDirectory> as default configuration to specifiy the source code directory. Alternatively, we can change the <sourceDirectory> setting if the source code is different directory. For example, if the ec directory is directly under the src directory, then we can configure it by adding <sourceDirectory>src</sourceDirectory> or adding <sources><source>src/main/generated</source></sources> in the build element.
The resource files and configuration files are under the src/main/resources directory by default. Files and directories under the resources directory will be copied to the root of built package. The the resource directory can also be configured by <resources><resource><directory>new_resoruce_directory</directory></resource></resources>
- Open the
README.mdby a simple text editor, e.g., NotePad++. Follow the instructions in README.md to explore the project.
This example shows the directory structure of a Maven project. Maven command can be applied through Eclipse and command console. Command console commands are mostly use practical situation for building and deploying applications. The biggest advantages of using Maven is that we don’t need to get and add the dependent jar files manually. Instead, we add the dependencies in the POM file, the Maven tool will then get the dependencies to from remote repositories to local repositories, so that the project can use the libraries from the local repositories.
Take one screen shot to indicate you can build Java project using Maven commands, e.g. mvn package
Create Maven project by command line
Next let’s create a simple Maven project named ec-lab-grade through command prompt. If you encounter issues, you can check ec-lab-grade directory in the sample of lab0 submission package for trouble shotting.
- Open a cmd console, cd to directory the lab0 directory, e.g.
C:\enterprise\workspace\lab0then run the following command.
mvn archetype:generate -DgroupId=ec.lab -DartifactId=ec-lab-grade -DarchetypeArtifactId=maven-archetype-quickstart -DarchetypeVersion=1.4 -DinteractiveMode=false
This will create a dummy Maven project of architype maven-archetype-quickstart with groudID=ec.lab and artifactId=ec-lab-grade under directory ec-lab-grade. Open ec-lab-grade\pom.xml in an editor to see the content of the pom.xml file.
Note that we will use ec.asgmt as groupId for all assignment Maven projects.
Use the following commands to check the directory and file structure of the project.
cd ec-lab-grade
tree /F
Run the following Maven commands to test, package, and run.
mvn test
mvn package
java -cp target/ec-lab-grade-1.0-SNAPSHOT.jar ec.lab.App
mvn clean install
Note that the last command mvn clean install will clean the target directory, compile and package and put the package jar to local repo under directory ec/lab/ec-lab-grade.
- Modify the pom.xml by updating
element as follows.
<dependencies>
    <dependency>
        <groupId>junit</groupId>
        <artifactId>junit</artifactId>
        <version>4.13.2</version>
        <scope>test</scope>
    </dependency>
    <dependency>
        <groupId>org.apache.logging.log4j</groupId>
        <artifactId>log4j-api</artifactId>
        <version>2.13.0</version>
    </dependency>
    <dependency>
        <groupId>org.apache.logging.log4j</groupId>
        <artifactId>log4j-core</artifactId>
        <version>2.13.0</version>
    </dependency>
</dependencies>
Insert the following elements into the end of the <build> element. This building method creates a light executable jar, which does not contains the dependencies, instead it put the dependency jars in target/lib directory, and add class-path to MANIFEST.MF.
<finalName>${project.artifactId}</finalName>
<plugins>
    <plugin>
        <groupId>org.apache.maven.plugins</groupId>
        <artifactId>maven-jar-plugin</artifactId>
        <configuration>
            <archive>
                <manifest>
                    <addClasspath>true</addClasspath>
                    <classpathPrefix>libs/</classpathPrefix>
                    <mainClass>ec.lab.App</mainClass>
                </manifest>
            </archive>
        </configuration>
    </plugin>
</plugins>
The
mvn clean package
java -jar target/ec-lab-grade.jar
You can still run the jar program by command java -cp target/ec-lab-grade.jar ec.lab.App
- Create and add the following Java programs to directory
ec-lab-grade\src\main\java\ec\lab
Grade.java
package ec.lab;

public interface Grade {
    public String getGrade(float grade);
    public String predictPass(float grade);
}
ECGrade.java
package ec.lab;

public class ECGrade implements Grade {
    public String getGrade(float grade) {
        String result = "F";
        if (grade >= 90.00) result = "A+";
        else if (grade >= 85.00) result = "A";
        else if (grade >= 80.00) result = "A-";
        else if (grade >= 77.00) result = "B+";
        else if (grade >= 73.00) result = "B";
        else if (grade >= 70.00) result = "B-";
        return result;
    }

    public String predictPass(float grade) {
        if (grade >= 70.00) return "pass";
        else return "fail";
    }
}
MyGrade.java
package ec.lab;

public class MyGrade
{
    public static void main( String[] args )
    {
        Grade grade = new ECGrade();
        System.out.println(grade.getGrade(92));
        System.out.println(grade.getGrade(88));
        System.out.println(grade.getGrade(83));
        System.out.println(grade.getGrade(78));
        System.out.println(grade.getGrade(75));
        System.out.println(grade.getGrade(72));
        System.out.println(grade.getGrade(69));
        System.out.println(grade.predictPass(69));
        System.out.println(grade.predictPass(70));
    }
}
Run the following commands to build and run the Java program.
mvn clean package
java -cp target/ec-lab-grade.jar ec.lab.MyGrade
- Create and add the following JUnit test program to directory
ec-lab-grade\src\test\java\ec\lab
GradeTest.java
package ec.lab;

import static org.junit.Assert.*;
import org.junit.After;
import org.junit.Before;
import org.junit.BeforeClass;
import org.junit.Ignore;
import org.junit.Test;
import ec.lab.Grade;

public class GradeTest {

    private static Grade grade;

    @BeforeClass
    public static void initCalculator() {
        grade = new ECGrade();
    }

    @Before
    public void beforeEachTest() {
        System.out.println("This is executed before each Test");
    }

    @After
    public void afterEachTest() {
        System.out.println("This is executed after each Test");
    }

    @Test
    public void testGetGrade() {
        assertEquals("A+", grade.getGrade(95));
        assertEquals("A", grade.getGrade(89));
        assertEquals("A-", grade.getGrade(84));
        assertEquals("B+", grade.getGrade(79));
        assertEquals("B", grade.getGrade(76));
        assertEquals("F", grade.getGrade(65));
    }

    @Test
    public void testPredictPass() {
        assertEquals("pass", grade.predictPass(71));
        assertEquals("fail", grade.predictPass(69));
    }
}
Run the following Maven command to test the Grade class.
mvn test
- Change the
element value to ec.lab.MyGrade in the pom.xml, then run the following.
mvn clean package -DskipTests
java -jar target/ec-lab-grade.jar
Take a screen shot of screen output of the above Java program execution.
- It is required to submit the
ec-lab-gradefolder in the lab0 submission package. Run Maven command ‘mvn clean’ to clean the generated target directory to minimize the size of submission package.
Maven project in Eclipse
We can create and develop Maven project by command line operations and simple text editors. We can also use programming IDEs such as Eclipse, IntelliJ, NetBeans, VS Code to develop Java projects with Maven.
We will use Eclipse IDE. Next we import existing Maven project ec-lab-grade to Eclipse.
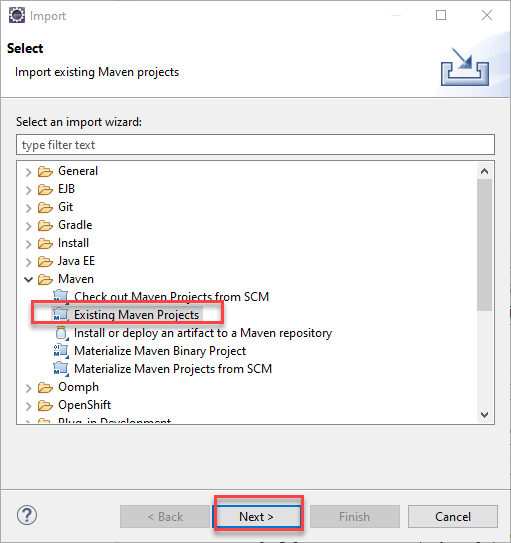
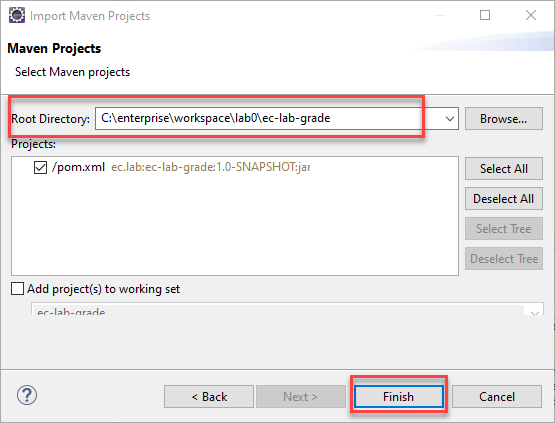
Eclipse File > Import > Maven > Existing Maven Projects, Next > Browser to the ec-lab-grade project folder, Finish.
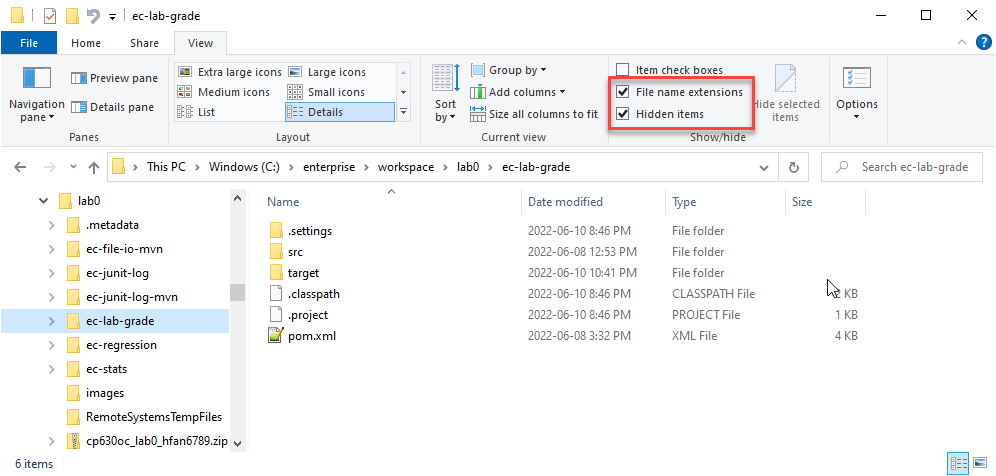
Note that the importing will not copy lab0/ec-lab-grade to the Eclipse workspace directory. Eclipse uses lab0/ec-lab-grade as the project directory, and add additional directory .settings and files .classpath, .project to the ec-lab-grade directory. These are hidden items. To show the hidden items, we can set the file explore view to show hidden items and extensions. Then we can use NotePad++ to view .classpath, .project files, and files under .settings.
After importing into Eclipse, we can update the project by right clicking the project > Maven > Update Project.
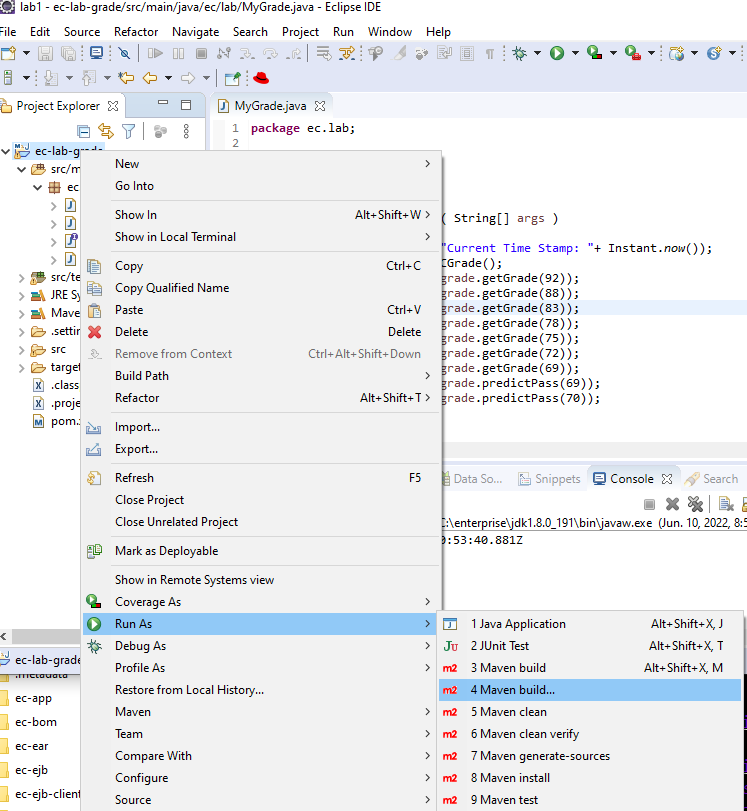
We can run some Maven commands by provided menus options. Right click ec-lab-grade > Run As > select a Maven operation.
If the Maven Build … is selected, we can further set specific goals, e.g., clean package.

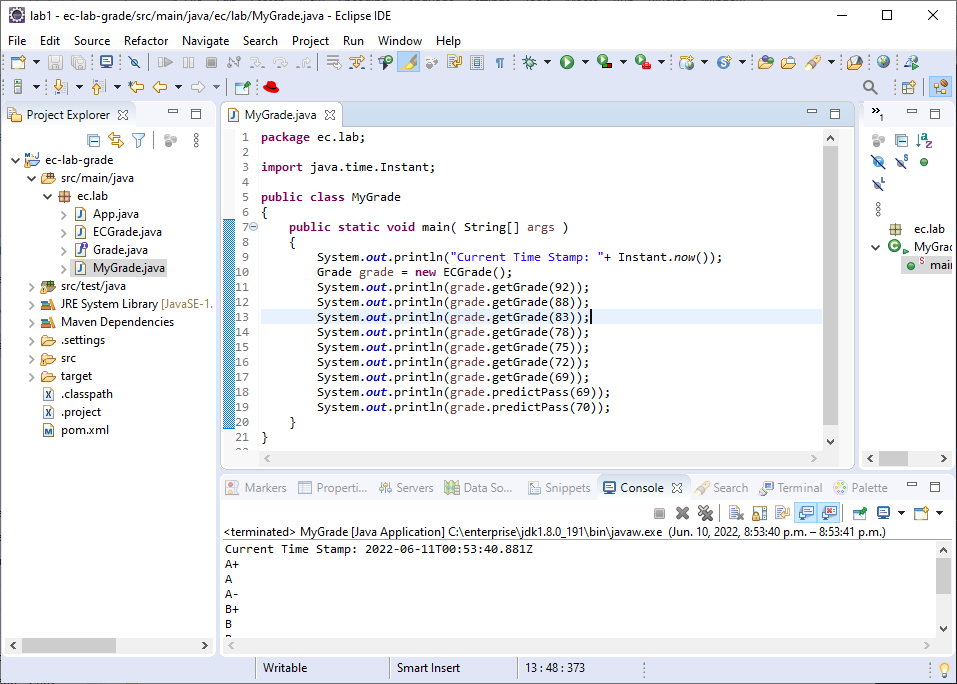
Once we have the Maven project compiled, namely after running goals like compile, test, install, or package. We can run MyGrade.java by right click the opened MyGrade.java > Run As > Java Application. The output will be shown in the console tab, see Figure 12.
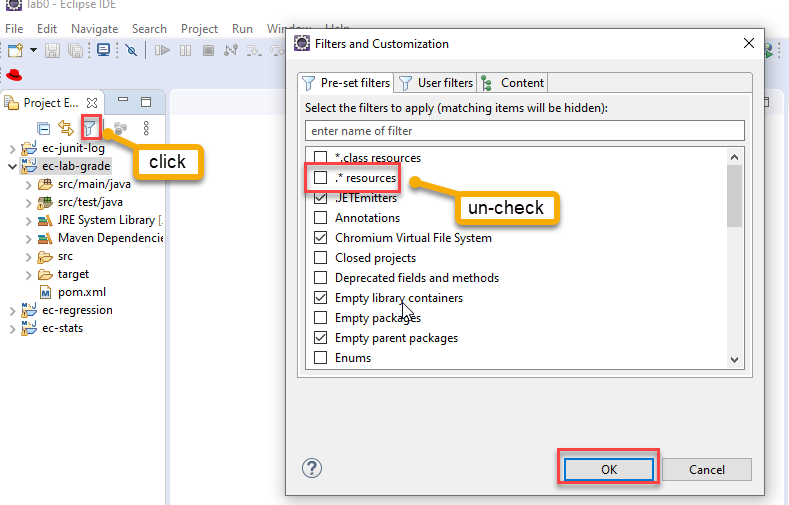
Note that by default, Eclipse does not show hidden items. We can set the filter to show the hidden items, see Figure 16.
We can delete the ec-lab-grade from Eclipse by right clicking ec-lab-grade > Delete, OK. Further more, we can delete .setting, .classpath, .project from directory ec-lab-grade if we want to return to the original pure Maven project.
Also note that, we can develop Maven projects using Eclipse or some other IDE, so it is upon your preference what IDE to use for the future projects.
ec-file-io
ec-file-io is a Maven project, it provides some examples of file I/O, particularly object stream I/O.
- Import ec-file-io to Eclipse as existing Maven project.
- Read the pom.xml file.
- Read the README.md file and explore the project accordingly.
ec-stats
ec-stats is an Maven project containing example programs to use the Apache math.stat library to do statistics computing. Suppose you are to create a component to do mathematics and statistics computing, you can try to use this library.
- Import ec-stats to Eclipse as existing Maven project.
- Read the pom.xml file. It does not configured to build executable jar. However, we can run the Java programs within Eclipse.
- Read the README.md file and follow the instructions in README.md to explore the project.
Note that it contains example programs of computing descriptive statistics, as well as simple and multi-linear regressions. These are fundamental data processing tasks. Practically, we can use Apache math.stat library to solve the stats computing problems. However, sometimes we need to write our own code to implement algorithms to meet specific requirements.
ec-regression
ec-regression is a Maven project, demonstrates how to use Apache math.stat library to compute multi-linear regression model for house price and prediction. Follow the instructions in README.md to explore the project. We will use stats and linear regressions and as basic data processing operations in lab tasks and assignment questions.
- Import ec-regression to Eclipse as existing Maven project.
- Read the pom.xml file. Note that it uses maven-shade-plugin to build an executable fat jar.
- Read the README.md file and follow the instructions in README.md to explore the project.
ec-annotation-reflection
ec-annotation-reflection (Download by right clicking ->Save link as -> Save to thlab0 folder) project demonstrates the usage of Java reflection to access Java object class, fields, method and runtime, as well as defining custom annotations, applying custom annotatons, and accessing custom annoations by reflection. The include the REAMDE.md gives the concepts of reflection and annotaton and steps of testing the provided code examples.
- Import ec-reflection-annotation to Eclipse: Eclipse -> Import -> General -> Existing Projects into Workspace, Next -> Check Select archive file, Browse to the above download zip, Finish. Alternative, you can unzip it by right clicking the zip file -> 7-Zip -> Extract to "ec-annotaton-reflection", then import it into Eclipse as existing Maven project.
- Read the README.md file and follow the instructions in README.md to explore the project.
References
- Maven features
- About Maven repositories
- Maven Dependency Mechanism
- Java Logging Frameworks: : log4j vs logback vs log4j2
- Git document
- Sign the
readme.txtfile by filling in your Name, ID, and do the self-evaluation for each grading item. - Write lab report by adding necessary information to the
lab0_report.md. Then convertlab0_report.mdtolab0_report.htmlby command:pandoc -i lab0_report.md -o lab0_report.html
Make sure thatlab0_report.htmlshows the screen shot images.
- Select required folders and files in lab0 folder to create a zip file, and rename it to
lab0.zip. The zip file should contain the following files and folders.readme.txt ec-lab-grade (project folder) lab0_report.md lab0_report.html images (folder)
- Submit the
lab0.zipto lab0 dropbox on MyLS.
Note: to minimize submission package size, clean the project before adding it to the submission package. For example, you can run mvn clean to clean a Maven project.
How a lab submission is graded by maker? 1. download and unpackage the submission, 2. open the report in browser and check readme on signature and self-evaluation, 3. check the statement and screnshots of to verify the self-evaluations, 4.prepare, grade and release the marking report. Report is a very important document. A well-presented, clear and conconving report makes it efficient to verify and grade your work.
End