Introduction
This document refers to Eclipse 2023-03 for Windows, the most current version as of this writing. Note that different computer set ups and themes may mean that the screen shots in this document may not match exactly your computer system. In particular, the Mac version of Eclipse looks different, although it has the same functionality as the Windows version.
This is a short tutorial on using Pylint with Eclipse/PyDev.
As noted on the Pylint Project home page:
Pylint analyses your code without actually running it. It checks for errors, enforces a coding standard, looks for code smells, and can make suggestions about how the code could be refactored.
Using Pylint in our courses is not required, but you may find using it to be very useful.
Installing Pylint
Pylint is most easily installed into Eclipse with pip Python's package installer. This can be done from inside Eclipse.
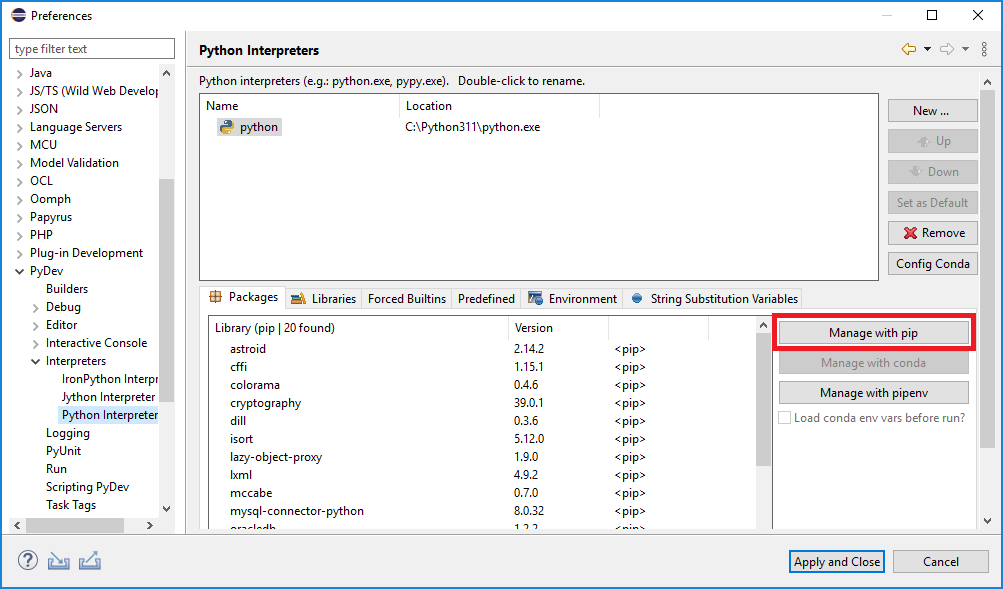
From Eclipse's main menu, choose Window | Eclipse / Preferences / PyDev / Interpreters / Python Interpreter, as in the following figure:
Press . This brings up the Manage pip dialog:
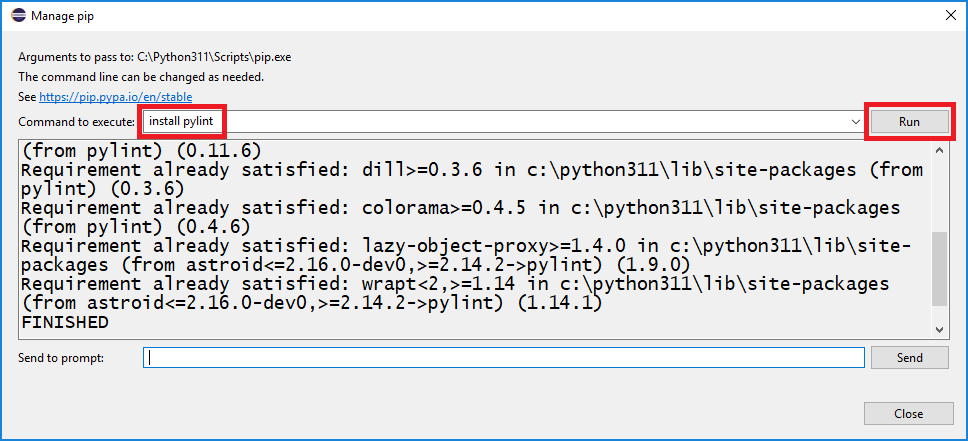
In the Command to execute: text area, enter the command install pylint , then press . Assuming no problems you should see messages similar to those shown in the Figure above. Press .
The next step is to enable Pylint for the workspace. From Eclipse's main menu, choose Window | Eclipse / Preferences / PyDev / Editor / Code Analysis / Pylint, as in the following figure:
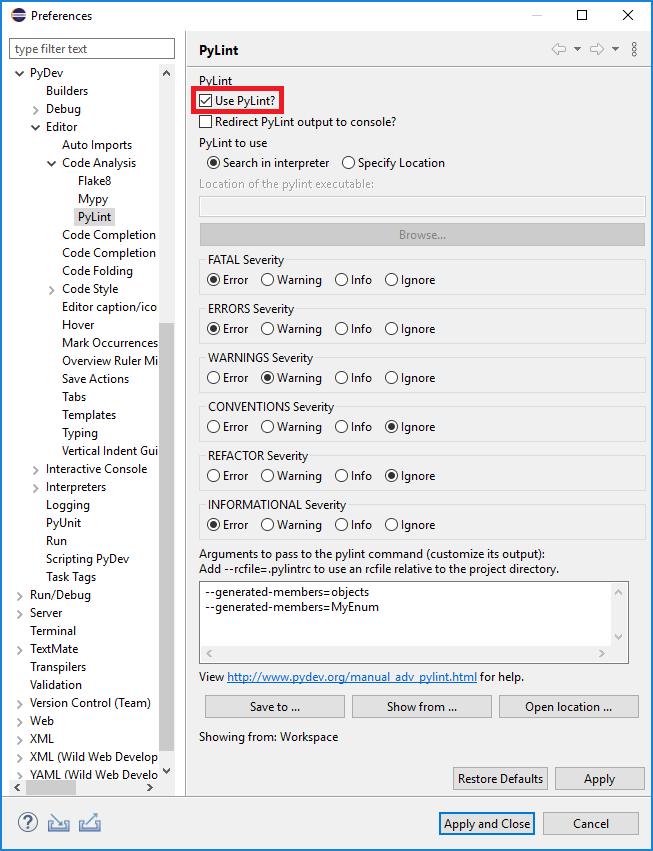
Enable the Use Pylint? checkbox, then press
This same dialog is used to customize whether or not various types of Pylint messages are displayed as errors, warnings, information, or ignored.
Using Pylint
The following Figure shows error messages and warnings for a sample chunk of code when Pylint is not enabled. These error/warning dialogs appear when you position your cursor over the line (line 11) underlined in red:
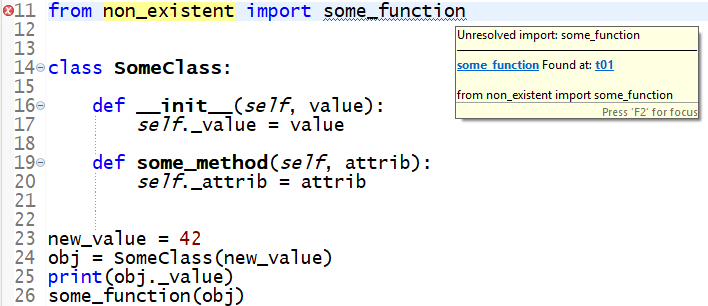
The message in the yellow pop-up dialog box is telling you that Python
cannot import the function some_function.
The following Figure shows error messages and warnings for the same sample chunk of code when Pylint is enabled. Errors are underlined in red, warnings in yellow:
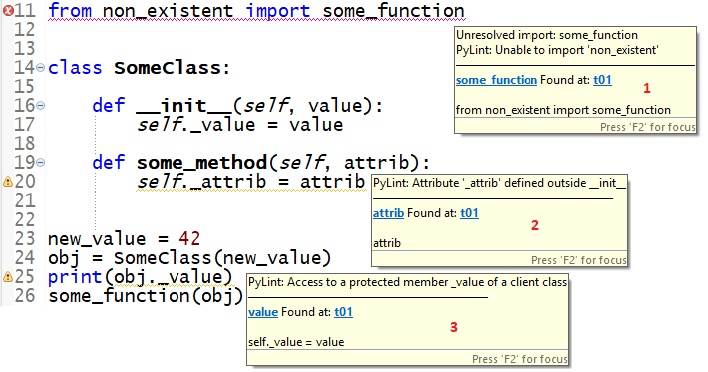
(Note that since you can only point your cursor at one line at a time, Eclipse cannot show you multiple error/warning dialogs at one time. This diagram shows multiple dialogs only for display purposes - you will never actually see this in Eclipse.)
The numbered dialogs are:
- shows the same message as in the previous Figure, but adds the
Pylint information
Unable to import 'non-existent'
. Given that the modulenon_existentis, indeed, non-existent, this error makes clear whysome_functioncannot be imported. - warns that the class attribute
_attribis being initialized outside of the class constructor (the method__init__). Initializing an object attribute this way is not an error, but it is bad practice and should be avoided, thus the Pylint warning. - warns that code defined outside a class is accessing a
protected class attribute. Because the attribute (
_value) is named with a leading_(underscore), Pylint understands that we intend the attribute to be private. If this were testing code we could ignore the warning, but if this were production code we should definitely fix this.
The following figure shows how these error/warning messages are repeated in the Problems tab:

Each of the entries in the Problems tab repeats the message shown in the related error/warning dialog as well as listing the type and location of the line associated with the error/warning. Double-clicking on a error/warning line opens the associated module and highlights the code with the problem.
Pylint messages can also be written out to an external file for later examination, but that is beyond the scope of this tutorial.
Pylint Messages
Pylint has dozens of messages of various types:
- Fatal
- A module cannot be analyzed by Pylint; for example, the module doesn't exist. This is not an issue when Pylint is used within an IDE such as Eclipse.
- Error
- Your code will fail to execute properly. Example: an unresolved import.
- Warning
- Your code may, or may not, fail to execute properly. Example: accessing a private attribute outside of the class it is defined in.
- Convention
- Your code may not match Python programming standards. Example: Formatting a regular string which could be a f-string.
- Refactor
- Pylint suggests a way to rewrite your code that is simpler or more efficient.
- Information
- Information about Pylint processing. This is not an issue when Pylint is used within an IDE such as Eclipse.
Pylink messages are listed by type at: Messages
Pylint messages can be suppressed for an entire module by adding Pylint comments to the top of a module, immediately after the documentation. Messages can be identified by either code or description. For example, the following Pylint comments:
# pylint: disable=bad-indentation
# pylint: disable=W0311
disable the same message: a warning that the module contains code that is badly indented. (This is not a warning that should be disabled!)
Pylint messages can also be disabled on individual lines, but that is beyond the scope of this tutorial.
Resources
- https://pypi.org/project/pylint/
- The Pylint project home page.
- https://pylint.readthedocs.io/en/latest/user_guide/messages/
- Pylint Messages.
- http://www.python.org/dev/peps/pep-0008/
- A style guide for Python code.
- http://wiki.python.org/moin/
- The Python wiki.