Introduction
This document refers to Eclipse 2021 for Windows, the most current version as of this writing. Note that different computer set ups and themes may mean that the screen shots in this document may not match exactly your computer system. In particular, the Mac version of Eclipse looks different, although it has the same functionality as the Windows version.
Note: Installation instructions for a specific operation system are boxed
and preceded by the following icons:
This is a short primer on using Eclipse / PyDev (Python Development Environment) on Laurier's network.
Eclipse organizes your work into workspaces and projects. A workspace may contain many projects, and a project may contain many modules and/or files. The Eclipse organization hierarchy looks like this:
In CP104 you should have one workspace for the course. All programs must
be created as Eclipse projects. Each workspace and project represents a
folder in your operating system's file system. A project contains one or
more .py Python source code files, and may contain other
types of files as required. A project can be saved as a .zip
(zip-encoded) file for submission or for moving to another computer. A
project typically represents a lab or an assignment.
Installing Eclipse
Please see CP104 Software Installation.
The Eclipse Main Window
The Eclipse main window is generally displayed with four sections:
- the Menu Bar
- the Package Explorer pane
- the Editing pane
- the Console pane
The Menu Bar
The menu bar contains the Eclipse main menu as well as various icons that act as alternatives to menu commands. Although this primer uses only menu options in its examples you may use any icons or keyboard shortcuts that you are comfortable with. In this primer menu commands are shown in italics with a '/' between the menu levels, as in the example: File / Save.

The Package Explorer Pane
The Package Explorer lists all projects in the current workspace and the
contents of open projects. The example shows that the workspace contains
various projects, all but one of them closed. The open barn4520_a01
project contains a src (source) folder with four .py
source code files and a text file named testing.txt .
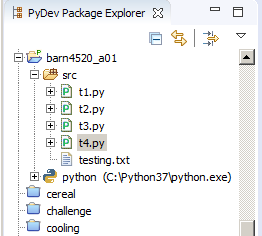
Use the Package Explorer to open, close, and export projects, add and delete files, and execute programs.
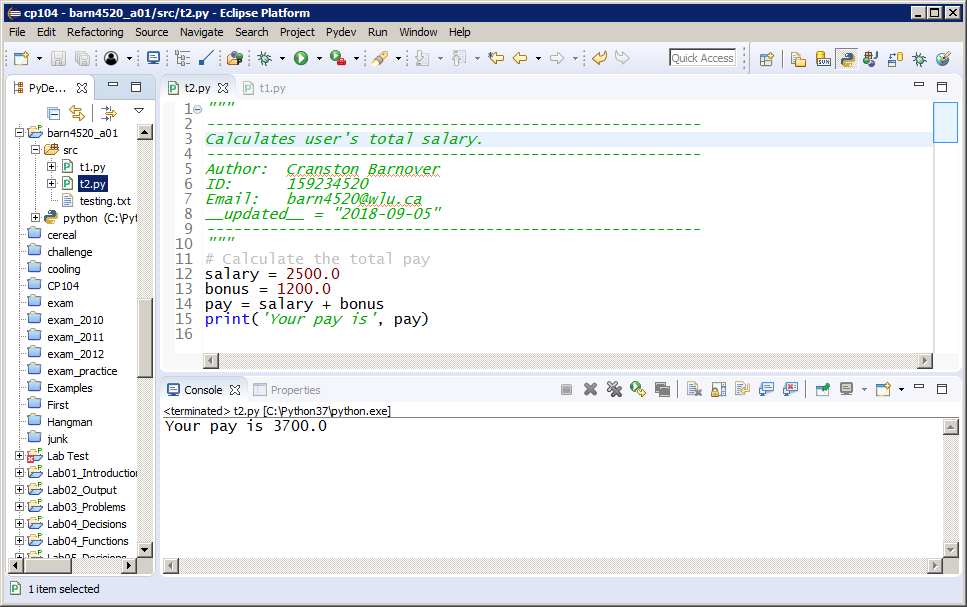
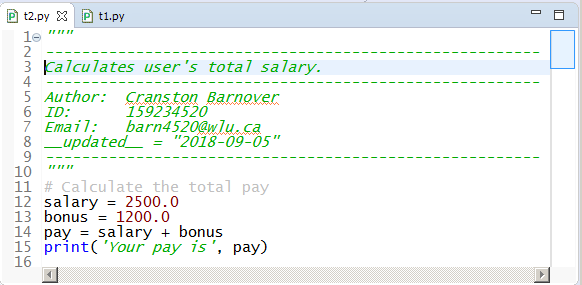
The Editor Pane
Use the Editor pane to edit multiple source code files, although only
one file is visible at a time. In the example the file t2.py
is open in the editor. The editor allows typical editing functions
(input, deletion, searching, replacing, etc.) as well as code formatting
and code completion. Different parts of the code are displayed
differently depending on their purpose. This helps you write and debug
code. In this example Python keywords are in blue, text in green,
variables in black, and numeric values in red. Line numbering helps you
locate execution errors.
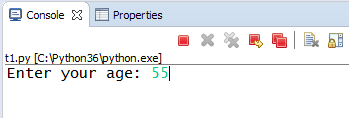
The Console Pane
Python programs with only text input/output can be run in the Console
pane. The Console pane allows you to enter values, copy output, or
terminate the running program. The Console pane also displays messages
caused by execution errors. The example shows that the user has entered
a value of 500 in response to the program's prompt for the
size of a tract of land. Note that the input is in green to distinguish
it from the program output. Error messages are displayed in red.
The square red icon at the top centre of the Console pane is the Terminate button. If a programs does not end normally, use this button to cancel its execution. Failing to do so can leave multiple programs running under Eclipse. Leaving too many of these programs running degrades Eclipse's performance or even causes it to crash.
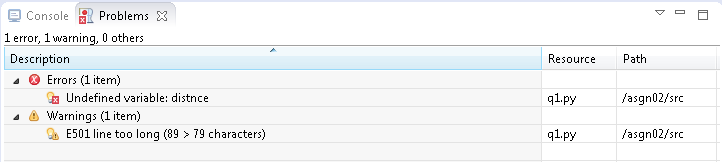
The Console pane may also contain a Problems tab. Warnings and errors in program syntax and compilation are displayed in the Problems tab. (The Problems tab is not initially displayed if there are no problems with the code being edited.) Double-clicking on an error or warning moves the cursor to the location of that warning or error in the Editor pane. This example shows that there is one error and one warning in the programs currently being edited.
The Eclipse main window can be customized and these various panes can be be dragged to different positions within the main window or even be hidden. If a section seems to be hidden you can display it by selecting Window / Show View from the main menu, or choose Reset Perspective to return the Eclipse screen setup to its default values.

Creating Projects
Creating a new PyDev project consists of a number of steps:
- Setting a Workspace
- Customizing a Template
- Creating a New PyDev Project
- Adding Source Code Files (PyDev Modules)
- Project Reference (Optional)
Setting a Workspace
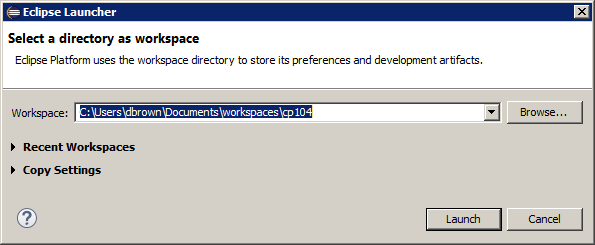
Before creating a new Eclipse project, make sure you are in the correct workspace. The first thing to do upon starting Eclipse is to change the workspace to your own folder, either on your own laptop or on a device such as a USB memory stick. Do not put a workspace on the local drive of a lab machine as it will be erased when the machine is rebooted. To set a workspace select File / Switch Workspace from the main menu. This brings up the Workspace Launcher dialog box:
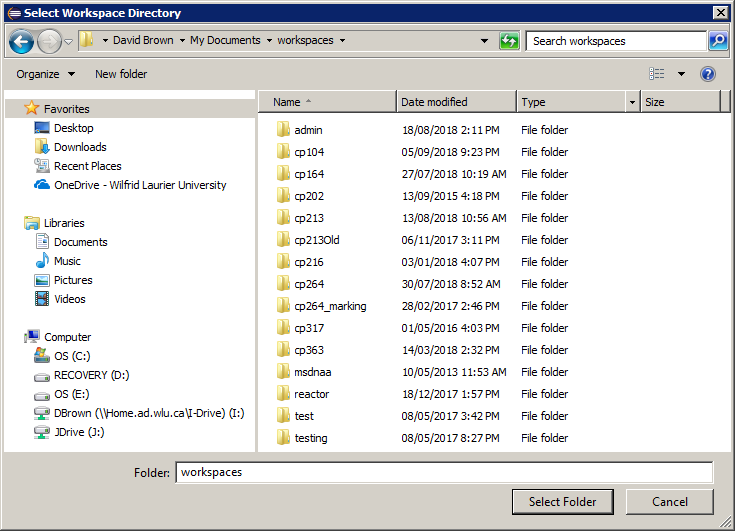
From here browse to your own workspace using the Select Workspace Directory dialog box:
If you do not yet have a workspace, create a new folder to use as your workspace. You may have multiple workspaces, but we recommend at one workspace per course that uses Eclipse. More than one workspace for a course is unnecessary.
The workspace should be configured to the CP104 coding standards. These standards can be installed from a preferences file. Right click on the following link to save this file to your Downloads folder:
cp104_prefs.epf
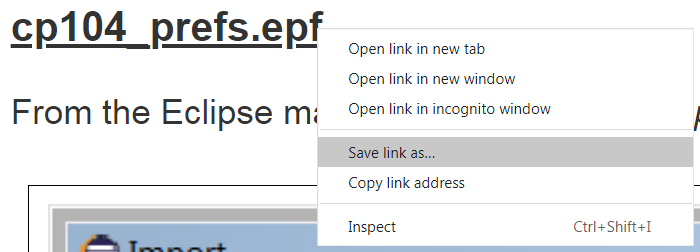
From the Eclipse main menu chose File / Import, and then select General / Preferences:
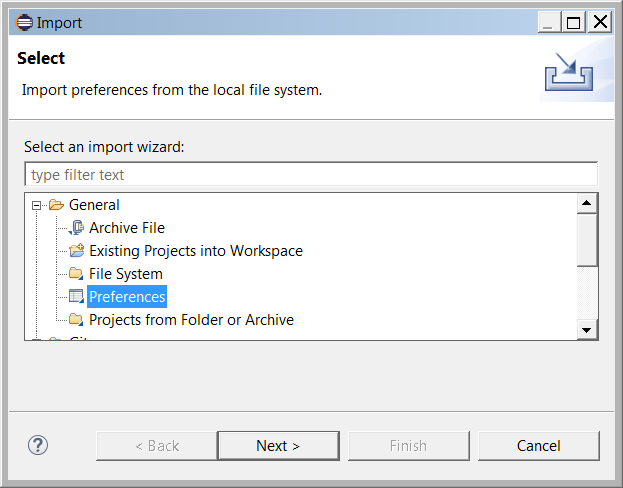
Press .
Select the cp104_prefs.epf you just downloaded:
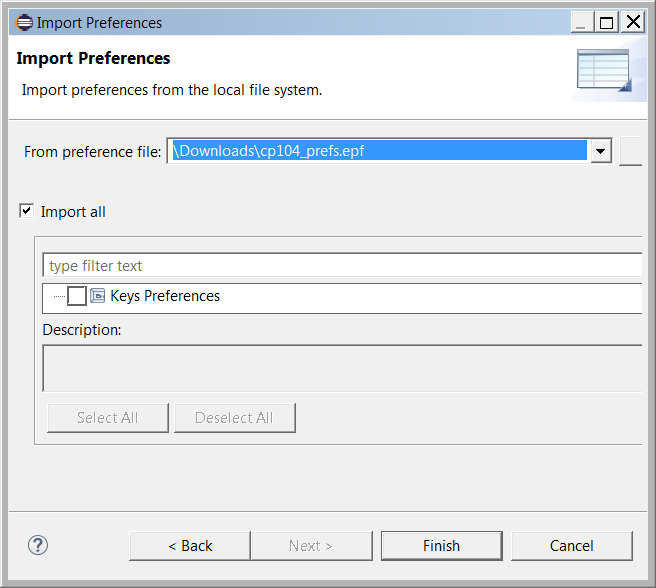
Press .
Eclipse asks you to restart:
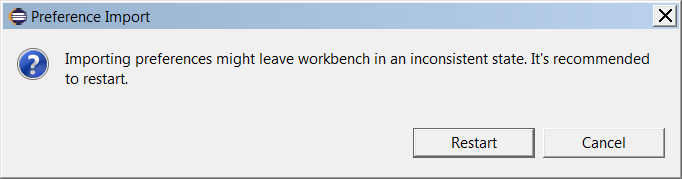
Press .
Customizing a Template
Eclipse can be set up to save you time by automatically creating default documentation whenever you create a new PyDev module. To set this documentation up with your own information, follow these steps:
-
From the Eclipse main menu choose:
Window / Preferences
Eclipse / Preferences
This brings up the Preferences dialog. In this dialog, choose PyDev / Editor / Templates:
Preferences Dialog 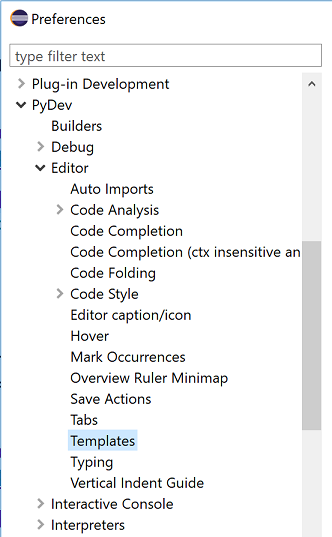
-
In the templates list you my either find an existing template or create a new one. (The <Empty> template is used by default whenever creating a new PyDev module.) Select to alter a template. This brings up the Edit Template dialog:
Edit Template Dialog 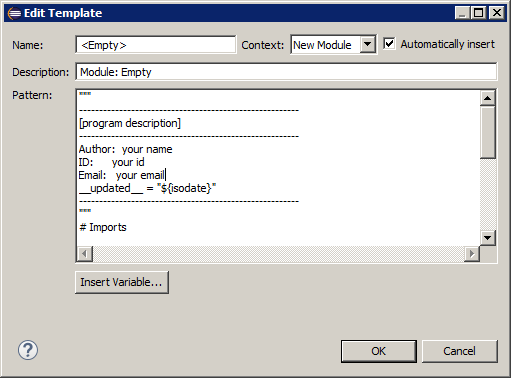
Replace the text
your name,your ID, andyour Laurier email addresswith the appropriate information. Press to save the changes. The file template.txt contains standard Laurier template code.
Creating a New PyDev Project
Once in your own workspace, create a new PyDev project by right-clicking in an empty area of your Package Explorer and choosing New / Project / PyDev Project from the pop-up menu. This brings up the PyDev Project dialog.
If PyDev does not show up as a project option, please follow the Installing PyDev Manually instructions in the Configuring PyDev document, then return to this tutorial.
If the Eclipse workspace has not yet been set up to work with a version of Python, you will see the warning Project interpreter not specified (outlined in red):
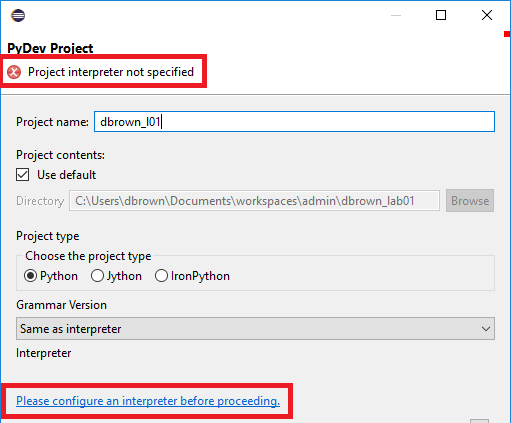
To specify the Python interpreter you will use in your workspace, click on the Please configure an interpreter before proceeding link. This brings up the Configure interpreter dialog:

Click on .
Macs come with Python 2.7 pre-installed. Make sure that you select the Python 3 that you installed earlier in the Eclipse install process.
If does not give you a list of
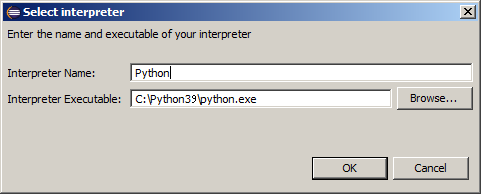
Python interpreters, then you must configure it by hand. Press , and in the Select
interpreter dialog name the interpreter (ex: Python)
and browse to the location of your python.exe file and
select it. (The Python interpreter should be located wherever you
installed Python on your system.) The following is an example of what
the selected name and interpreter may look like:
Depending on how many different versions of Python are installed on your computer, you must select one of them:
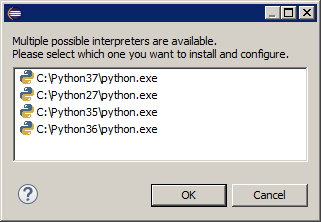
Choose a version of Python that is 3.0 or higher. Generally pick the most recent one.
This brings up the Selection needed dialog box:
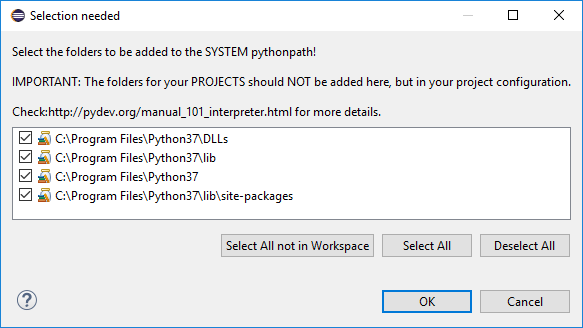
Simply click on until you get back to the PyDev Project dialog box.
Having set up the proper version of Python for your workspace, in the PyDev Project dialog:
- Enter the
Project name - Click on the
Create 'src' folderradio button
as shown below:
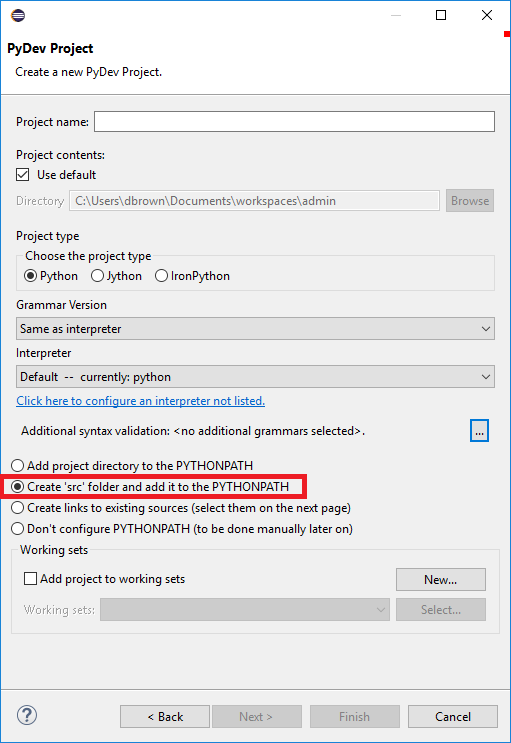
All other options can be left with their default values.
In this example, the project creates a new folder named barn4520_a02
and stores it in the cp104 workspace. (This workspace is
actually the E:\workspaces\cp104 folder.) The project
itself is stored in the folder E:\workspaces\cp104\barn4520_a02
; i.e. the folder name matches the workspace and project names. By
default the project creates a separate folder ( src ) for
source files. Click on .
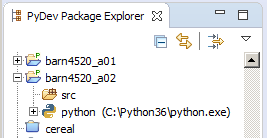
The project barn4520_a02 is now added to the Package
Explorer pane, and contains a src folder and a reference to
the Python interpreter (in this case the Python 3.6 interpreter). Put
your Python source code files (files that end in .py ) in
the src folder. The interpreter reference is a system
element and must be left alone.
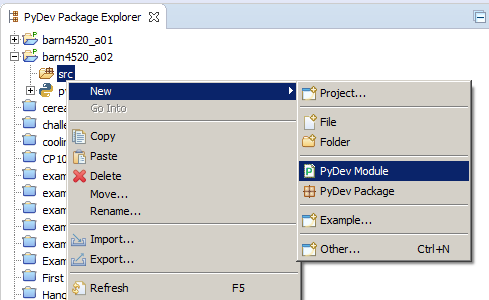
Adding Source Code Files (PyDev Modules)
Add source code files to the source code folder of a project by right
clicking on the src folder of your project in the Package
Explorer pane and selecting New / PyDev Module from the pop-up
menu:
This brings up the Create a new Python module dialog:
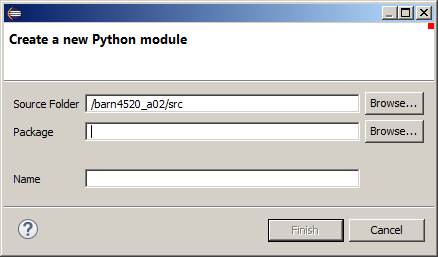
Give the module a name - do not enter .py as PyDev
adds that extension automatically to the module - and click on to continue. This
brings up the Template dialog:
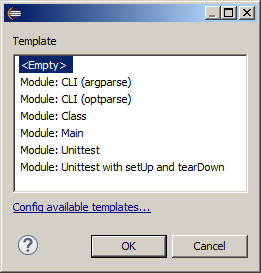
Select the appropriate template (in this example, <Empty>,
and click on . In this
example a file named t1.py is created in the src
folder of the someProject project.
The module is now added to the selected package in the Navigator pane and is opened in the Editor pane, as in this example:
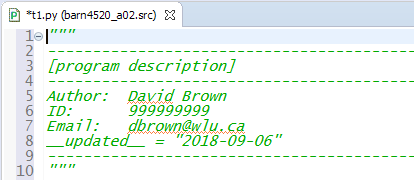
You can now fill in the [program description] parts of the
documentation, enter Python code, edit it, and execute the resulting
program. Your code goes below the triple quotes (""")
of the template at the top of the file.
Executing a Python Program
To execute a program from within Eclipse, open the file in the editor, right click anywhere in the body of the program, then select Run As / Python Run from the pop-up menu:
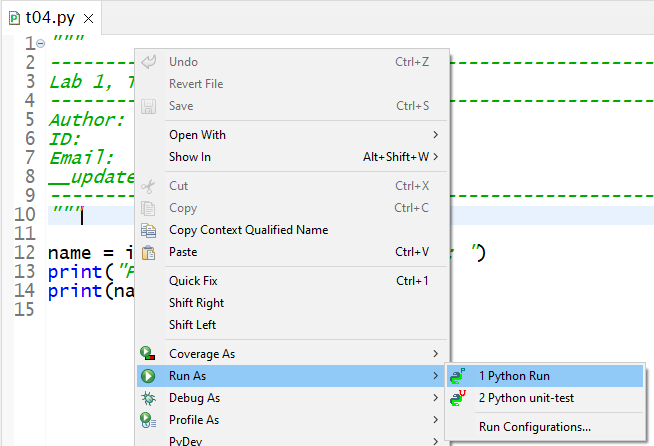
The program is then executed either in the console or in its own window. Python text-based programs execute within the console. Python GUI-based programs open their own windows.
In order to enter keystrokes into the Console pane it must have focus; i.e. you must click on the Console tab before you can start typing into the Console. When the Console has focus, its tab is white. If it does not have focus, its tab is the same grey as the menu bar background.
Sometimes is it necessary to kill an executing program - either because you don't want to go to the trouble of running it because you've already found an error, or perhaps because you have an endless loop and the program will never stop otherwise. Having too many Python programs running inside Eclipse can literally slow down your machine, and if enough programs are running cause it to crash.
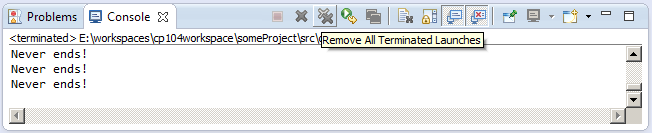
The following Python code never ends on its own:
while True:
    print( "Never ends!" )
To kill it, click on the red double-square: Terminate All. All Python programs currently running in Eclipse are stopped.

You may then clear out the console by clicking the grey double-x: Remove All Terminated Launches. The console is cleared and ready to run the next program.
Copying and Pasting Results
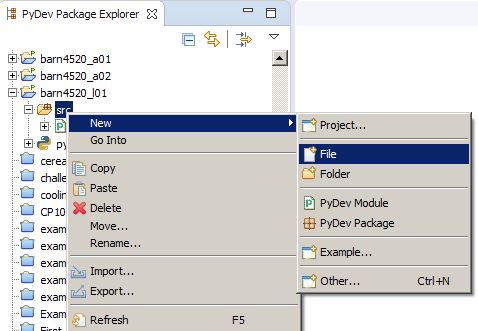
To create a test results file (typically named testing.txt),
create the file in a project's src folder by right-clicking
on the src folder and choosing New / File:
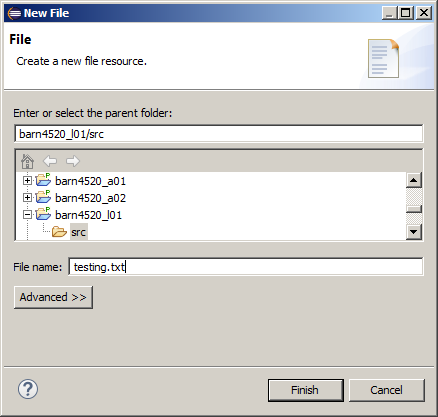
In the New File dialog, enter the file name:
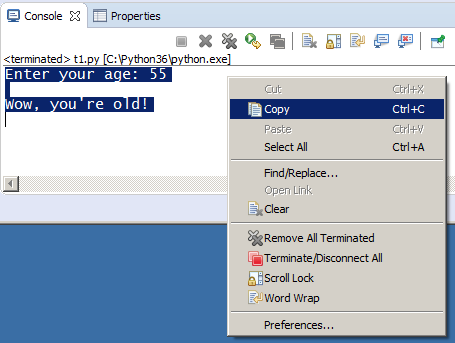
You may copy the contents of the Console to the clipboard by right-clicking on the Console and choosing Select All from the pop-up menu, and then Copy with a second right-click, as in this example:
You may then paste the contents of the clipboard to the test results file.
Exporting a Project
In order to submit Python programming assignments or copy projects to
other computers you must export a project. Projects can be exported in a
number of ways, but normally you will export a project as an archive
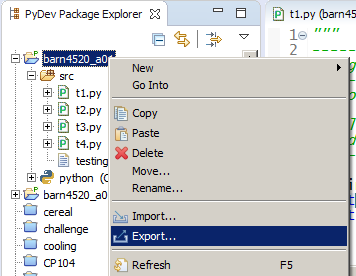
(i.e. a .zip file). To export a project, right click on the
project name in the Package Explorer pane then select Export...
from the pop-up menu.
This brings up the Export dialog box:
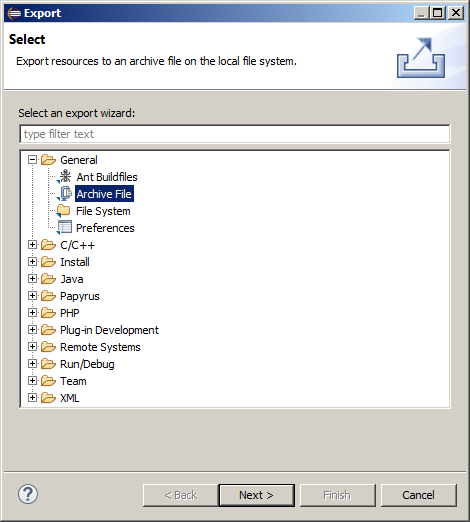
From this dialog box select the General / Archive File option
and click on .
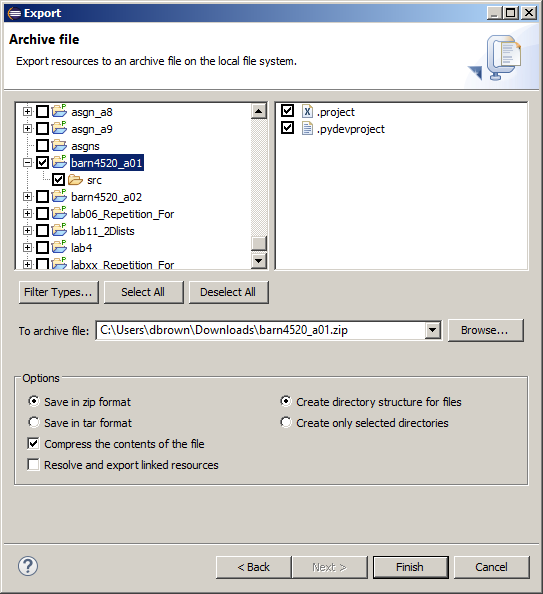
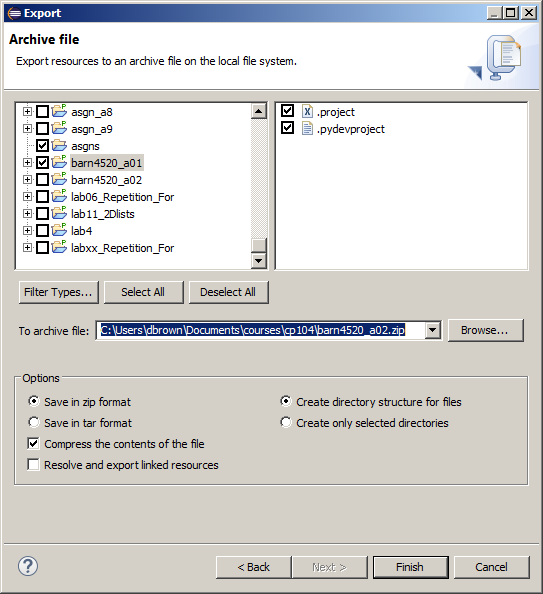
On the next page of the Export dialog box, enter the name and
location of the archive file and click on . By default the export dialog selects
all files in a project, as well as recreating its directory structure in
the resulting .zip file:
Important!
- Leave the files .project and .pydevproject selected. They are absolutely necessary to exporting an Eclipse project correctly.
- Know where you saved your archive file. If you cannot find your archive file, you cannot use it again. Use to find a good place to save it - your Desktop, the root of a drive, or other easy to find place - and note where you saved it.
- Do Not export a project .zip file anywhere inside your workspace. This can confuse Eclipse - and you.
To select multiple projects in the same zip file, simply select all projects required in the same zip (with whatever multiple-selection mouse clicks are required by your operating system) and right-click on any of the projects selected:

In the Export Dialog, the checkboxes of all projects to be exported are selected:

Complete the export as with one project.
If you see the error: Resource is out of sync with the file
system... , Eclipse thinks that a project file has been changed by a
non-Eclipse program. (This can happen if you edit anything in the
project folder from outside Eclipse.)
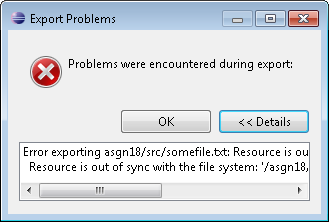
Your .zip file has actually been exported. To get rid of the error
anyways, go back to the project, right click on the project name and
choose Refresh . (You may also just press the F5
function key.) This 'resyncs' the project, and you may export it without
annoying error messages. You may have to overwrite the original .zip
file.
Submitting a Project to MLS
First, make sure you know where on your computer your zipped project file lives. It's difficult to submit a file if you can't find it. If necessary, go back to Eclipse and re-export your project, paying close attention to the folder into which you have exported it.
From the MLS main menu choose Dropbox. This displays the Dropbox Folders page:
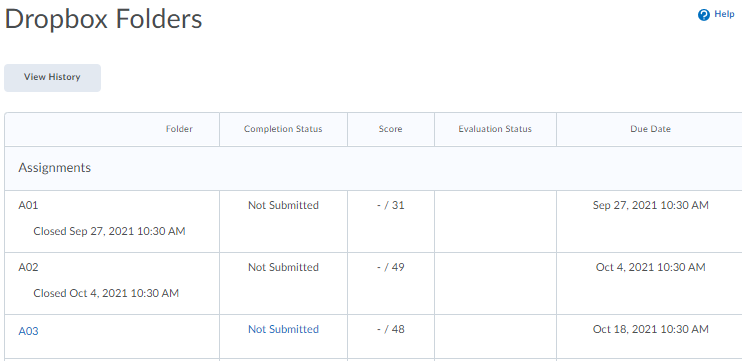
Lab dropbox dates never overlap with other Lab dropbox dates, and Assignment dropbox dates never overlap with other Assignment dropbox dates, but Lab dropbox dates may overlap with Assignment dropbox dates, so make sure that you have chosen the correct Lab or Assignment dropbox. Click the appropriate Lab or Assignment dropbox. This displays the submission information for that dropbox:
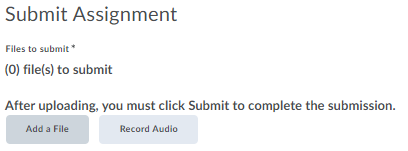
Click to bring up the list of submission sources dialog box:

Choose My Computer as your zipped project file source:
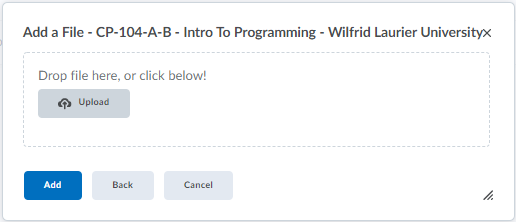
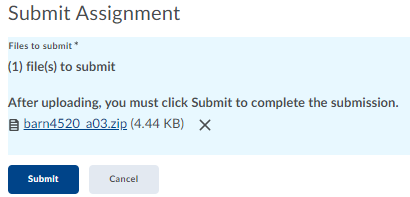
Drag and drop your zipped project file into the Drop file here box, or click . Clicking on the button brings up a standard file selection dialog box - select the file to upload and press . The file to be uploaded is now listed:
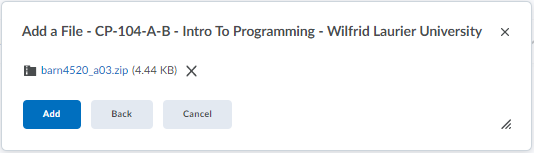
Click to upload the selected file. The file you are adding is now listed in the dialog box:
Click to verify that this is the file you want to submit to dropbox. This displays the Review page that verifies that you have correctly submitted a zipped project file:
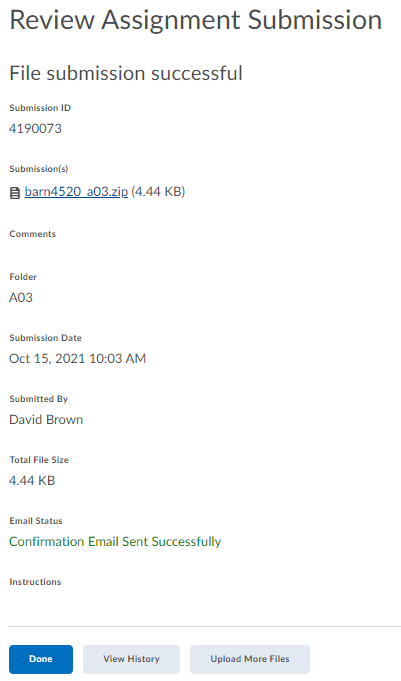
Click .
You may go back at any time to restart the submission process. You may overwrite your submitted file at any time. Only the last zipped project file submitted is saved and graded.
DO NOT WAIT UNTIL THE LAST MINUTE TO SUBMIT A ZIPPED PROJECT FILE. When the dropbox is set to close at, for example, 10 am, it is closed as of 10:00:00, not 10:00:01 to 10:00:59. There also could be potential connection delays. Give yourself lots of time.
Importing a Project
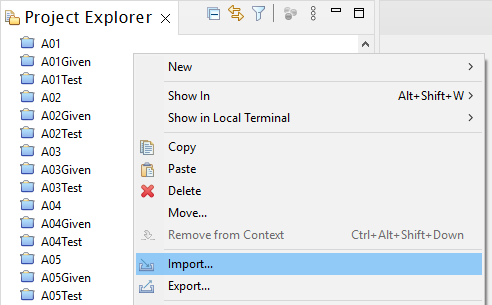
To import an existing Eclipse project from an archive (.zip) file, right click in the Package Explorer pane and choose Import... from the pop-up menu.
This brings up the Import dialog:

From this dialog select General / Existing Projects into Workspace and press . This brings up the next Import dialog:
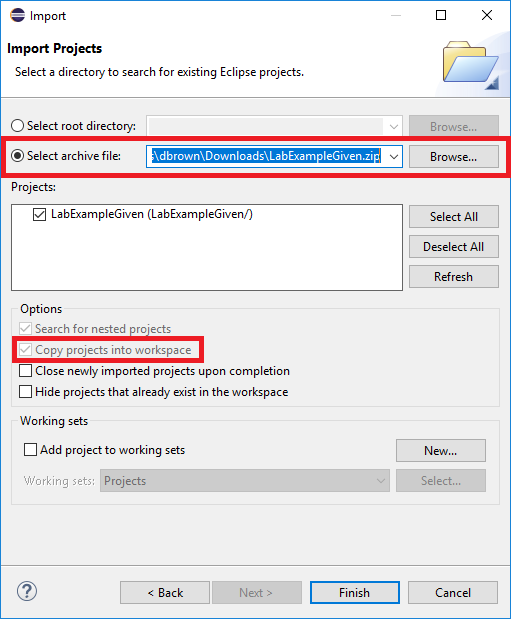
Click on Select archive file: then to the location of the archive file to import. The Projects box lists all of the projects in the archive file. Click on the checkbox of the project(s) you wish to import, then . Make sure that Copy projects into workspace is selected. (If you do not see any projects listed in the Projects box, then the archive file does not contain any valid Eclipse projects!)
If you get the warning Some projects cannot be imported because they already exist in the workspace, then some of the selected projects already exist in the workspace, and Eclipse does not allow you to click on that project's checkbox in the projects list.)
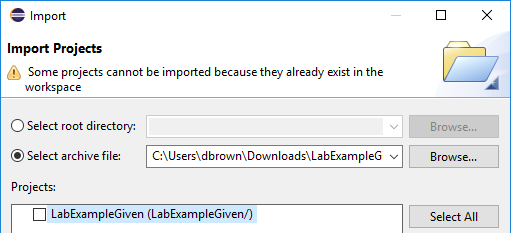
To replace such a project either rename or delete the existing project.
Renaming a Project
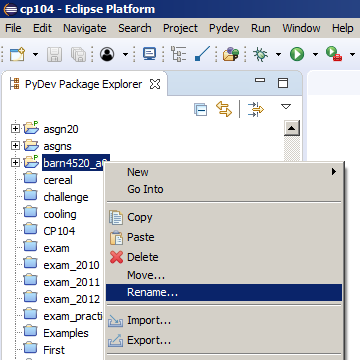
Open the project to be renamed if it is closed. In the Package Explorer right-click on the project name and choose Rename…:
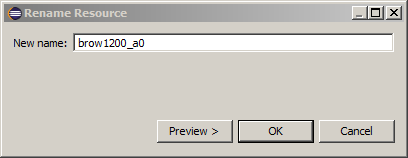
Then simply rename the project in the Rename Resource dialog box:
Deleting a Project
In the Package Explorer right-click on the project name and choose Delete:
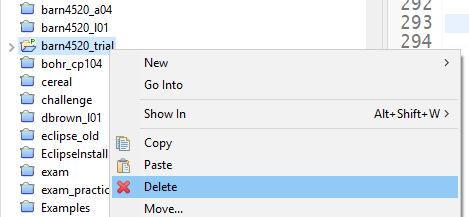
Then delete the project in the Delete Resources dialog box. Important: select the Delete project contents on disk option:
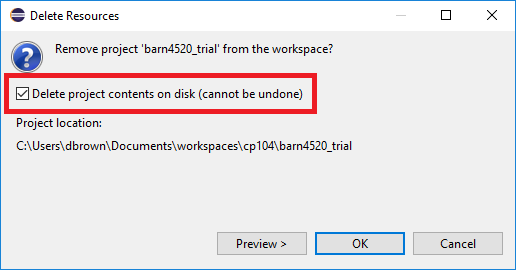
If you do not delete the project contents on disk, then any attempt to create a new project of the same name fails, with Eclipse warning you that the project already exists.
Multiple Python Interpreters
If you have a workspace that is used on multiple computers - a workspace stored on a USB memory stick, a portable drive, or a network drive - this workspace must be configured to work with different computer set ups. Typically, the location of the Python interpreter differs from computer to computer, or the Python interpreters may even be of different versions.
A workspace can be set up to work with different Python interpreter locations and versions. Note, however, that interpreter versions must be of the same major version. i.e. a workspace compatible with Python 3 works with Python 3.0 or any higher versions 3.1, 3.2 to 3.X , but not with any version of Python 2.
You may add a second or subsequent Python interpreter to a workspace in the same way you added the first Python interpreter to a workspace. (See the instructions in the Configuring PyDev section of the Installing Python, Eclipse, and PyDev tutorial. The following example shows a workspace configured with two Python interpreters on two different drives (on different computers):

Thus, if the workspace shown here is on a USB memory stick, it will work with a computer that has a Python interpreter on drive C:, and on a second computer with its Python interpreter on drive E: (in the folders shown). You may configure a workspace to work on multiple operating systems. Thus a workspace may have simultaneously listings for interpreters on a Windows PC, a Mac laptop, and a linux box.
If upon moving a workspace to another computer the PyDev projects complain that they cannot find a Python interpreter, you may have to change the order the interpreters are listed in the workspace. In the Python Interpreters dialog box, select the interpreter appropriate to the computer being used and move it to the top of the interpreter list by clicking on the Up button. In the example above, this would move the interpreter on drive E: to the top of the list, making it the default interpreter for the workspace. You may move interpreters up and down the list at any time. If necessary, close and re-open the project for it to recognize the new default interpreter.
Running Python on a Command Line
You may start a Python session on a command line without invoking a
program simply by typing python at a command line prompt:
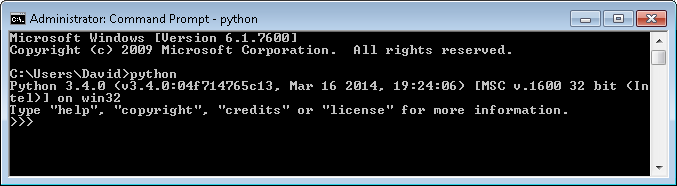
You can now enter and test simple Python commands without having to
enter and save an entire program. Press Ctrl-Z to exit this
mode.
Invoking a command line differs amongst various operating systems. Getting to a command line in Windows, a Mac, or on Linux are beyond the scope of this document.
Project Reference
Code reuse is an important part of good programming practices. Although
code can be copied between packages, a far better approach is to set up
references to packages, source code, and classes between projects.
Create a reference from one project to another by right-clicking on a
project in the Package Explorer pane and select Properties
/ Project References from the pop-up menu. This displays the Properties
for ... dialog box:
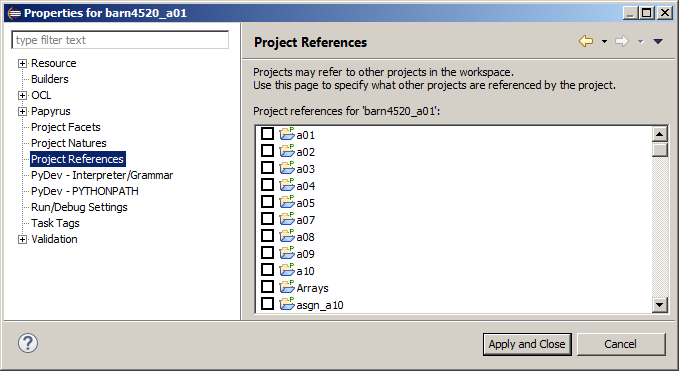
From this dialog box select any external projects you wish to reference from the current project. Note: this step is only necessary if this project needs to reference another one. If the project is stand alone there is no need to reference any other project.
When exporting projects, you must explicitly select any referenced projects to be included in the exported .zip file:
Resources
- http://www.eclipse.org/
- The Eclipse home page.
- http://www.oracle.com/technetwork/java/index.html
- The Java home page.
- https://www.python.org/
- The Python home page.
- http://www.pydev.org/
- The PyDev home page.
- http://www.python.org/dev/peps/pep-0008/
- A style guide for Python code.
- http://wiki.python.org/moin/
- The Python wiki.