This is a short primer on using JDT (Java Development Tools) in the Physics & Computer Science labs.
Note: Instructions for a specific operating system are boxed and
preceded by the following icons:
Note: Installation instructions for a specific operation system are boxed
and preceded by the following icons:
Eclipse organizes your work into workspaces and projects. A workspace
may contain many projects, and a project may contain many files. We
suggest that you set up separate workspaces for each separate course and
any other work you may be doing with Eclipse. Each workspace and project
represents a folder in your operating system's file system. A project
contains one or more .java Java source code files, and may
contain other types of files as required. A project can be saved as a .zip
(zip-encoded) file for submission or for moving to another computer.
Please see Installing Eclipse.
Note: in order to develop Java programs in Eclipse you must have installed a Java JDK (Java Development Toolkit), not just a Java JRE (Java Runtime Environment). Java programs require a JRE to execute but writing Java programs requires a JDK. (The JDK contains a JRE). There are various JDKs for various purposes. For basic Java programming we suggest (as of this writing) the Java Java SE Development Kit 18 from the Java download site.
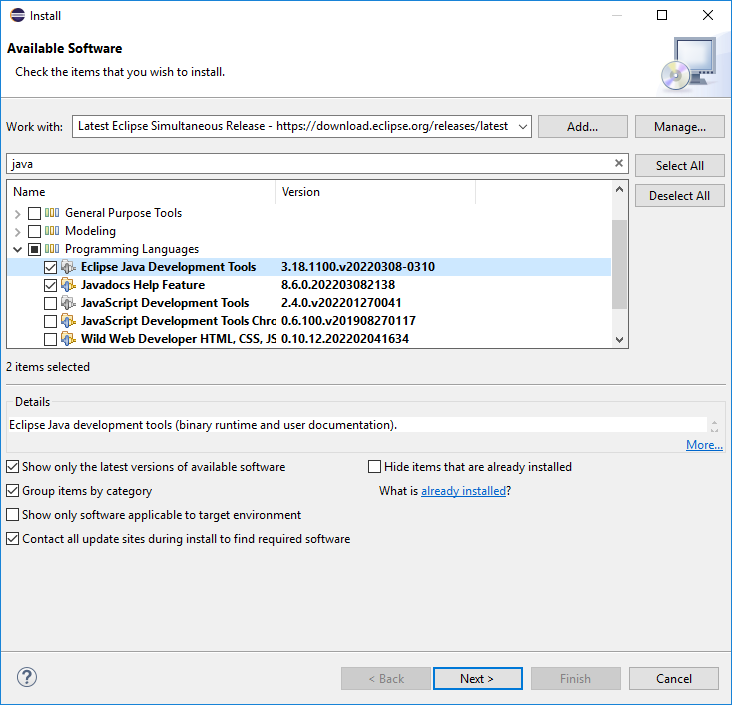
Typical Eclipse installations come pre-installed with the Eclipse Java Development Tools, but should they not be installed for some reason, the following steps help with that.
Follow the basic steps for installing plug-ins from the Installing Plug-ins section of Installing Eclipse. In particular, select the Latest Eclipse Simultaneous Release ( https://download.eclipse.org/releases/latest ) update site, which is already listed on the Work with: drop-down box. Once there, select the Eclipse Java Development Tools from the Programming Languages section, as shown here:
Restart Eclipse after the JDT is installed.
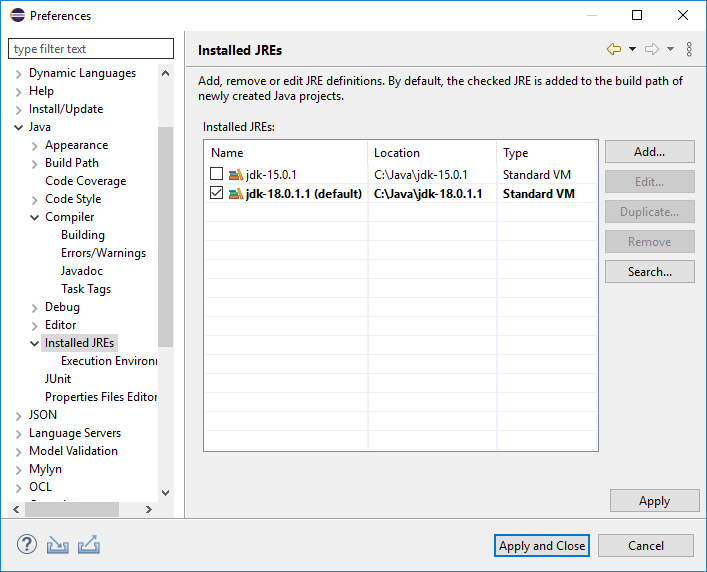
You may need to change some of the default settings for your Java programs. From the main menu select Window / Preferences to display the Preferences dialog. From this dialog you can set preferences for various items in the Java tree. In the following example the default compiler selected is the jdk-18.0.1.1 from its location on drive C:
Use Eclipse / Settings
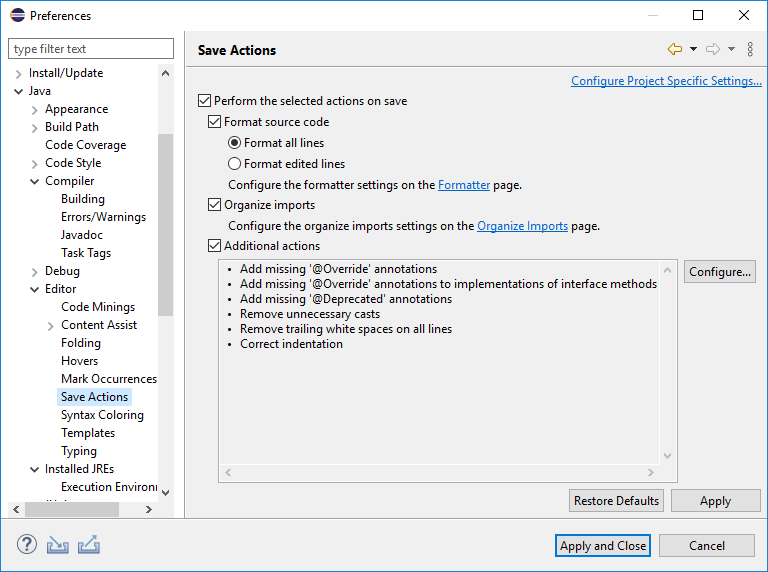
Of particular use are the Editor / Save Actions. The following preferences tell Eclipse to automatically format all source code and organize imports whenever a source code file is saved:
We provide a shortcut to setting your preferences to match the CP213 standards. Right click on cp213.epf and save this predefined preferences file to your Downloads folder.
From the Eclipse main menu chose File / Import, and then select General / Preferences:
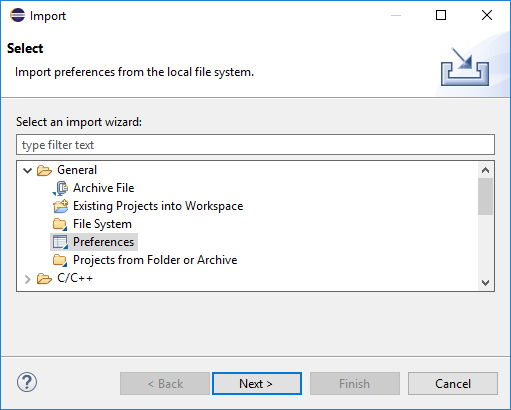
Press .
Select the cp213.epf file you just downloaded:
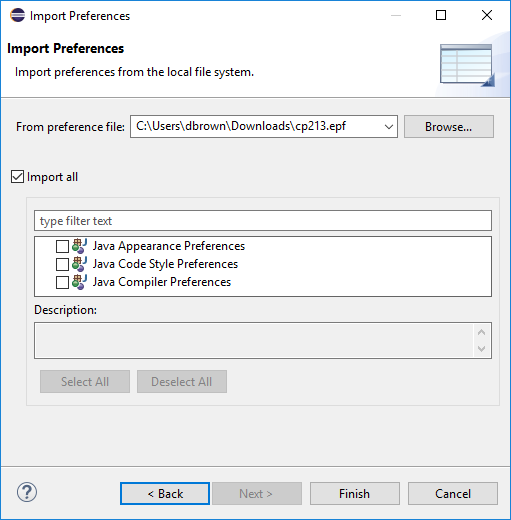
Press . Eclipse asks you to restart:
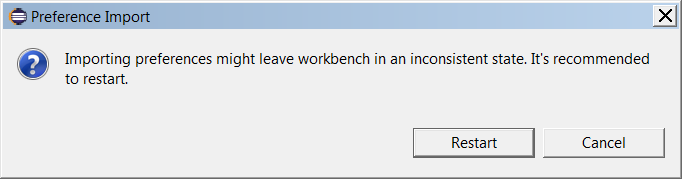
Press .
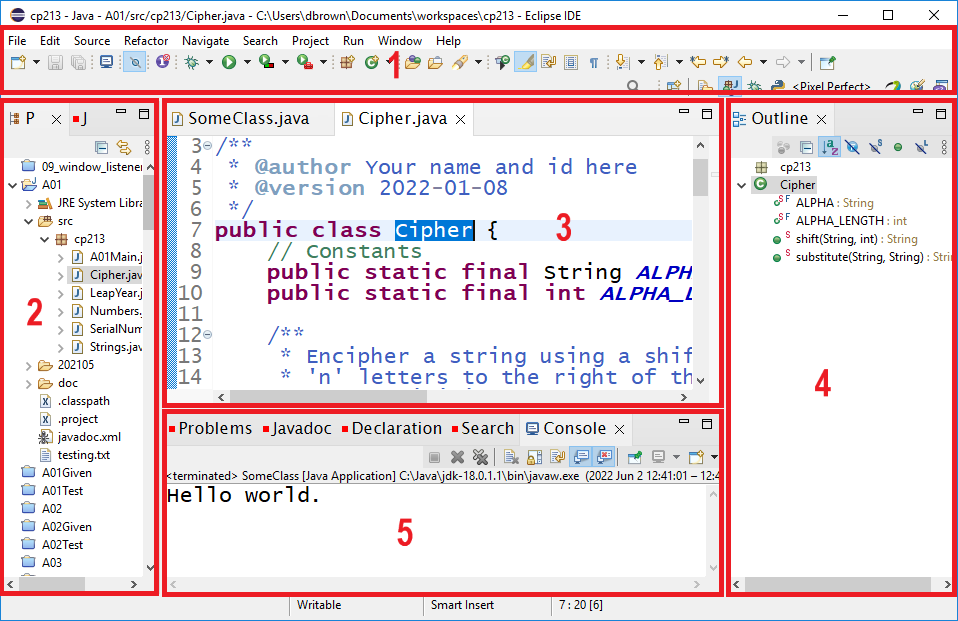
The Eclipse main window is generally displayed with five sections:
- the Menu Bar
- the Package Explorer Pane
- the Editing Pane
- The Outline Pane
- the Console Pane
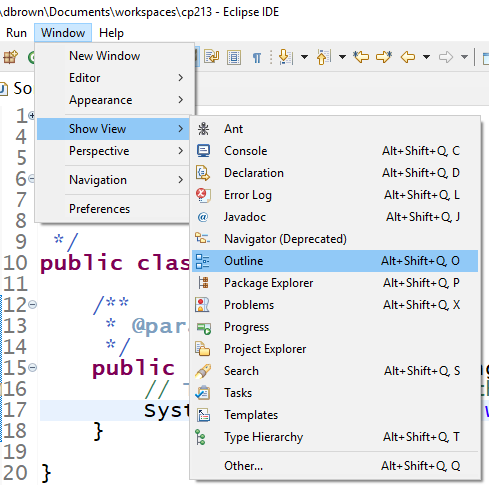
The Eclipse main window can be customized and these various panes can be be dragged to different positions within the main window or even be hidden. If a pane is hidden or missing you can display it by selecting Window / Show View from the main menu.
The menu bar contains the Eclipse main menu as well as various icons that act as alternatives to menu commands. Although this primer uses only menu options in its examples you may use any icons or keyboard shortcuts that you are comfortable with. In this primer menu commands are shown in italics with a '/' between the menu levels, as in the example: File / Save.
The Mac Menu Bar starts with Eclipse rather than File

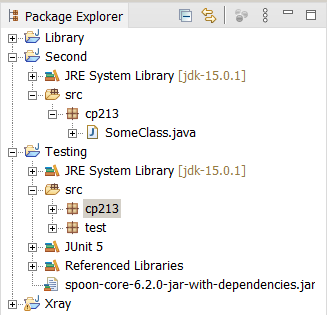
The Package Explorer lists all projects in the current workspace and the
contents of open projects. The example shows that the workspace contains
(at least) the Arrays project and four different asgn
projects. The Second project contains a src/cp213
(source) folder with one .java source code file. The other
folders and files are used by Eclipse and JDT to manage the project and
should generally be left alone.
Use the Package Explorer to open and close projects and add and delete files.
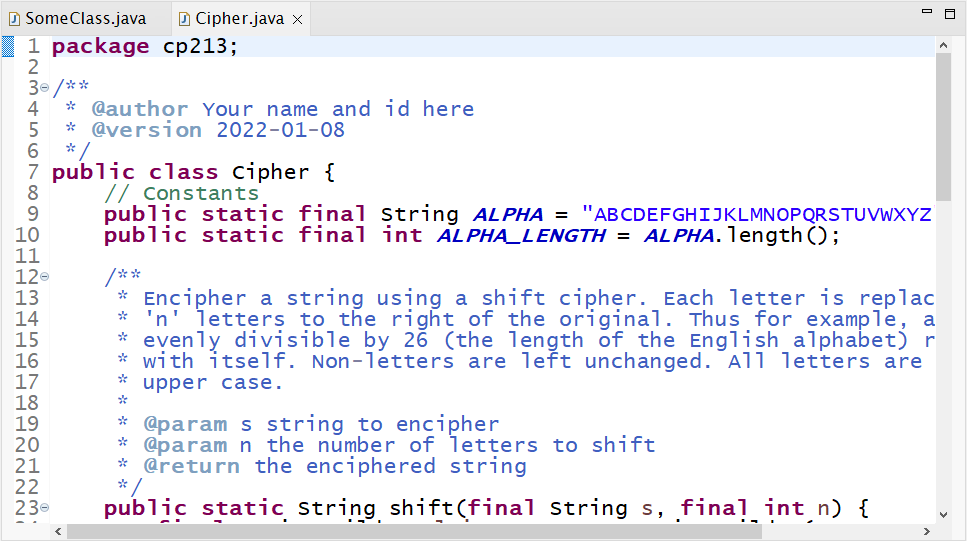
Use the Editor Pane to edit multiple source code files, although only
one file is visible at a time. In the example the files Cipher.java
and SomeClass.java are open in the editor with Cipher.java
on top. The editor allows typical editing functions (input, deletion,
searching, replacing, etc.) as well as code formatting and code
completion. Different parts of the code are displayed differently
depending on their purpose. This helps you write and debug code. In this
example Java keywords are in magenta, classes are in black, and
constants are in dark blue. Line numbering helps you locate execution
errors.
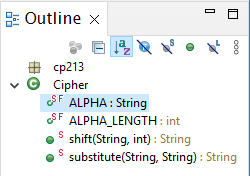
The Outline Pane lists the imports, classes, methods, and variables in
the source code currently displayed in the Editor Pane. Clicking on one
of these items takes you to the matching source code. In this example
the Outline Pane shows the contents of the Cipher class:
the package cp213; the public constants ALPHA
and ALPHA_LENGTH; and the methods shift and substitute.
Note that each item has a colour-coded symbol beside it to help identify
its type.
To define default templates for new Java source code files, from the main menu select Window / Preferences / Java / Code Style / Code Templates, and select Comments / Files, and press :
Use Eclipse / Settings
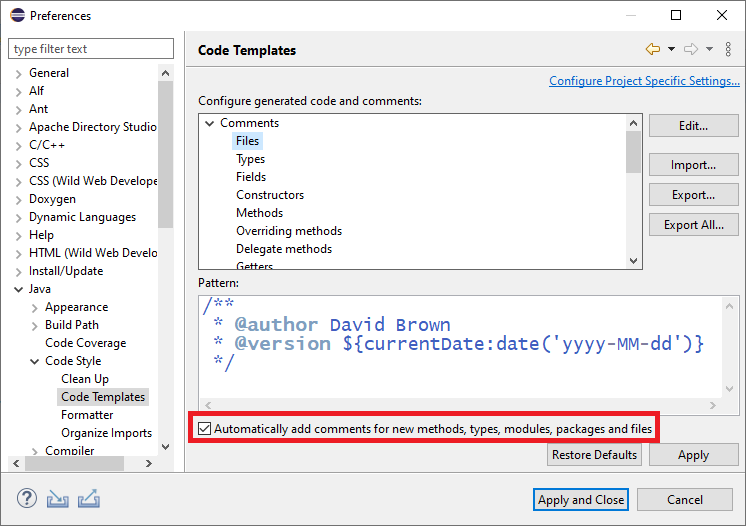
Fill in the Pattern box with your default comments, such as:
/**
 * @author David Brown
 * @version ${currentDate:date('yyyy-MM-dd')}
 */
and make sure the Automatically add comments checkbox is checked. Then press .
Before creating a new Eclipse project, make sure you are in the correct workspace. The first thing to do upon starting Eclipse is to change the workspace to your own folder. Do not put a workspace on the local drive of a lab machine as it will be erased when the machine is rebooted. To set a workspace select File / Switch Workspace from the main menu. (Select Other if your workspace is not listed, or to create a new workspace.) This brings up the Eclipse IDE Launcher dialog:
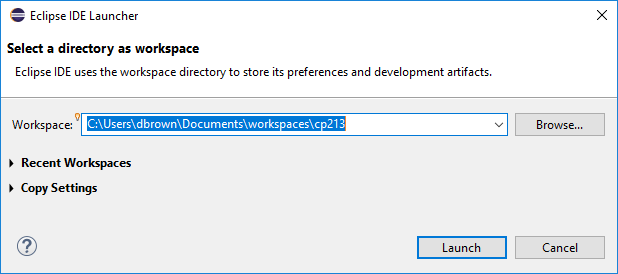
Use to select a new workspace folder, or enter a new workspace folder name in the Workspace: text box.
You may have multiple workspaces - we recommend at least one workspace per course that you use Eclipse in.
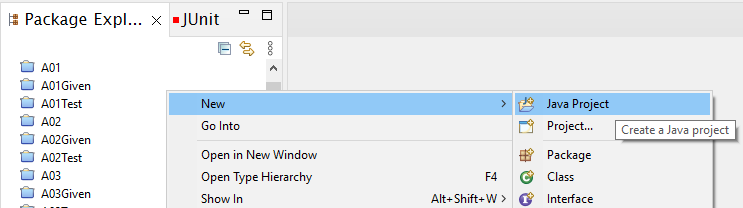
Create a new Java project by right clicking in the Package Explorer and choose New / Java Project:
This brings up the New Java Project dialog:

In this example, the project is creating a new folder named Second
and storing it in the workspace cp213. (This workspace is
actually the C:\Users\dbrown\Documents\workspaces\cp213
folder.) The project itself is stored in the folder C:\Users\dbrown\Documents\workspaces\cp213\Second;
i.e. the folder name matches the workspace and project names.
Click on Use default JRE to make sure that all your projects are using the default version of Java set up for Eclipse. (If necessary, click on Configure JREs… to set up the Java Runtime Environment for Eclipse.)
By default Create separate folders for source and class files is selected - accept this default, then .
The project Second is now added to the Package Explorer
panel, and contains a a src folder and a reference to the
current Java system library. (The Package Explorer display may vary
depending on how Eclipse is set up.) Put your Java source code in the src
folder. Compiled Java classes are automatically placed in a bin
folder, which is not visible. Any other folder and files are system
elements and should be left alone.
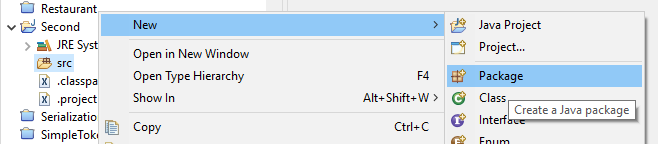
Java applications must also contain at least one package. A package is
an organization level inside a Java application. All classes must belong
to a package or subpackage. To create a package definition in the src
folder right click on the folder and select New / Package.
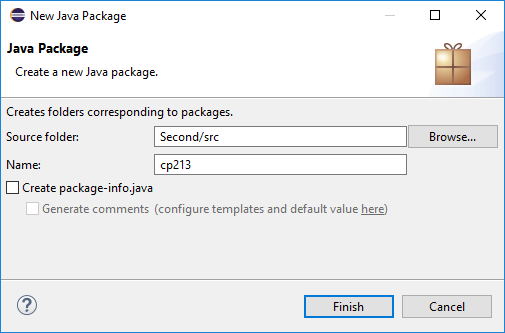
This brings up the New Java Package dialog:
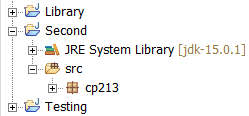
Give the new package a name. The following example shows what the Second project looks like in the Package Explorer after the package cp213 is added to the project:
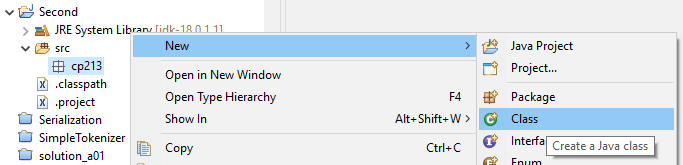
Add source code files to the source code folder of a project by right clicking on a project package in the Package Explorer Pane and select New / Class. That brings up the New Class dialog. There are various options in this dialog depending on the type of class you wish to create. For most of our projects you will create a simple class, a class with a superclass, or an interface implementation. Having selected the appropriate options, select .
This brings up the New Java Package dialog:
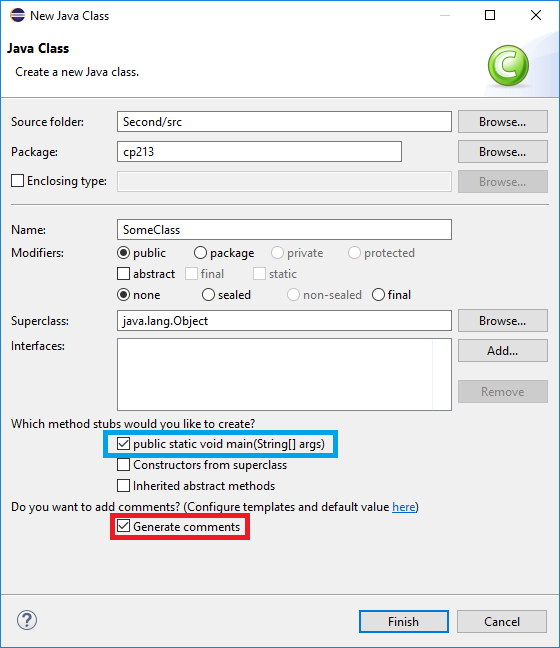
Select Generate
comments to have Eclipse set up defaults comments for your
class. Select public static void main(String[] args) to have Eclipse
set up a main method for the class.
The class is now added to the selected package in the Package Explorer Pane and is opened in the Editor Pane, as in this example:
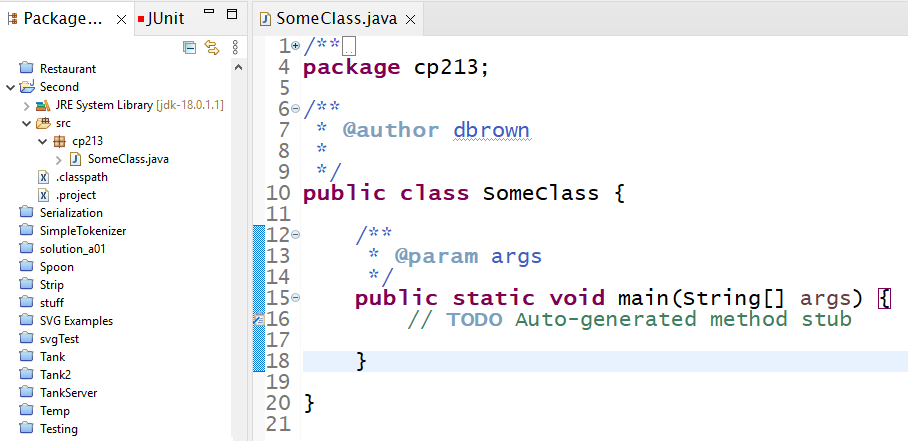
You can now enter Java code, edit it, and execute the resulting program.
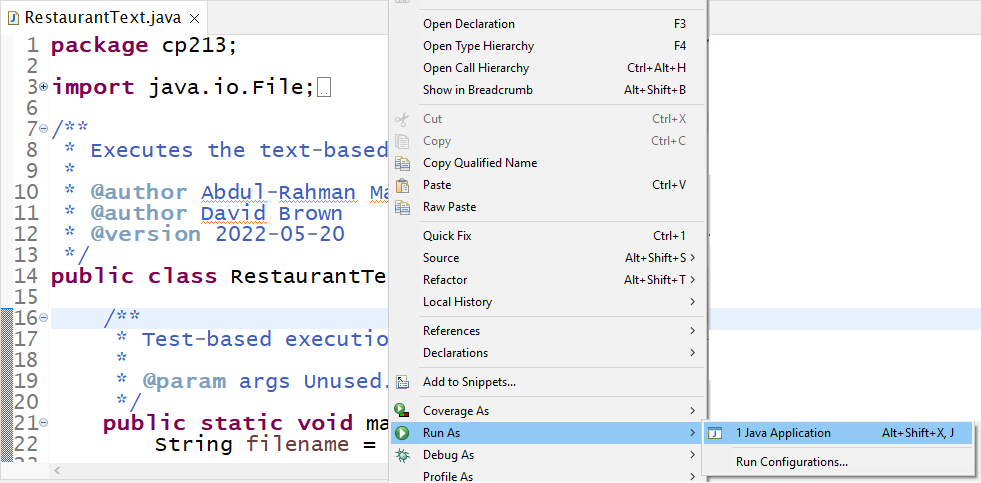
To execute a program from within Eclipse, right-click on the java
application's main source code file in the Editor Pane, and select Run
As / Java Application from the pop-up menu. The program is then
executed either in the console or as a graphical application, depending
on how it is written. (Note that only classes that contain a properly
defined main method are recognized as an executable Java
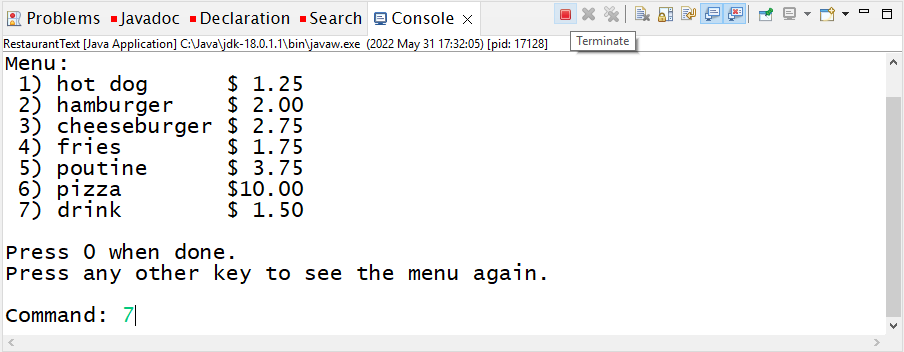
program.) Java text-based programs executes within the console. Java
GUI-based programs open their own windows.
In order to enter keystrokes into the Console Pane it must have focus; i.e. you must click on the Console tab before you can start typing into the Console. When the Console has focus, its tab is white. If it does not have focus, its tab is the same grey as the menu bar background. The Console Pane also displays messages caused by execution errors. Input is in green to distinguish it from the program output. Error messages are displayed in red.
Sometimes is it necessary to kill an executing program - either because
you don't want to go to the trouble of running it because you've already
found an error, or perhaps because you have an endless loop and the
program will never stop otherwise. Having too many Java programs running
inside Eclipse can literally slow down your machine, and if enough
programs are running cause it to crash. To kill a running program click
on the red Terminate square ![]() .
.
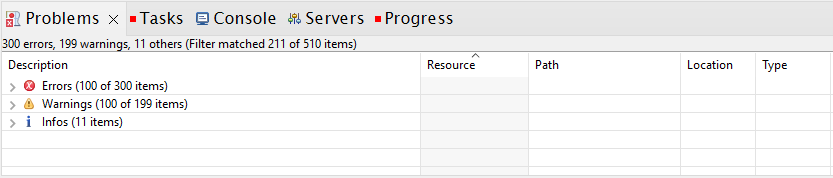
The Console Pane also contains a Problems tab. Errors in program syntax and compilation are displayed in Problems. Double-clicking on an error listing moves the cursor to the location of that error in the Editor Pane.
You may copy the contents of the Console to the clipboard by right-clicking on the Console and choosing Select All from the pop-up menu, and then Copy from a second right-click, as in this example:

You may then paste the contents of the clipboard to a file such as testing.txt or some other program.
Reference: Javadoc Tool
Javadoc comments are of the form:
/**
…
 */
Any comments that start with the /** are included in the
HTML documentation generated by the Javadoc tool. For example, the
comments:
/**
 * @author David Brown
 * @version 2022-09-13
 */
show up as:
- Version:
- 2022-09-13
- Author:
- David Brown
The tags @author and @version are special
javadoc tags that document your code in specific ways. For more details
about actual javadoc commenting please see the Javadoc Tool
reference above.
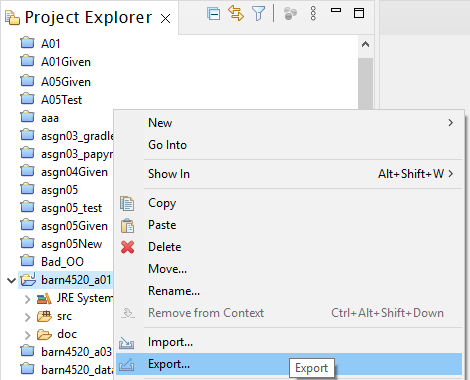
To generate javadoc documentation for your own Java classes - assuming you have added appropriate javadoc comments - right click on the project name in the Package Explorer Pane then select Export... from the pop-up menu:
This brings up the Export Dialog:
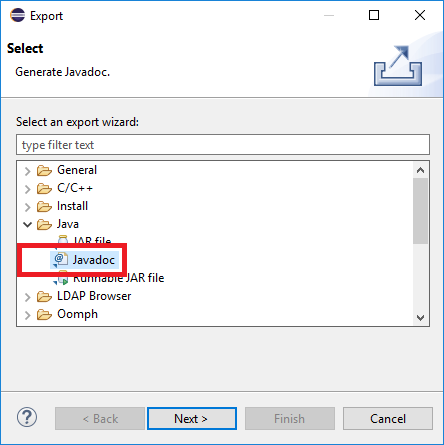
Select Java / javadoc then press . This brings up the next Export Dialog:
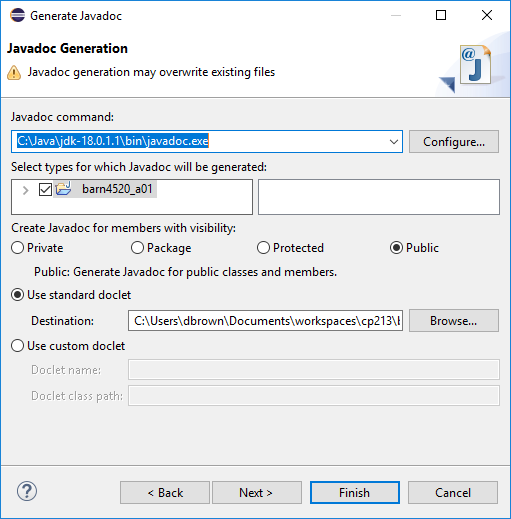
If necessary, click on to tell Eclipse where the file javadoc.exe is stored on your computer. (It should be located in the bin folder of your Java JDK installation.)
Press to generate the javadoc files. Upon successful completion, Java creates the resulting HTML documentation in the doc folder of the project. (Right-click on the project name and choose Refresh from the drop-down menu to display the doc folder if you do not already see it.)
Javadoc displays the results of its generation in the Console pane:
Loading source files for package cp213...
Constructing Javadoc information...
Building index for all the packages and classes...
Standard Doclet version 18.0.1.1+2-6
Building tree for all the packages and classes...
Generating C:\Users\dbrown\Documents\workspaces\cp213\barn4520_a01\doc\cp213\Device.html...
C:\Users\dbrown\Documents\workspaces\cp213\barn4520_a01\src\cp213\Device.java:5: warning: no comment
public class Device {
       ^
Most error messages are fairly straightforward (no comment means exactly that). When in
doubt about any errors that appear, please check with your Lab
Instructor.
To submit Java programming assignments or copy projects to other computers you must export a project. Projects can be exported in a number of ways, but normally you will export a project as an archive (i.e. a .zip file). To export a project, right click on the project name in the Package Explorer Pane then select Export... from the pop-up menu:
This brings up the Export Dialog:
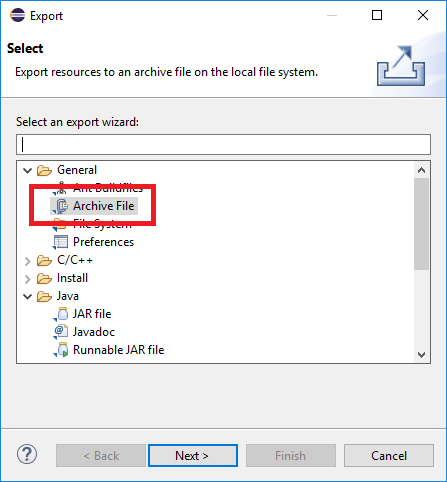
Select General / Archive File then press . This brings up the next Export Dialog:

Enter the name and location to write the archive file and then
. By default the export dialog selects all files in a project, as well
as recreating its directory structure in the resulting .zip
file.
Important!
- Leave the files .project and .classpath selected. They are absolutely necessary to exporting an Eclipse project correctly.
- Know where you saved your archive file. If you cannot find your archive file, you cannot use it again. Use to find a good place to save it - your Download or Desktop folders, or other easy to find place - and note where you saved it.
- Do Not export a project .zip file anywhere inside your workspace. This can confuse Eclipse - and you.
If you see the error: Resource is out of sync with the file system..., Eclipse thinks that a project file has been changed by a non-Eclipse program. (This can happen if you edit anything in the project folder from outside Eclipse.)
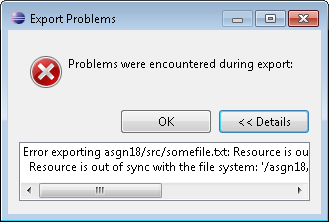
Your .zip file has actually been exported. To get rid of the error anyways, go back to the project, right click on the project name and choose Refresh . (You may also press the function key.) This 'resyncs' the project, and you may export it without annoying error messages. You may have to overwrite the original .zip file.
Submitting a Project to MLS
First, make sure you know where on your computer your zipped project file lives. It's difficult to submit a file if you can't find it. If necessary, go back to Eclipse and re-export your project, paying close attention to the folder into which you have exported it.
From the MLS main menu choose Dropbox. This displays the Dropbox Folders page:
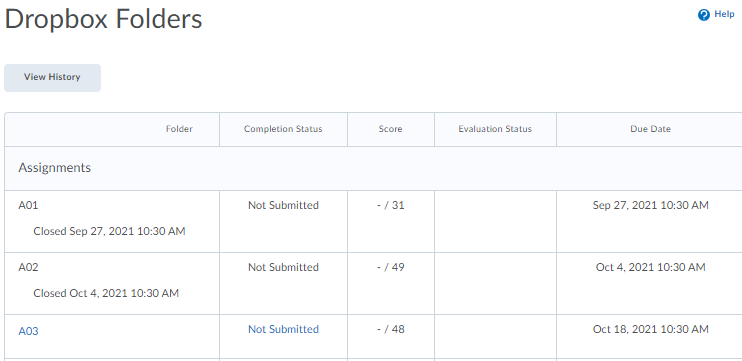
Lab dropbox dates never overlap with other Lab dropbox dates, and Assignment dropbox dates never overlap with other Assignment dropbox dates, but Lab dropbox dates may overlap with Assignment dropbox dates, so make sure that you have chosen the correct Lab or Assignment dropbox. Click the appropriate Lab or Assignment dropbox. This displays the submission information for that dropbox:
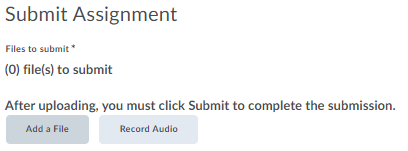
Click to bring up the list of submission sources dialog box:
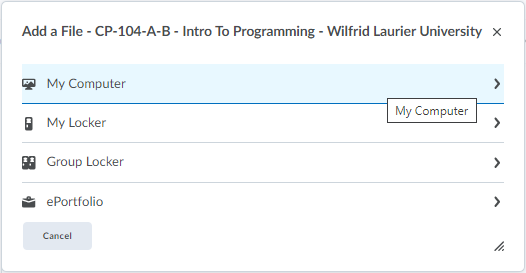
Choose My Computer as your zipped project file source:
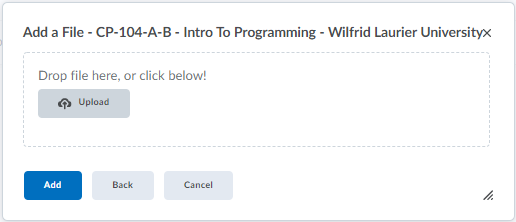
Drag and drop your zipped project file into the Drop file here box, or click . Clicking on the button brings up a standard file selection dialog box - select the file to upload and press . The file to be uploaded is now listed:
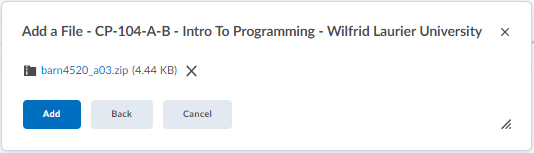
Click to upload the selected file. The file you are adding is now listed in the dialog box:
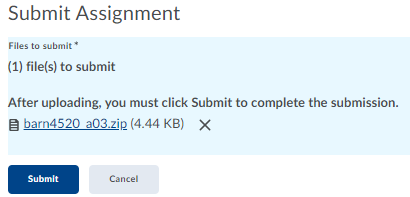
Click to verify that this is the file you want to submit to dropbox. This displays the Review page that verifies that you have correctly submitted a zipped project file:
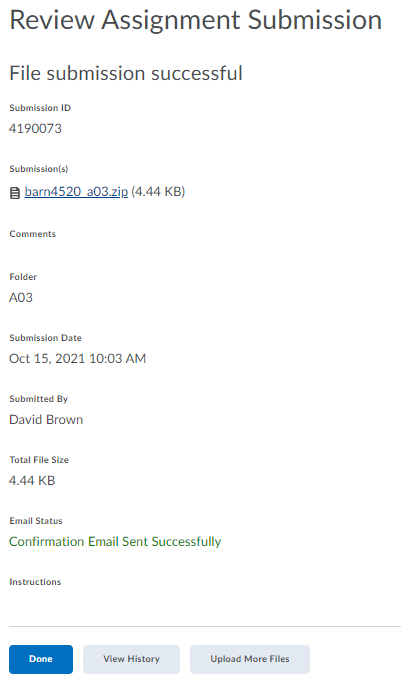
Click .
You may go back at any time to restart the submission process. You may overwrite your submitted file at any time. Only the last zipped project file submitted is saved and graded.
DO NOT WAIT UNTIL THE LAST MINUTE TO SUBMIT A ZIPPED PROJECT FILE. When the dropbox is set to close at, for example, 10 am, it is closed as of 10:00:00, not 10:00:01 to 10:00:59. There also could be potential connection delays. Give yourself lots of time.
To import an existing Eclipse project from an archive (.zip) file, right click in the Package Explorer Pane and choose Import... from the pop-up menu.

This brings up the Import dialog:
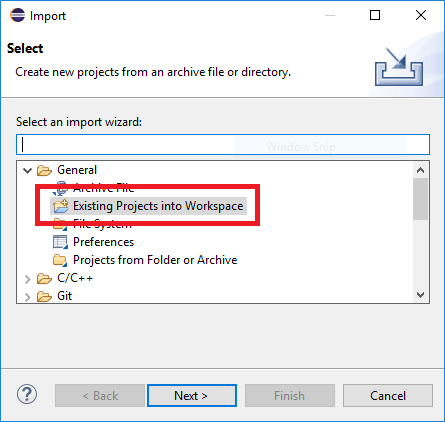
From this dialog select General / Existing Projects into Workspace and press . This brings up the next Import dialog:
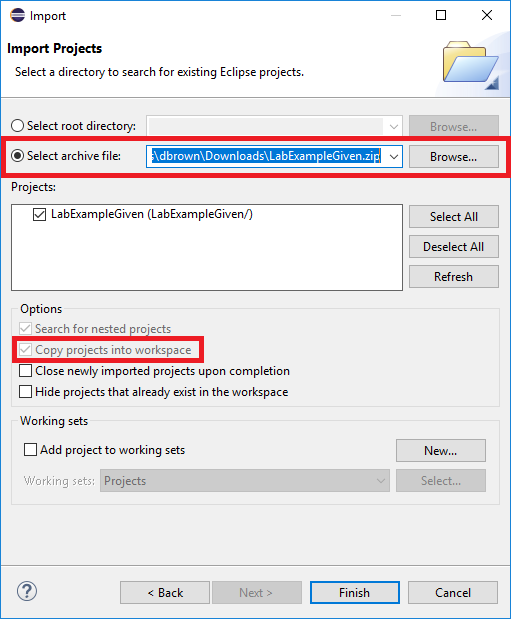
Click on Select archive file: then to the location of the archive file to import. The Projects box lists all of the projects in the archive file. Click on the checkbox of the project(s) you wish to import, then . Make sure that Copy projects into workspace is selected. (If you do not see any projects listed in the Projects box, then the archive file does not contain any valid Eclipse projects!)
If you get the warning Some projects cannot be imported because they already exist in the workspace, then some of the selected projects already exist in the workspace, and Eclipse does not allow you to click on that project's checkbox in the projects list.)

To replace such a project either rename or delete the existing project.
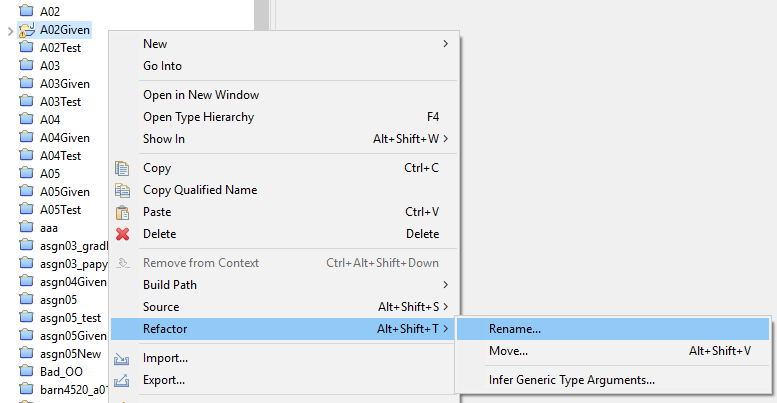
Renaming a Project
Open the project to be renamed if it is closed. In the Package Explorer right-click on the project name and choose Refactor / Rename…:
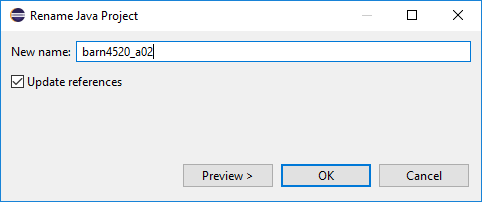
Then simply rename the project in the Rename Java Project dialog box:
- http://www.eclipse.org/
- The Eclipse home page.
- http://java.sun.com/
- The Java home page.
- https://docs.oracle.com/en/java/javase/17/docs/api/index.html
- The Java Platform, Standard Edition 17 API Specification. The JDK (Java Development Kit) API (Application Programming Interface) defines the class libraries available in the java package from Sun.
- https://docs.oracle.com/en/java/javase/18/javadoc/index.html
- The JavaDoc Guide.
-
http://java.sun.com/docs/books/tutorial/index.html
- The Sun Java Tutorials.